Re: life adjust Z - my way
Ah, ok - I have no idea what a PID calibration is and have never used Octoprint so I will have to do some reading up...
Thanks for the pointers
Regards
Chris
Re: life adjust Z - my way
I touched the nozzle down (using a piece of office paper, just dragging) and lifted it 50 so the Live adjust is -.650mm (touched at -.700)
that's a point to start, but you usually have to lower the nozzle some more, I guess -725µm should be a good point to start. the whole y-carriage is somehow "elastic", so the force from the extruded filament is able to push it down a few x*10µm.
by the way, as you may have read somewhere inside this thread: the printbed usually isn't dead flat. so it might be that it needs correction at front, rear, right or left. or even better at all 8 of the 9 calibration points (check for PJR's amendment to the G80 inside this thread).
and a further info for you (as you've "adjusted" the z live value by moving the z-axis through the menu): as long as you move the extruder manually through the menu, no correction due to the meshbed-levelling (achieved through the 9 point calibration) will be applied !
dem inscheniör is' nix zu schwör...
Re: life adjust Z - my way
and a further info for you (as you've "adjusted" the z live value by moving the z-axis through the menu): as long as you move the extruder manually through the menu, no correction due to the meshbed-levelling (achieved through the 9 point calibration) will be applied !
That is a very important piece of info, and should be highlighted somewhere in manual! I wasted once o hour figuring out why my mesh bed leveling was off by testing it via settings menu, and came to same conclusion.
Re: life adjust Z - my way
Ah, ok - I have no idea what a PID calibration is and have never used Octoprint so I will have to do some reading up...
Thanks for the pointers
Regards
Chris
The PID calibration is a new feature in the latest firmware. It really helps keep the temperature stable, especially if using a sock.
Are you still having bed adhesion issues?
I have sometime found that I get a residue on the bed that prevents adhesion. My solution:
1) Wipe the bed rigorously with Windex.
2) Repeat with acetone (pure - some for nails have additives)
3) Repeat with IPA (the purer the better - some have additives that prevent adhesion)
While anecdotal, I believe that each is good at removing different things, and this cycle of three has brought my bed back to life when it was being strange and IPA alone was not cutting it. This is a rare cleaning, mostly just use IPA, but this has worked for me.
Any advices given are offered in good faith. It is your responsibility to ensure that by following my advice you do not suffer or cause injury, damage or loss. If you solve your problem, please post the solution…
Re: life adjust Z - my way
Ah, ok - I have no idea what a PID calibration is and have never used Octoprint so I will have to do some reading up...
Thanks for the pointers
Regards
Chris
💡
every closed control loop could mainly be mathematically described with three parameters, regarding the proportional, the integral and the differential part of the equation.
if you know these parameters, you can predict how the system behaves when you alter the input parameters.
if a system is designed, you usually get some good informations on how the system should behave in reality.... but as we all know, reality and theorie often differ. so our prusa firmware initially holds the calculated parameters for two important control loops, the hotend and the heatbed.
beginning with firmware 3.0.10 a feature inside the firmware has been enabled to "measure" the pid parameters of the real system. it usually does this with checking how the system (here hotend and heatbed) responds in time and output to alterations of the input parameters (here: power on or off).
so if you use the "real" pid parameters, previously measured for your system, you avoid oscillations or insufficient control of the systems output.
long text, short conclusion: if you do a pid calibration, you'll get very accurate temperature control for hotend and heatbed.
as aaron already mentioned: inside firmware 3.0.12 a pid calibration routine is accessible through the calibration menu.
unfortunately this routine uses the internal calibration routine (enabled with 3.0.10) with less accuracy, so you'll get less reliable results as with the method described at the thread about the 3.0.10 firmware capabilities.
dem inscheniör is' nix zu schwör...
Re: life adjust Z - my way
thank you for sharing this. I am in the process calibration my Live-Z adjust. The v2 calibration gcode is way to short to correctly calibrate things.
This will give me more time as a newcomer, I need more time 🙂
Re: life adjust Z - my way
Dear "prusers",
I've printed a bit of everything with the grey PRUSA PLA shipped with the printer, from tiny things to a full print bed of parts for the LACK enclosure.
Once I ran out of grey and the black and orange PLA arrived, my problems started.
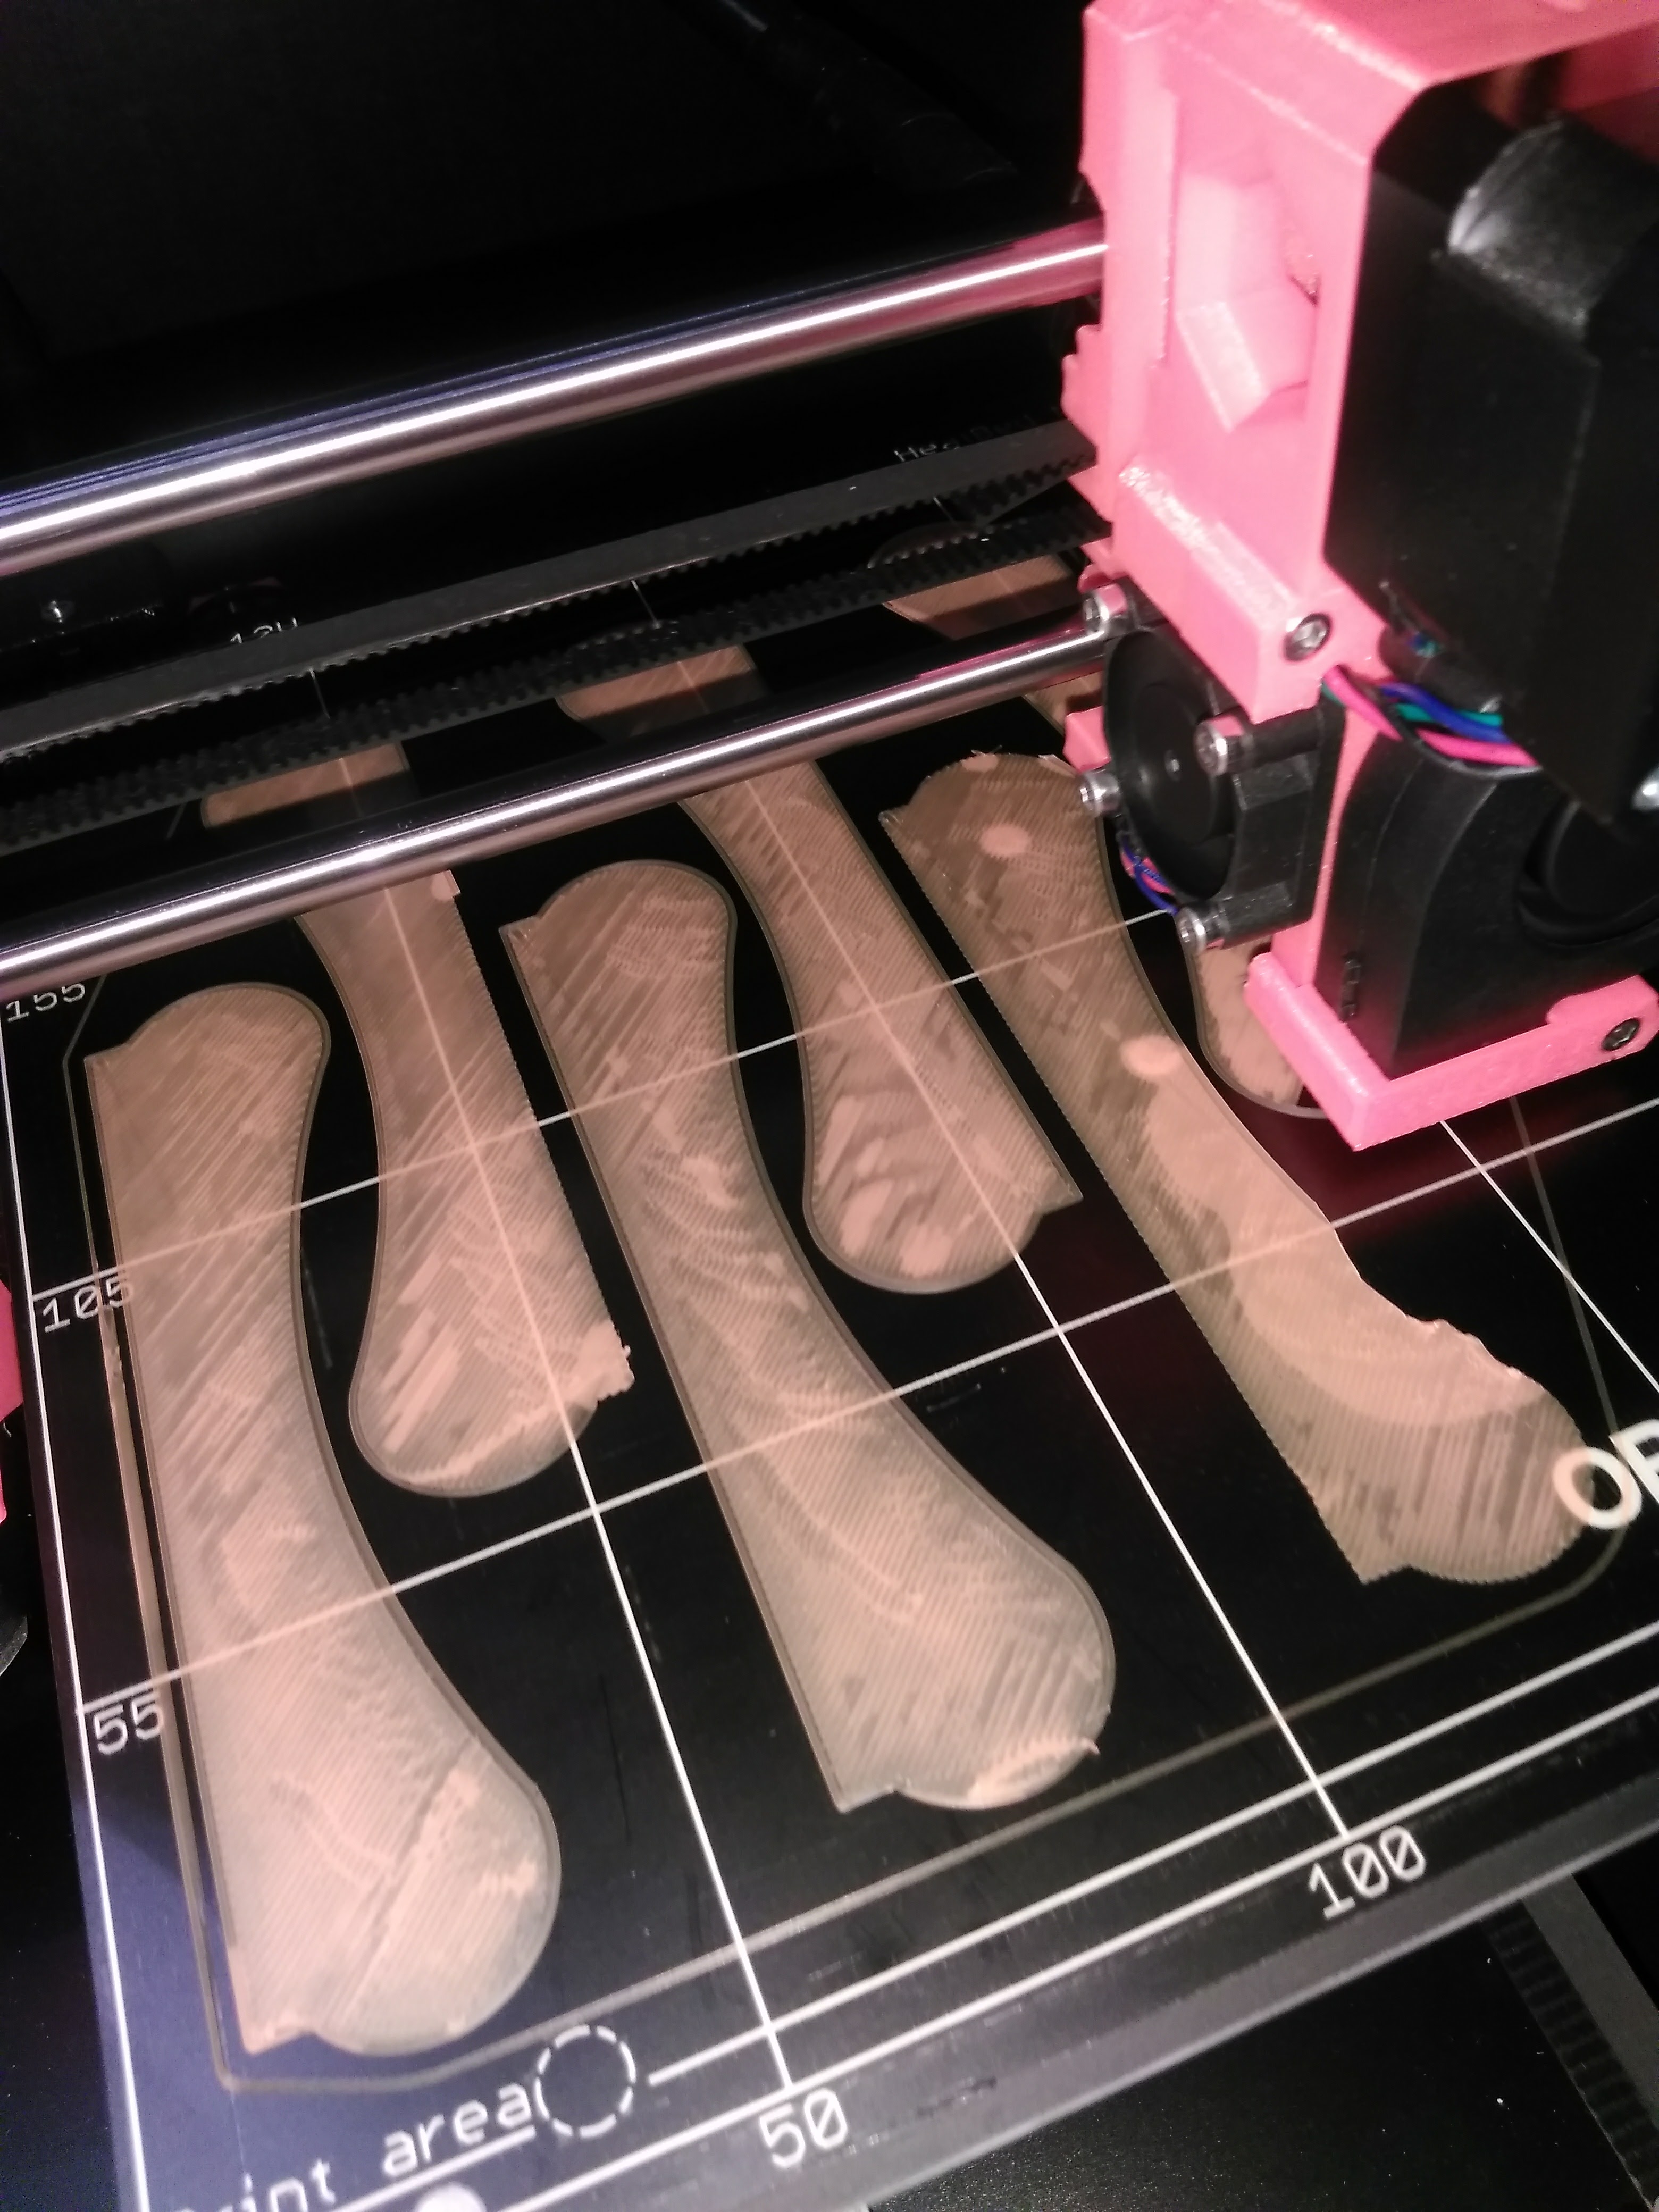
Went through the V4 calibration file (btw, excelent way of calibrating the ZZs) with the orange PLA and arrived to Z offset of -775um. I was using -650 with the grey PLA.
Once I tried again to print a full bed of T.u.s.h parts, I got what you can see in the photo.
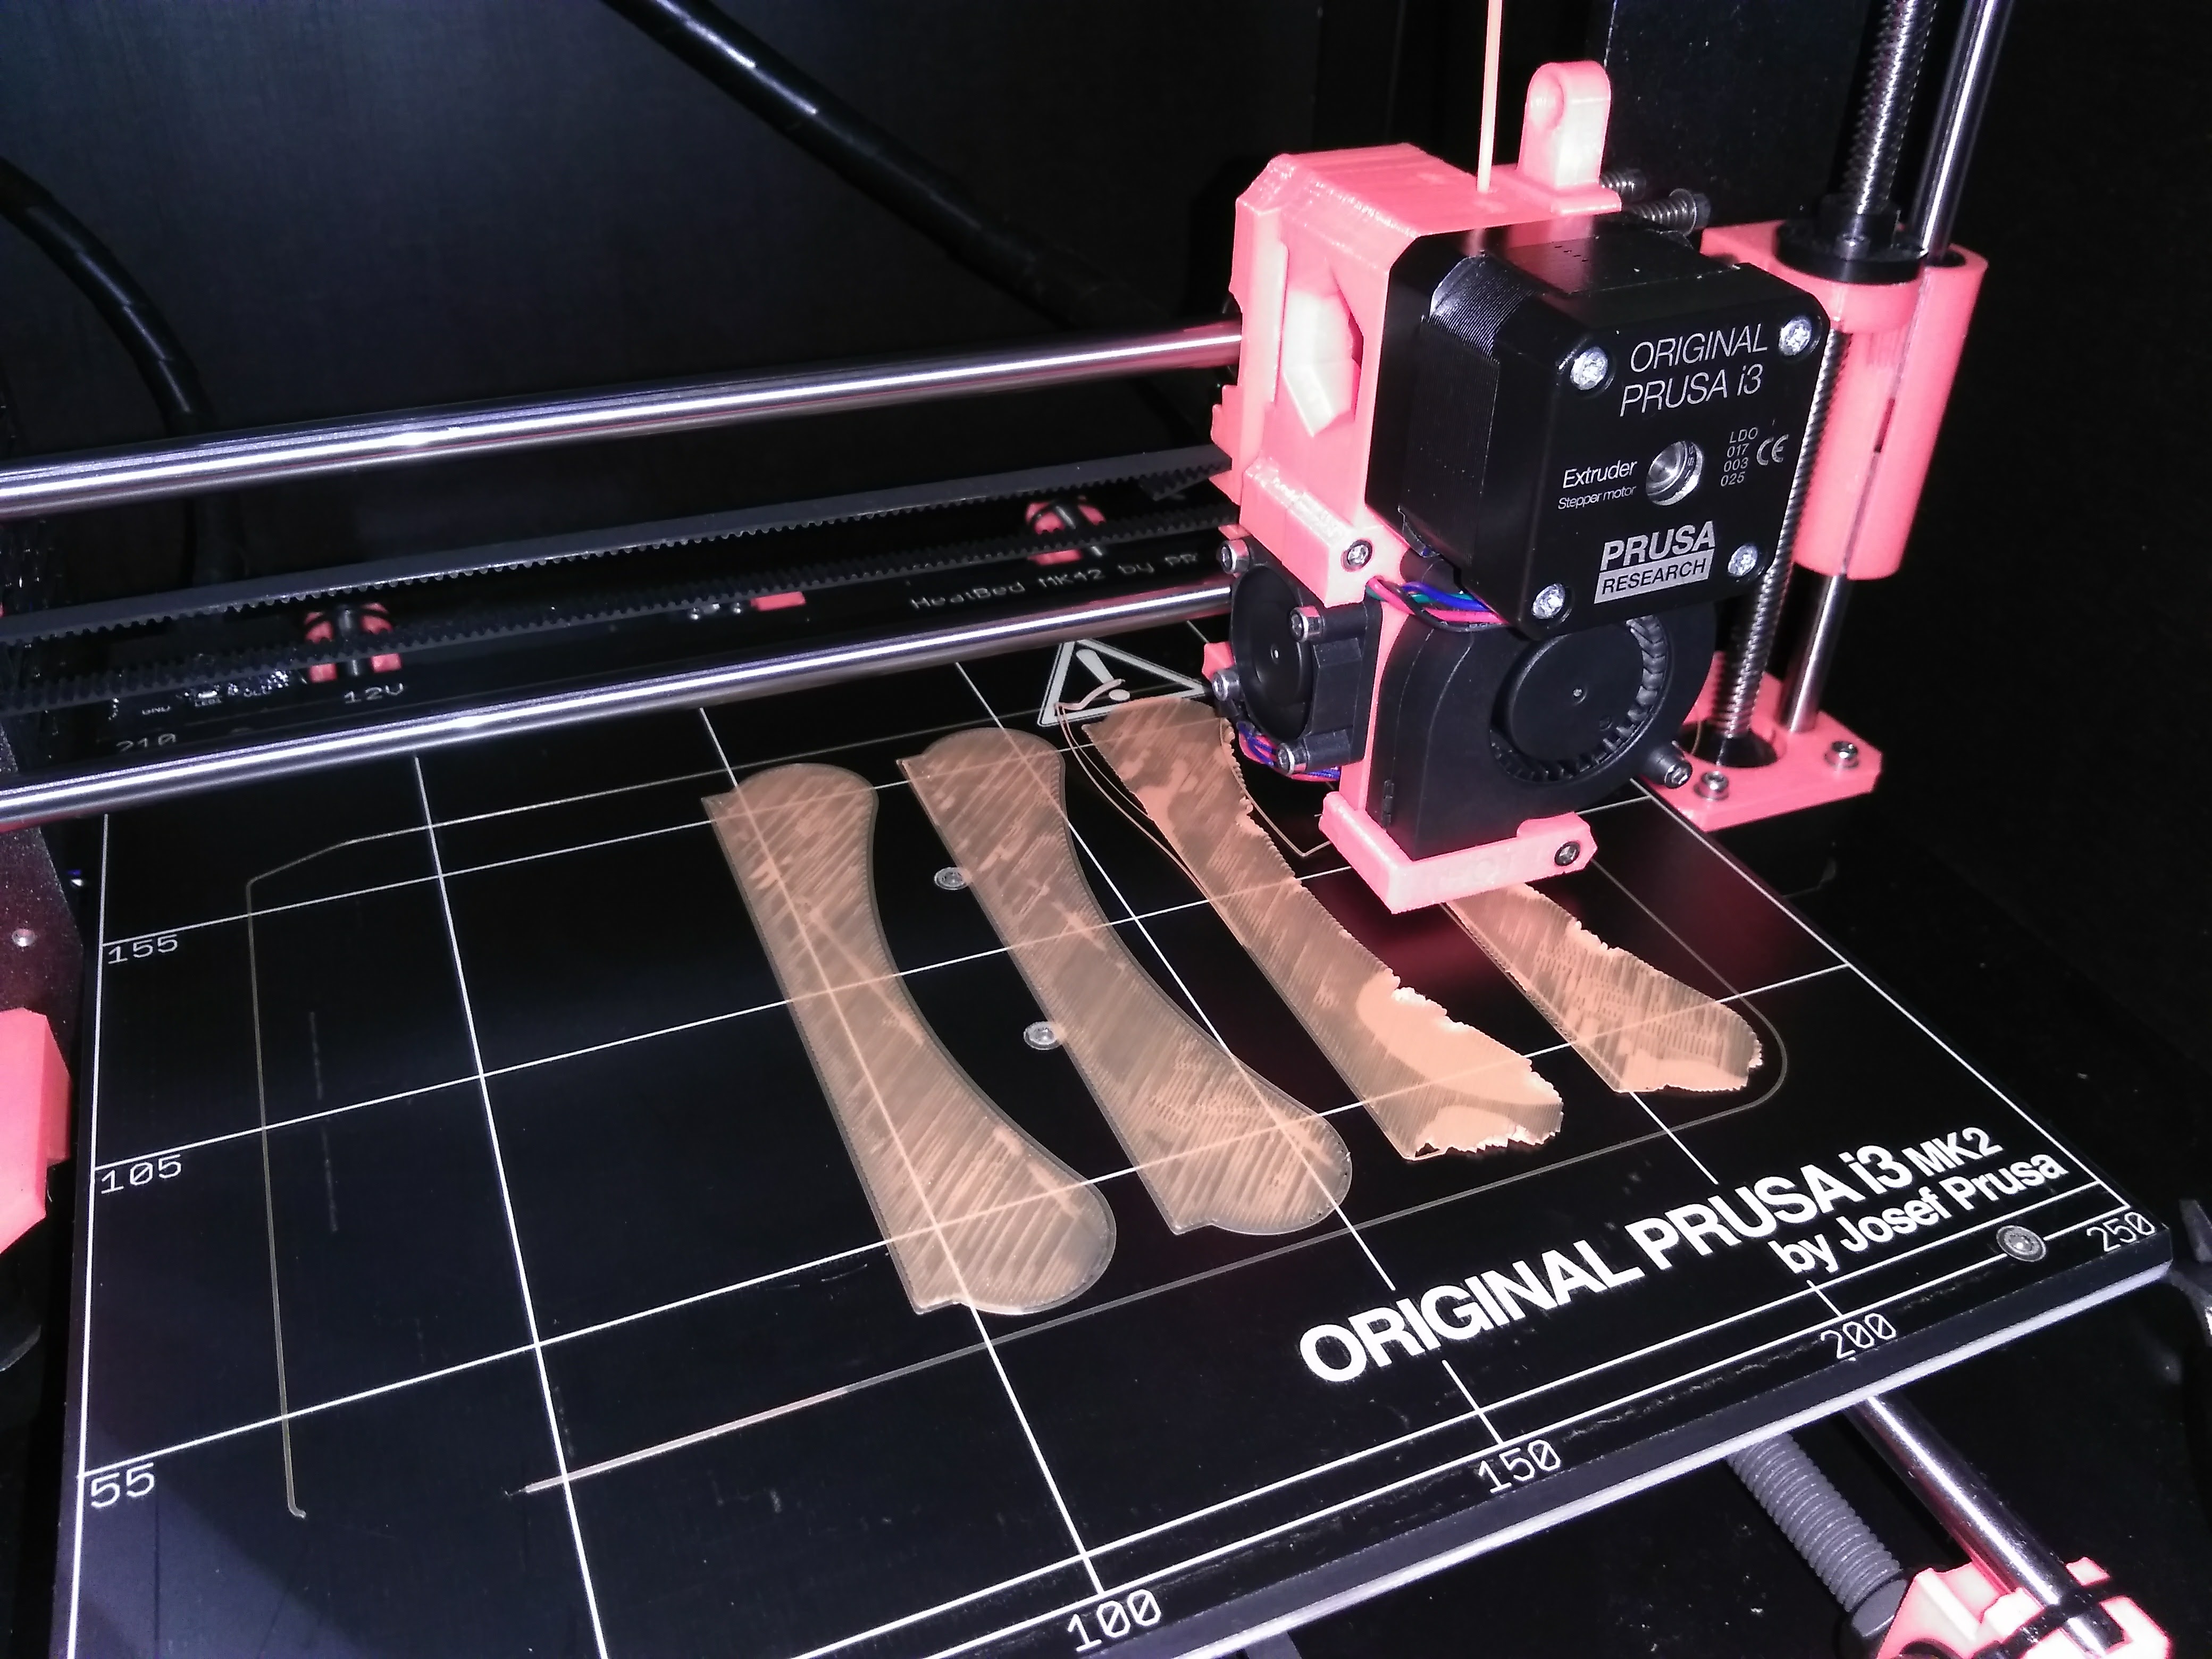
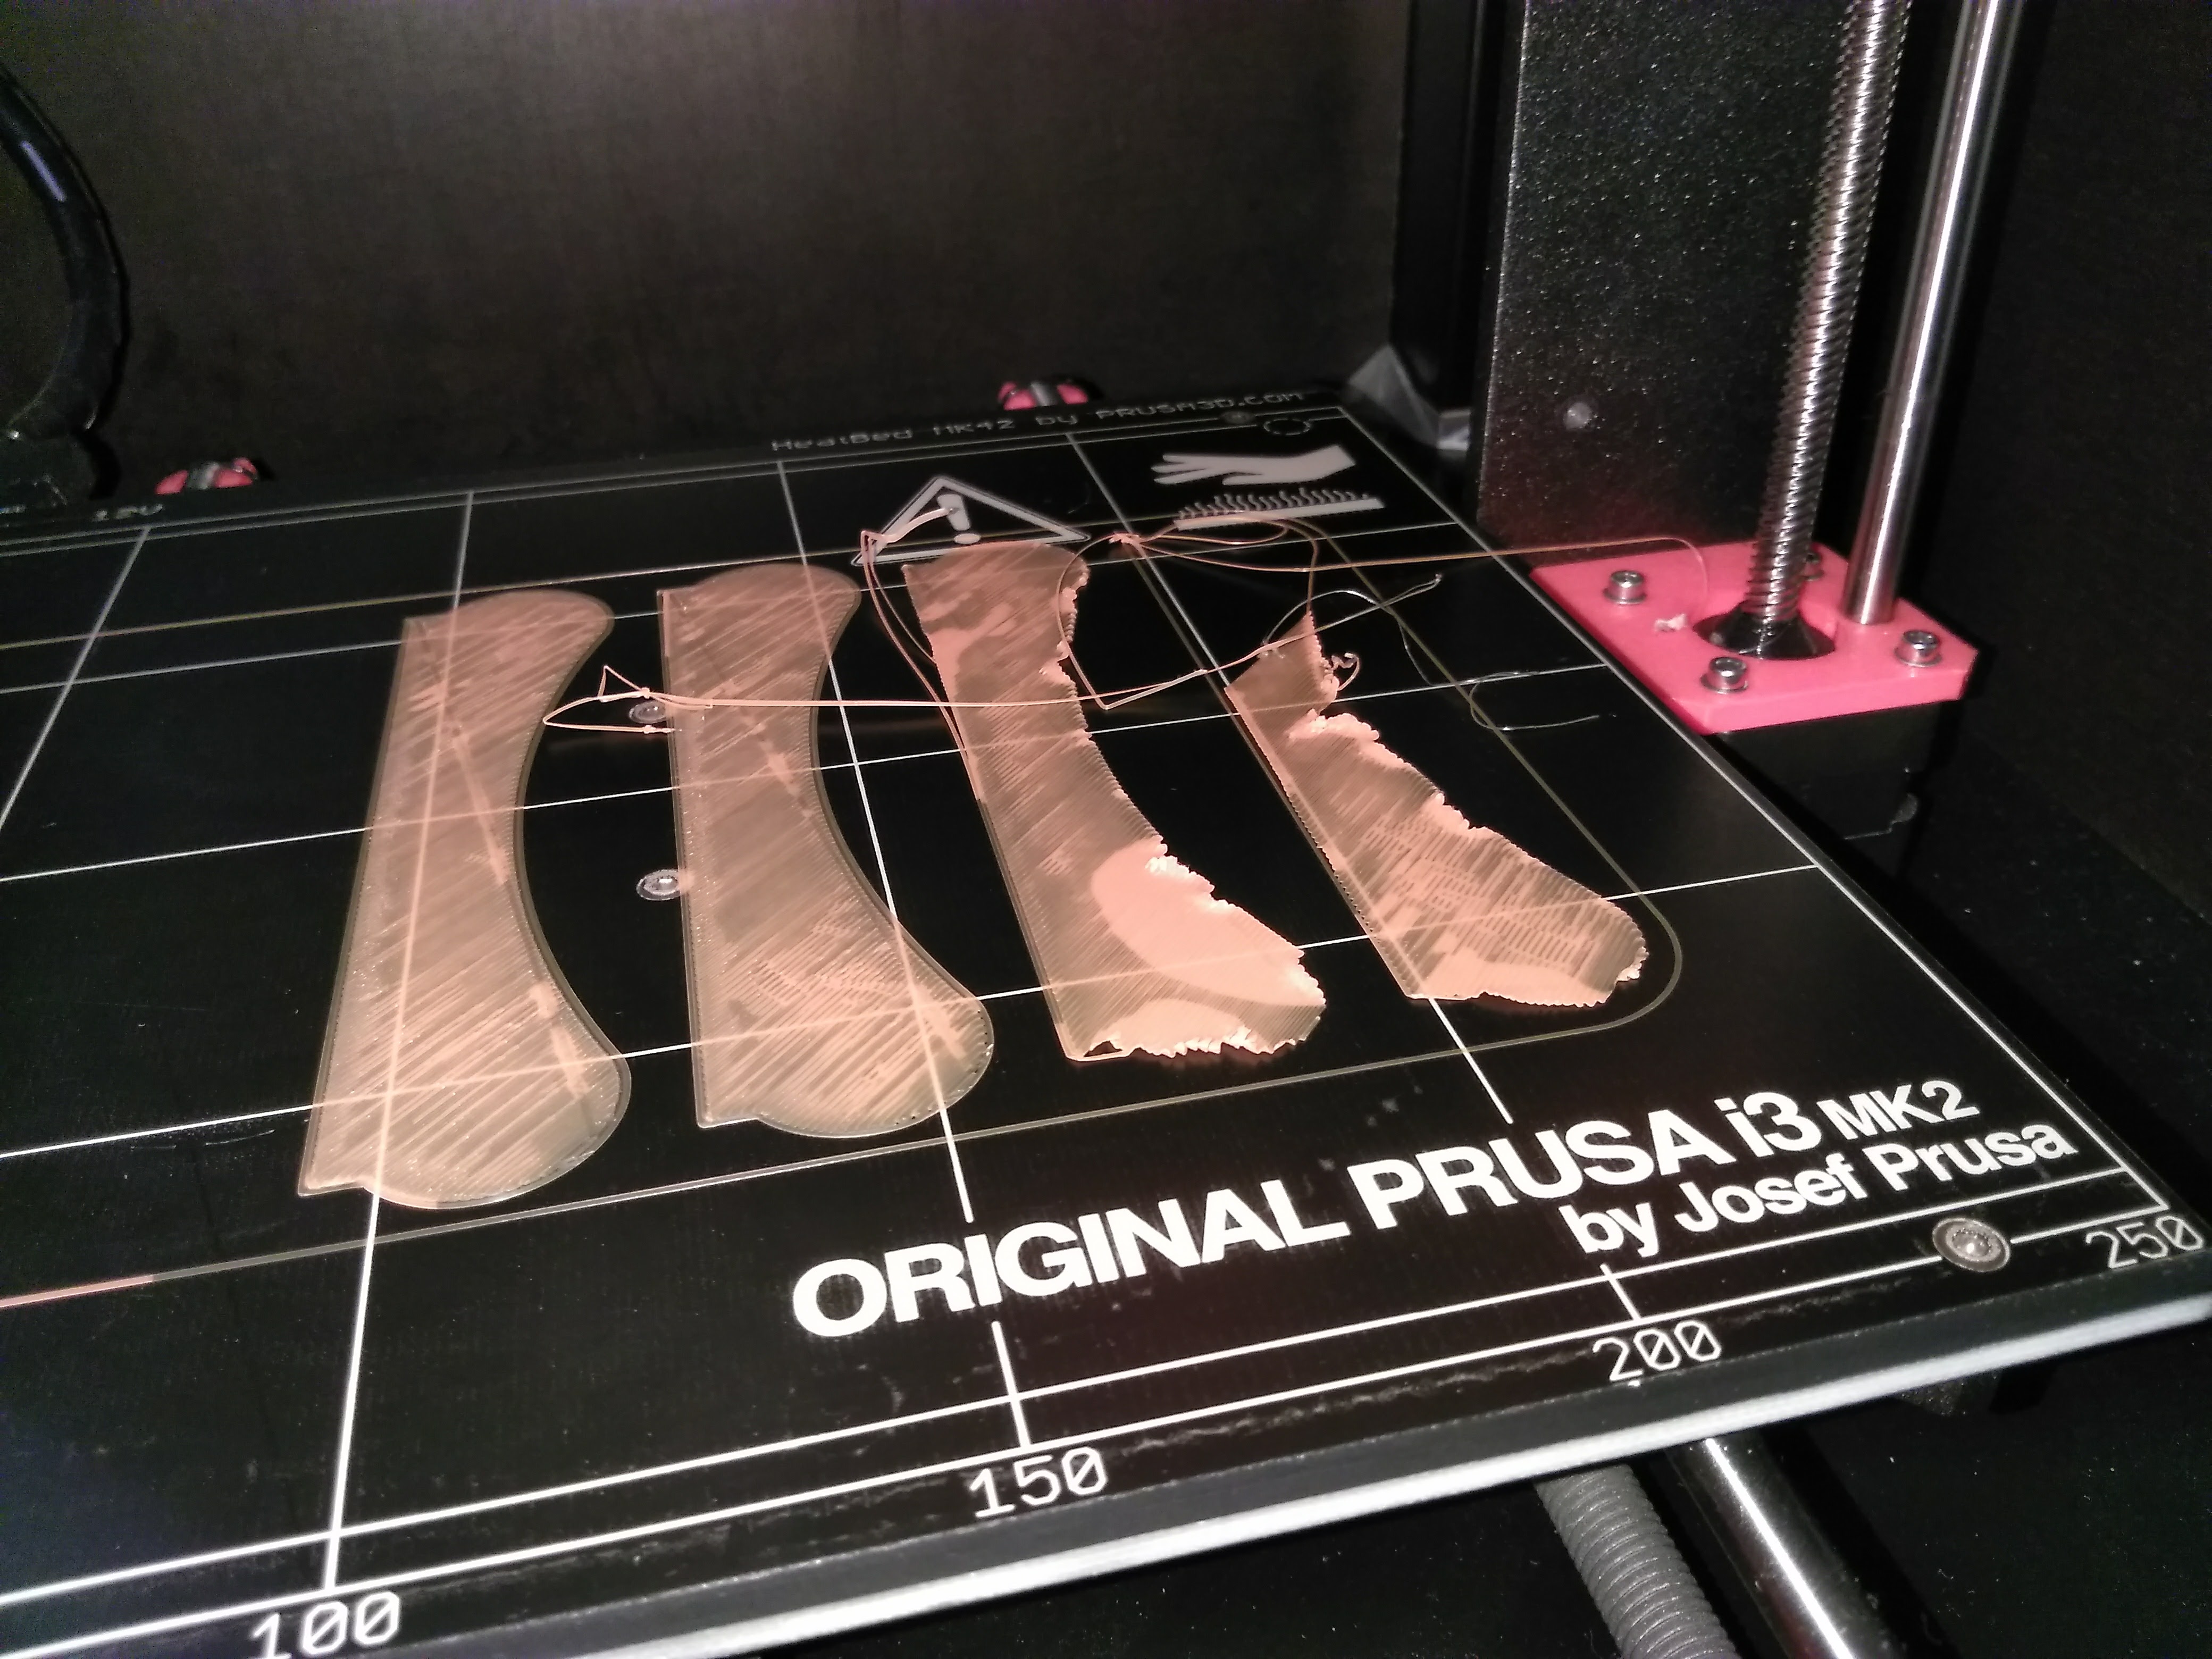
My first guess is that either my print bed or the YYs are misaligned. Can you help? I did the ZZs calibration as I did many times before. Mesh bed leveling always runs fine.
I'm now printing using only the leftmost side of the print bed, but still, the first layer is translucid and it's quite clear that the adhesion is very uneven. You can also see where I already had to clip away some strings too.
The only issues I had with the grey PLA were due to retraction length (0.9mm was fine; Slic3r PRUSA settings come with 1.5mm by default which caused lots of clogging leading to skipped layers).
Any hints are appreciated.
Thank in advance,
--
Luis
--
Luis
Mk2S
Re: life adjust Z - my way
...
Any hints are appreciated.
Thank in advance,
--
Luis
💡
the problem is, that the heatbed is neither dead flat, nor will all the calibration points (small round areas with 100% copper layer inside the pcb) be detected equally.
prusa has implemented some kind of "adjustment" inside the calibration menu, where you can tweak front, rear, right and left a little bit. but that's not really handy because every change you make at an edge value will affect the middle by factor 0.5.
have a look inside this thread, where Peter (PJR) published his amendment to the firmware, using the G80 gcode command.
with this amendment you can "adjust" the layer hight for all the eight calibration points surrounding the middle one, so that you'll get a hyperfine bed levelling, which should cure your issue.
you can add the required G80 at your slicers start script... and as long as you're running only one printer, it'll be quite easy to handle.
----
by the way: it looks as you are printing inside an enclosure. so make sure that your temperature inside won't exceed 50°C. otherwise you'll get a frequently clogged extruder, because you can't cool the coldend of the extruder down below 53°C.
dem inscheniör is' nix zu schwör...
Re: life adjust Z - my way
I read the whole thread, interesting stuff. I came across info about calibrating your extruder. Mine extrudes 97mm instead of 100. Solution is using the multiplier setting within my slicer software.
The calibration file from this topic is a gcode file. How can i add this multiplier?
Re: life adjust Z - my way
... I came across info about calibrating your extruder. Mine extrudes 97mm instead of 100. Solution is using the multiplier setting within my slicer software....
that's only one solution, but there is a simpler way than adding it in your slicer and using the multiplier setting !
💡 extruder calibration 💡
use the M92 command to "Set axis_steps_per_unit " and store the settings inside the eeprom (should work with firmware 3.0.10 - 3.0.12-RC2).
the original value for the extruder is set inside the firmware with 161.30 microsteps/mm. if your printer only extrudes 97mm instead of 100mm, you need to alter this value to 161.30/0.97 = 166.29.
to do so, just connect your printer to your computer and run a terminal program like pronterface. establish the connection between printer and com-port @ 115200 baud (you could use octoprint as well).
now first sent the M503 command to your printer, which should echo the actual settings the printer is using, like:
>>>M503

SENDING:M503

echo:Steps per unit:

echo:  M92 X100.00 Y100.00 Z400.00 E161.30

echo:Maximum feedrates (mm/s):

echo:  M203 X500.00 Y500.00 Z12.00 E120.00

echo:Maximum Acceleration (mm/s2):

echo:  M201 X9000 Y9000 Z500 E10000

echo:Acceleration: S=acceleration, T=retract acceleration

echo:  M204 S1500.00 T1500.00

echo:Advanced variables: S=Min feedrate (mm/s), T=Min travel feedrate (mm/s), B=minimum segment time (ms), X=maximum XY jerk (mm/s),  Z=maximum Z jerk (mm/s),  E=maximum E jerk (mm/s)

echo:  M205 S0.00 T0.00 B20000 X10.00 Y10.00 Z0.20 E2.50

echo:Home offset (mm):

echo:  M206 X0.00 Y0.00 Z0.00

echo:PID settings:

echo:   M301 P18.48 I1.39 D61.32

echo:PID heatbed settings:

echo:   M304 P107.92 I5.47 D532.68

echo:Retract: S=Length (mm) F:Speed (mm/m) Z: ZLift (mm)

echo:   M207 S3.00 F2700.00 Z0.00

echo:Recover: S=Extra length (mm) F:Speed (mm/m)

echo:   M208 S0.00 F480.00

echo:Auto-Retract: S=0 to disable, 1 to interpret extrude-only moves as retracts or recoveries

echo:   M209 S0

echo:Filament settings: Disabled
now sent your calculated new value for the extruder steps to your printer with the M92 command:
M92 E166.29
if you use the M503 again, the new value should be echoed at the end of the second line.
now simply store these values inside the eeprom by sending the M500 command.
M500
➡ you could easily check whether the printer stored the value successful inside the eeprom or not (might be required to check if your firmware release supports storing the e-steps inside the eeprom) by altering the value again with the M92 command.
so you can set the e-steps back to the genuine value of 161.30 microsteps/mm with M92 E161.30.
if you now send the M503 command, you should get the actual settings with "echo: M92 X100.00 Y100.00 Z400.00 E161.30" in line#2 back again.
now use the M501 command to recall the eeprom settings.
if you now sent M503 to the printer, you should get back the value we've previously calculated, set with the M92 command and stored with M500 inside the eeprom.
simple, isn't it ?

dem inscheniör is' nix zu schwör...
Re: life adjust Z - my way
wow, thank you for the quick en extended reply, this sounds like a good solution. I am going to add this to my 3d printing notes 🙂
So my steps now are, calibrate the extruder, calibrate the PID (I have a sock), calibrate the bed en hotend temp and then finally calibrate the nozzle height according to the method in this thread.
Re: life adjust Z - my way
... I came across info about calibrating your extruder. Mine extrudes 97mm instead of 100. Solution is using the multiplier setting within my slicer software....
that's only one solution, but there is a simpler way than adding it in your slicer and using the multiplier setting !
💡 extruder calibration 💡
use the M92 command to "Set axis_steps_per_unit " and store the settings inside the eeprom (should work with firmware 3.0.10 - 3.0.12-RC2).
the original value for the extruder is set inside the firmware with 161.30 microsteps/mm. if your printer only extrudes 97mm instead of 100mm, you need to alter this value to 161.30/0.97 = 166.29.
to do so, just connect your printer to your computer and run a terminal program like pronterface. establish the connection between printer and com-port @ 115200 baud (you could use octoprint as well).
now first sent the M503 command to your printer, which should echo the actual settings the printer is using, like:
>>>M503

SENDING:M503

echo:Steps per unit:

echo:  M92 X100.00 Y100.00 Z400.00 E161.30

echo:Maximum feedrates (mm/s):

echo:  M203 X500.00 Y500.00 Z12.00 E120.00

echo:Maximum Acceleration (mm/s2):

echo:  M201 X9000 Y9000 Z500 E10000

echo:Acceleration: S=acceleration, T=retract acceleration

echo:  M204 S1500.00 T1500.00

echo:Advanced variables: S=Min feedrate (mm/s), T=Min travel feedrate (mm/s), B=minimum segment time (ms), X=maximum XY jerk (mm/s),  Z=maximum Z jerk (mm/s),  E=maximum E jerk (mm/s)

echo:  M205 S0.00 T0.00 B20000 X10.00 Y10.00 Z0.20 E2.50

echo:Home offset (mm):

echo:  M206 X0.00 Y0.00 Z0.00

echo:PID settings:

echo:   M301 P18.48 I1.39 D61.32

echo:PID heatbed settings:

echo:   M304 P107.92 I5.47 D532.68

echo:Retract: S=Length (mm) F:Speed (mm/m) Z: ZLift (mm)

echo:   M207 S3.00 F2700.00 Z0.00

echo:Recover: S=Extra length (mm) F:Speed (mm/m)

echo:   M208 S0.00 F480.00

echo:Auto-Retract: S=0 to disable, 1 to interpret extrude-only moves as retracts or recoveries

echo:   M209 S0

echo:Filament settings: Disabled
now sent your calculated new value for the extruder steps to your printer with the M92 command:
M92 E166.29
if you use the M503 again, the new value should be echoed at the end of the second line.
now simply store these values inside the eeprom by sending the M500 command.
M500
➡ you could easily check whether the printer stored the value successful inside the eeprom or not (might be required to check if your firmware release supports storing the e-steps inside the eeprom) by altering the value again with the M92 command.
so you can set the e-steps back to the genuine value of 161.30 microsteps/mm with M92 E161.30.
if you now send the M503 command, you should get the actual settings with "echo: M92 X100.00 Y100.00 Z400.00 E161.30" in line#2 back again.
now use the M501 command to recall the eeprom settings.
if you now sent M503 to the printer, you should get back the value we've previously calculated, set with the M92 command and stored with M500 inside the eeprom.
simple, isn't it ?
That made me giggle!
I find it somewhat simpler to calculate 100mm/97mm = 1.0309 and then change the EM setting in Slic3r to EM=1.031.
Re: life adjust Z - my way
...
That made me giggle!
I find it somewhat simpler to calculate 100mm/97mm = 1.0309 and then change the EM setting in Slic3r to EM=1.031.
yeah, but you have to consider that you then might get bad results printing things that haven't been sliced with your specific slic3r settings.
I'm thinking at models from the SD-card, or the "pre-sliced" calibration surface for example.
and furthermore: if you got more than one printer, you'll soon get into trouble which *.gcode you've sliced for which printer...
dem inscheniör is' nix zu schwör...
Re: life adjust Z - my way
...
That made me giggle!
I find it somewhat simpler to calculate 100mm/97mm = 1.0309 and then change the EM setting in Slic3r to EM=1.031.
yeah, but you have to consider that you then might get bad results printing things that haven't been sliced with your specific slic3r settings.
I'm thinking at models from the SD-card, or the "pre-sliced" calibration surface for example.
and furthermore: if you got more than one printer, you'll soon get into trouble which *.gcode you've sliced for which printer...
True, it's hard enough keeping tracks of the files made for just one printer.
What happens when the firmware gets updated, will the change need to be made again? (Not that I plan to change the firmware as long as the printer is working fine for once!)
Re: life adjust Z - my way
...
What happens when the firmware gets updated, will the change need to be made again? (Not that I plan to change the firmware as long as the printer is working fine for once!)
that's usually not necessary, unless you do a factory reset.
all the settings are stored inside the eeprom and a firmware update shouldn't change the eeprom content.
from Configuration.h:
#define EEPROM_BABYSTEP_Z 4088
=>the amount of microsteps is stored inside the eeprom inside two bytes at location 0xFF7h & 0xFF8h.
dem inscheniör is' nix zu schwör...
Re: life adjust Z - my way
now simply store these values inside the eeprom by sending the M500 command.
M500
This does not work on my 1.0.12; I'm sending M500 with pronterface, and while printer does respond with "Settings saved" (or similar - don't have printer at hand now), after reset M503 shows default values. As a workaround I have right now my calibrations (extruder, PID for nozzle and bed) prepended to printer's slicing g-code in Slic3r.
Re: life adjust Z - my way
...
This does not work on my 1.0.12; I'm sending M500 with pronterface, and while printer does respond with "Settings saved" (or similar - don't have printer at hand now), after reset M503 shows default values. As a workaround I have right now my calibrations (extruder, PID for nozzle and bed) prepended to printer's slicing g-code in Slic3r.
I'm going to check this with 3.0.12 (there was never a 1.0.12) this evening.
dem inscheniör is' nix zu schwör...
Re: life adjust Z - my way
Hi,
I have assembled my MK2S kit, updated the firmware to version 3.0.12 and run Selftest, Calibrate XYZ and adjusted the height of the INDA probe.
Because it seems not easy to determine the right setting for the Live adjust Z using the V2calibration.gcode, I've found and used the very intersting calibration surface (version 4) provided by Jeffjordan.
I have tried several settings: -0.350, -0.375, -0.400, -0.425, -0.450, -0.475, -0.500, -0.25, -0.550 and -0.575.
Unfortunately, except for -0.350 and -0.375, where you can see through the surface, because the single strings are not molten together, it's not so easy to get a clear result.
Starting from -0.400 till -0.575 the surface on the backside is very similar for all the other cases, being flat, smooth and without space left between the single filament strings.
But on the front side, there is no big difference between surfaces printed with one of the other Z settings, being quite rough, not smooth and a little thicker in the last 5-7 mm near to the border.
Mesuring the thickness of the surface with a caliber, is giving quite different results, 0.2 till 0.3, depending where you mesure it, also far from the borders, where the thickness is higher.
As from other people reported, being near to the optimal Z value, you should also get a smooth flat surface also on the front side. Increasing the value, the surface should start getting rougher and rougher.
I have set the Z value at about -0.425 or -0.450 and printed the whistle provided on the SD card. Looking at the first 2 or 3 layers, it seems that they are larger than the following layers, giving a sort of "elephant foot" shape. Does this mean that the Z value is to big, too near to the bed, spreading the molten filament on the side?
What am I doing wrong?
BTW: I couldn't insert all my pictures in the posting.
Any suggestion is welcome!
Re: life adjust Z - my way
just checked the above described procedure to store the changed E-steps permanently.
and you are right koder, it does not work with firmware 3.0.12 anymore. github says that there were changes 9 days ago... including: "retrieving settings from eeprom changed to exclude E steps per unit".
💡 curious.
don't know why this has been done.
dem inscheniör is' nix zu schwör...