Re: life adjust Z - my way
It works great!! PLA sticks like h....ll. Very smooth prints now. Thanks a lot, it was very helpfull.
Frans
Frans Krau
Europe, Holland, Apeldoorn
Re: life adjust Z - my way
I am using your solution and it has been very helpful!
I discovered something interesting last night that was repeatable over several tests. I followed your instructions and got to a very nice print that was 0.20 microns. I then decided to do one printout using the same Z adjust value for the whole print. What I found is pictured below. Basically, the bottom right diagonal prints out well, but when the top left diagonal is printed it tears apart at each strand. I tried up to + 50 microns with the results basically staying the same, lower right diagonal (where the print begins is good, top left breaks apart. I redid the XYZ calibration and the result was still the same. I also cleaned the bed with ISO before each print. My Z height is currently at -200
This lends me to believe that my bed is not level, but before changing too many variables I thought I would share my picture and get thoughts of others.
hmmm... normally the meshbed levelling (during the 9 point z-axis calibration) should cope small imperfections in the flatness of the print surface, at least that's what it's supposed to do. but i don't know the range it could do so.
➡ furthermore meshbed leveling assumes that the pinda probe is always able to detect the height between its tip and the copper pads inside the multi-layer heatbed with the same precision at each of the 9 pads. unfortunately reality doesn't follow that approach, because you have other metal parts nearby or under the printbed (for example a bearing under calibration point #4, screws, the frame and the (right) z-axis stepper motor(s)). and in addition, the whole printer operates in an electromagnetic environment where the environmental conditions might severely differ from location to location.
i think that is the reason why there is still the possibility to apply 4 additional correction values (but why only 4 ? nine would be more helpful).
and, last but not least, the pinda's sensitivity is a function of temperature....
😕 don't misunderstand me: i like the meshbed leveling a lot and i think it's one of the key features that contributed to the success of the mk2. but it has it's limits.
so it's always a good idea to get the printbed as flat as you can get it with assembly measures (avoid squeezing when tightening the screws that hold the printbed at the y-carriage, if nescessary use some washers to compensate dips in the surface etc.).
dem inscheniör is' nix zu schwör...
Re: life adjust Z - my way
I was having the same problem wIth the live adjust. It was driving me insane as I was going through all the same steps and worrying about the printbed not being level.
It turned out in my case it was the filament spool being tangled and not feeding cleanly. I cut a strip free and the square printed fine. The spool had been fine up until that point.
Re: life adjust Z - my way
Thanks so much! We just got our printer and were trying to figure out how to make the print adhere to the surface correctly. Your post and code were extremely helpful in addition tot the calibration code that came with the printer. We are now successfully printing off our first print from one of the models included with the printer!
Re: life adjust Z - my way
by request from michael.r16, here an untested (because i got only 0.4mm nozzles) version for 0.25mm nozzles:

dem inscheniör is' nix zu schwör...
Re: life adjust Z - my way
Hi @JeffJordan, is there any chance you could post the STL for this calibration model? I would like to use it on ABS and PETG which I have not been able to get to stick very well with my PLA live z. Also, how do you manage to change the height by round numbers (i.e. increments of five)? My live z adjustment seems to be by 3.
Re: life adjust Z - my way
Hi @JeffJordan, is there any chance you could post the STL for this calibration model? ...
yes, of course. but it's no big deal. simply a cube 75 x 75 x 0.2 mm in size.

... Also, how do you manage to change the height by round numbers (i.e. increments of five)? My live z adjustment seems to be by 3.
didn't get your problem here: simply dial carefully with the knob at the lcd module. if you can "dial" your value within a precision of +/- 5µm, you're allright.
dem inscheniör is' nix zu schwör...
Re: life adjust Z - my way
Hi @JeffJordan, is there any chance you could post the STL for this calibration model? ...
yes, of course. but it's no big deal. simply a cube 75 x 75 x 0.2 mm in size.
calibration_surface_75x75mm@200um_stl.zip
... Also, how do you manage to change the height by round numbers (i.e. increments of five)? My live z adjustment seems to be by 3.
didn't get your problem here: simply dial carefully with the knob at the lcd module. if you can "dial" your value within a precision of +/- 5µm, you're allright.
dem inscheniör is' nix zu schwör...
Re: life adjust Z - my way
curently doing the calibration.
I hve one question though...Lets say I move the printer and I am redoing the calibration. Do I also have to find a new Z Adjust? Or will the Z adjust always be the same?
Re: life adjust Z - my way
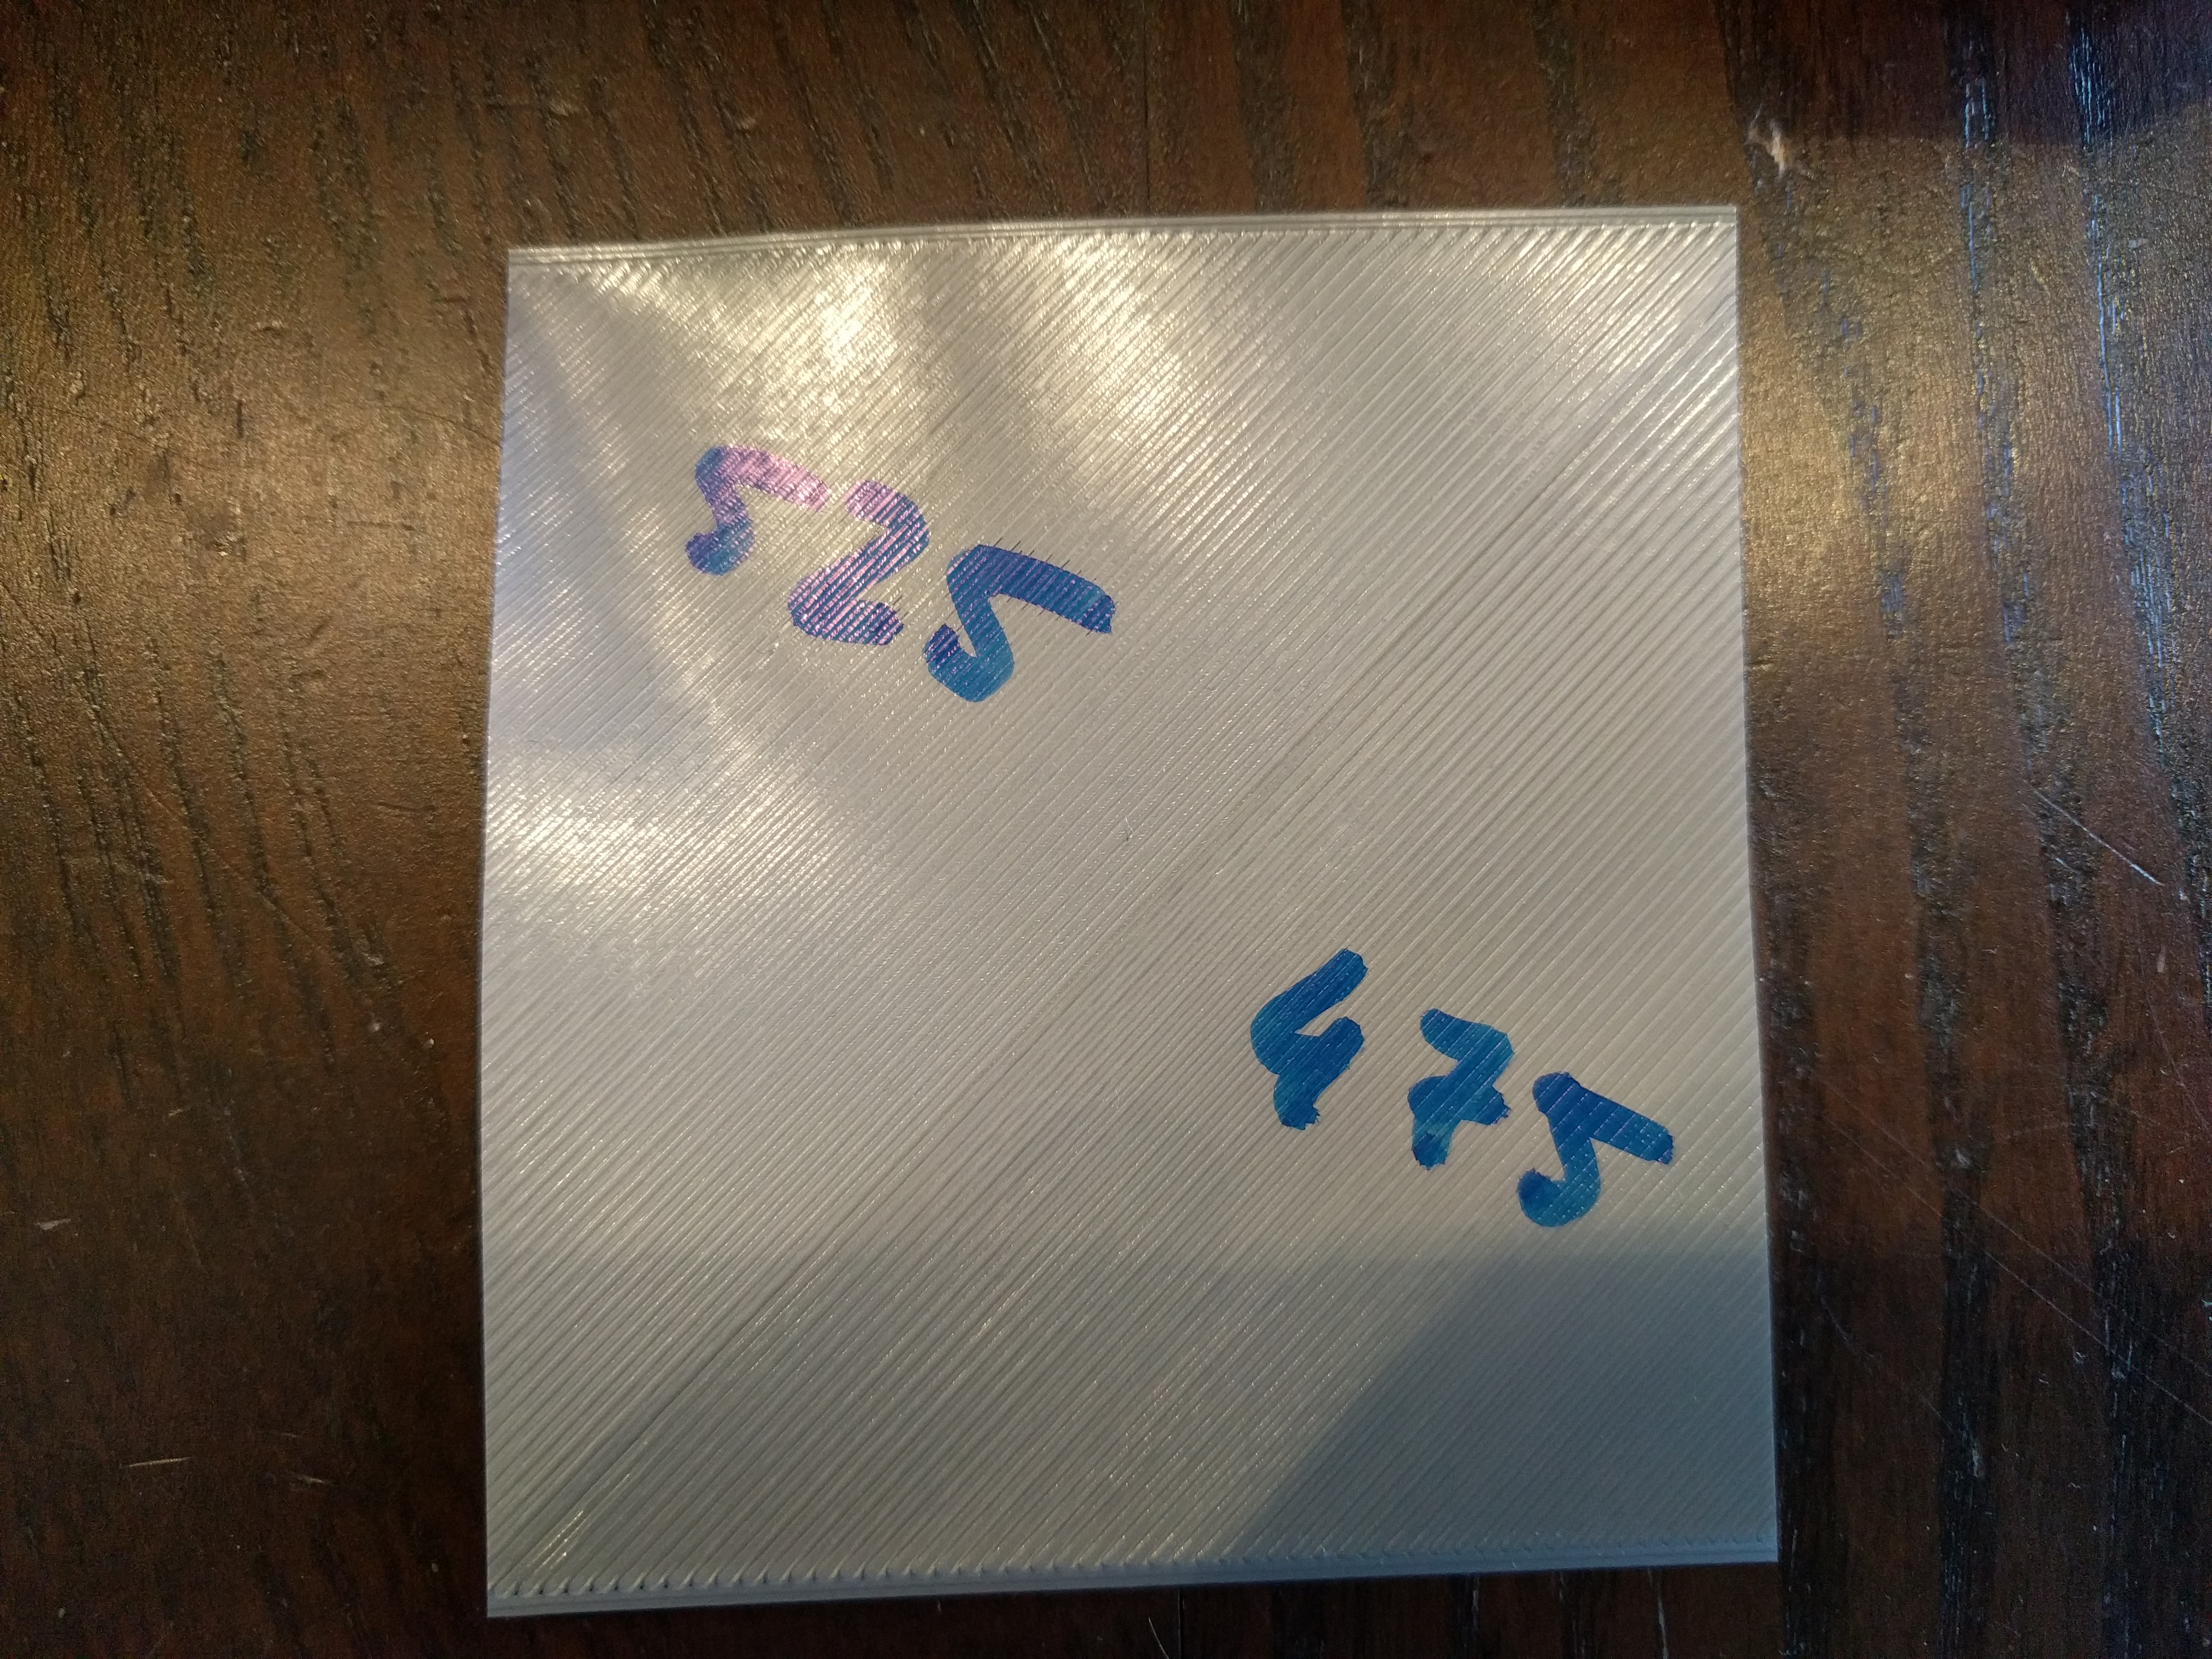
Ok so calibration is done.
I believe I was spot on with 525 last night.
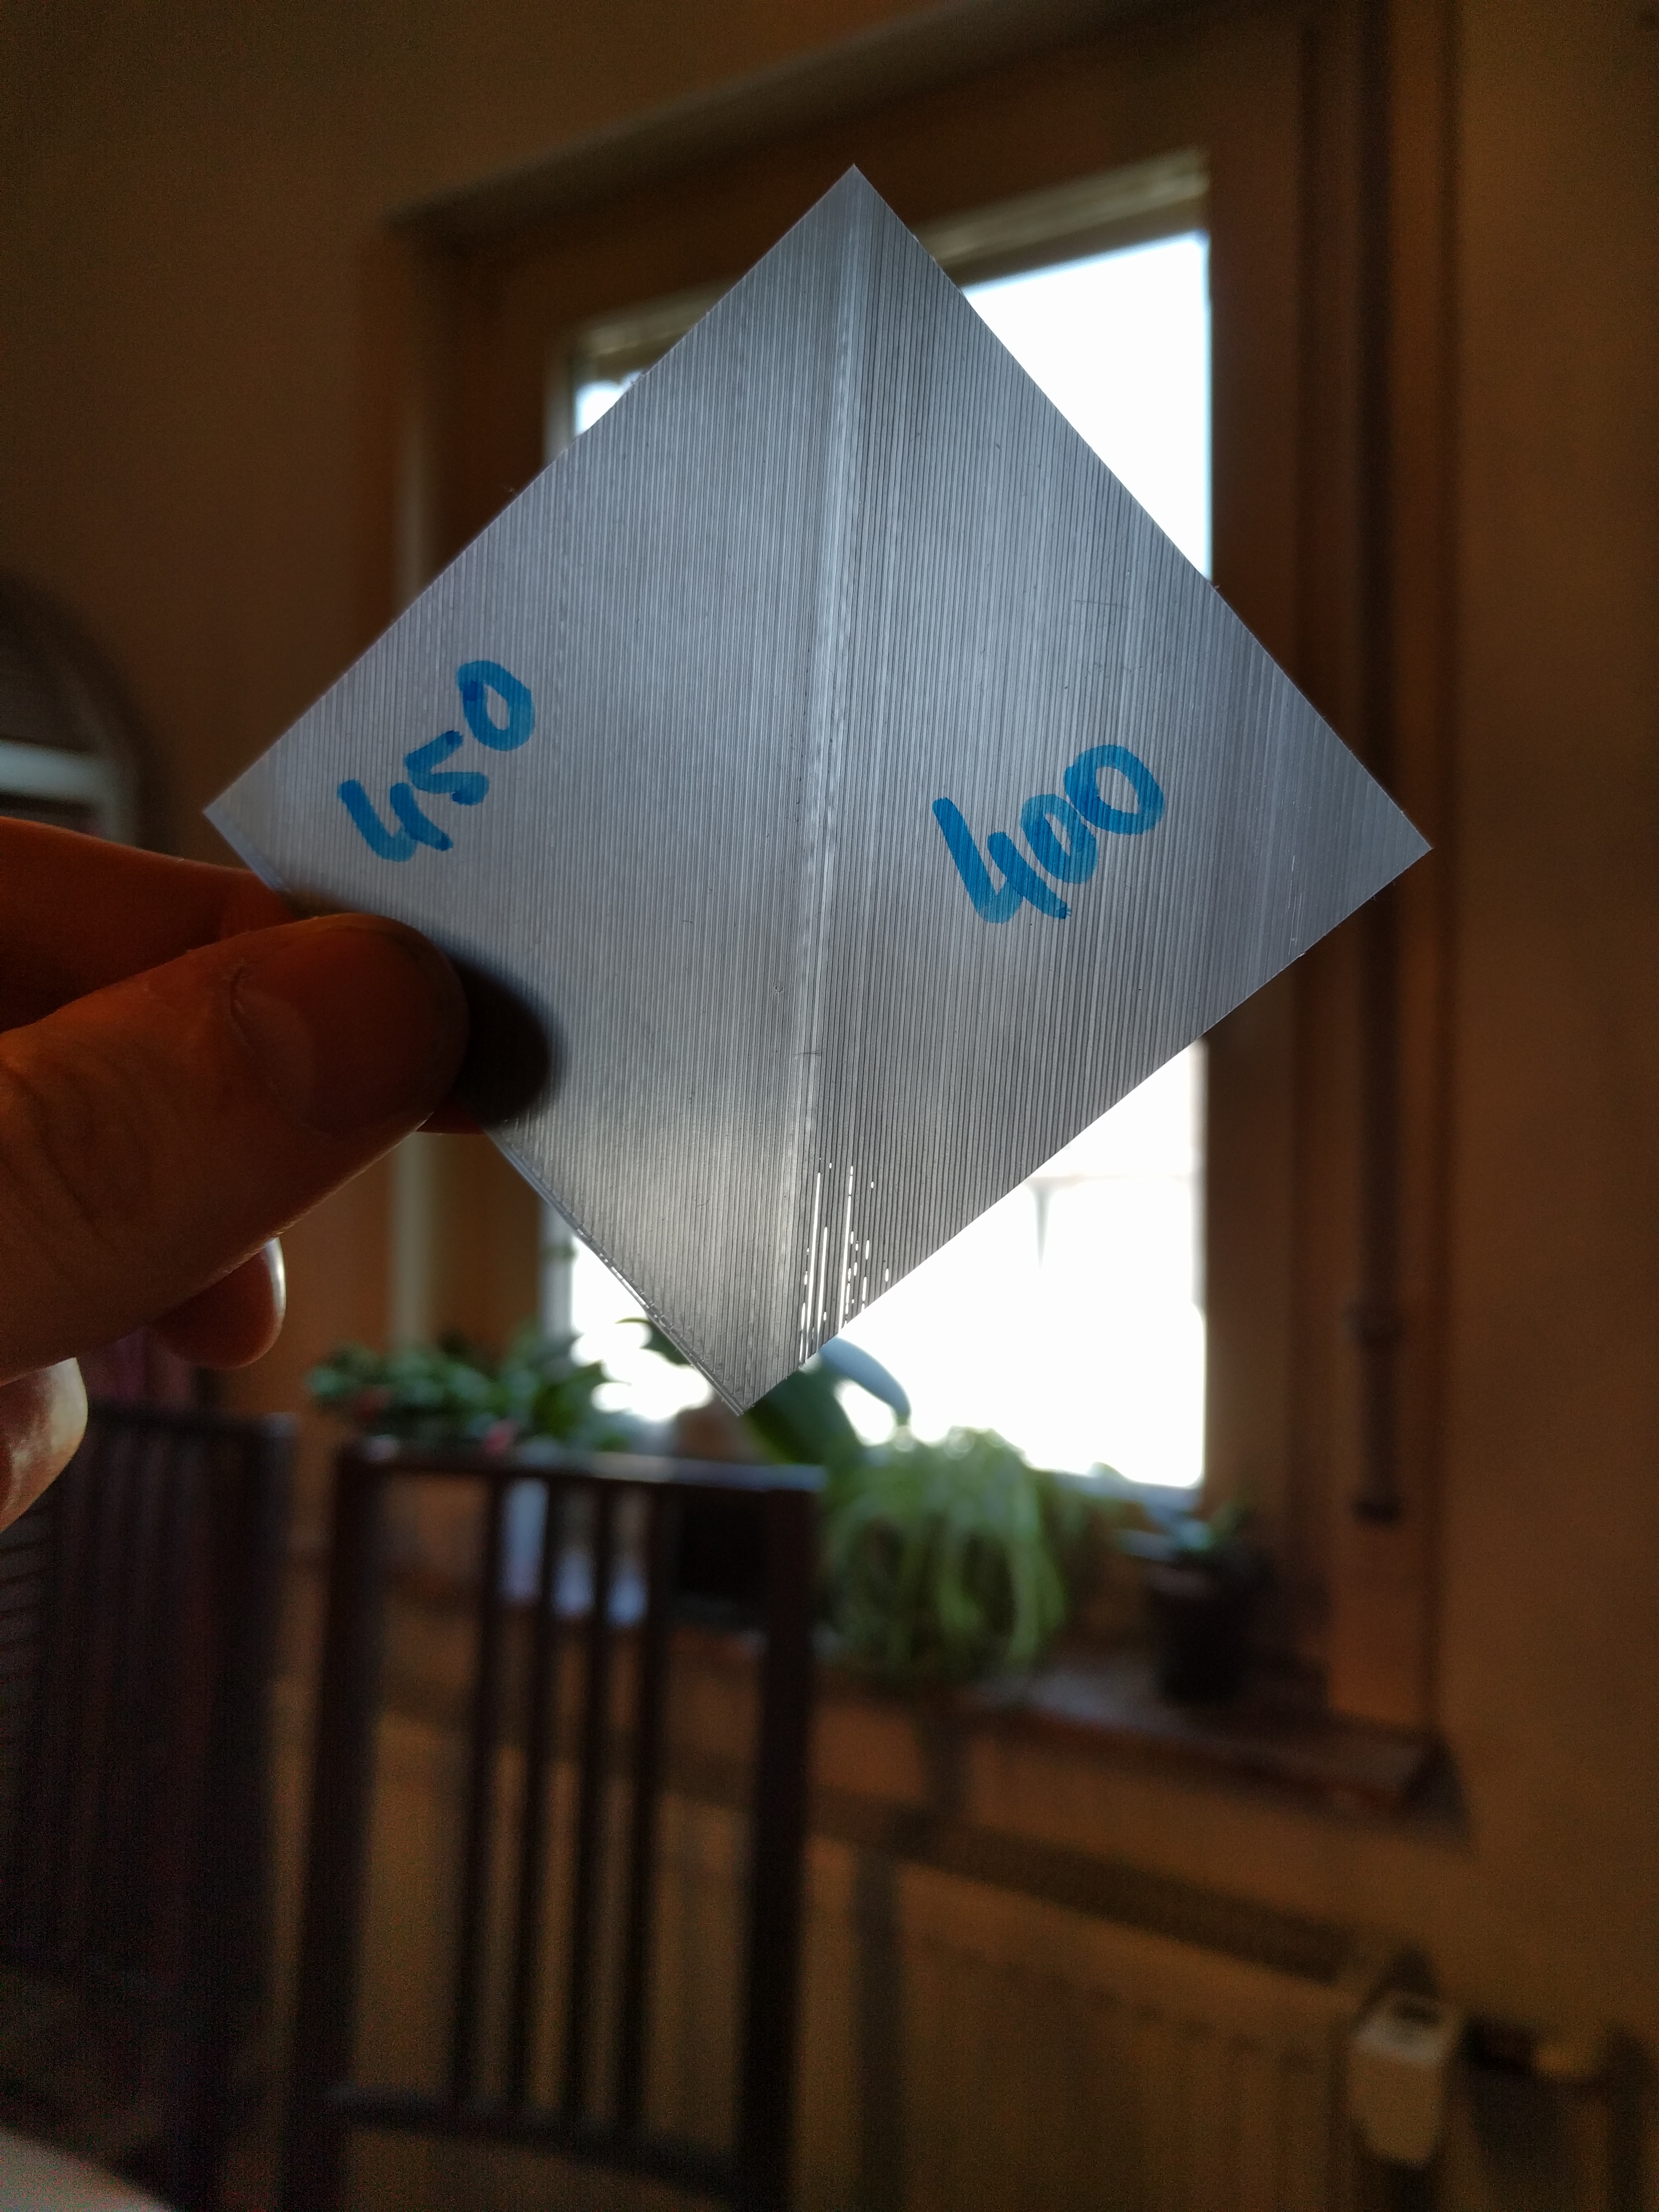
400 has holes
450 is smooth and 0.200 thick. But not a 100% accurate look
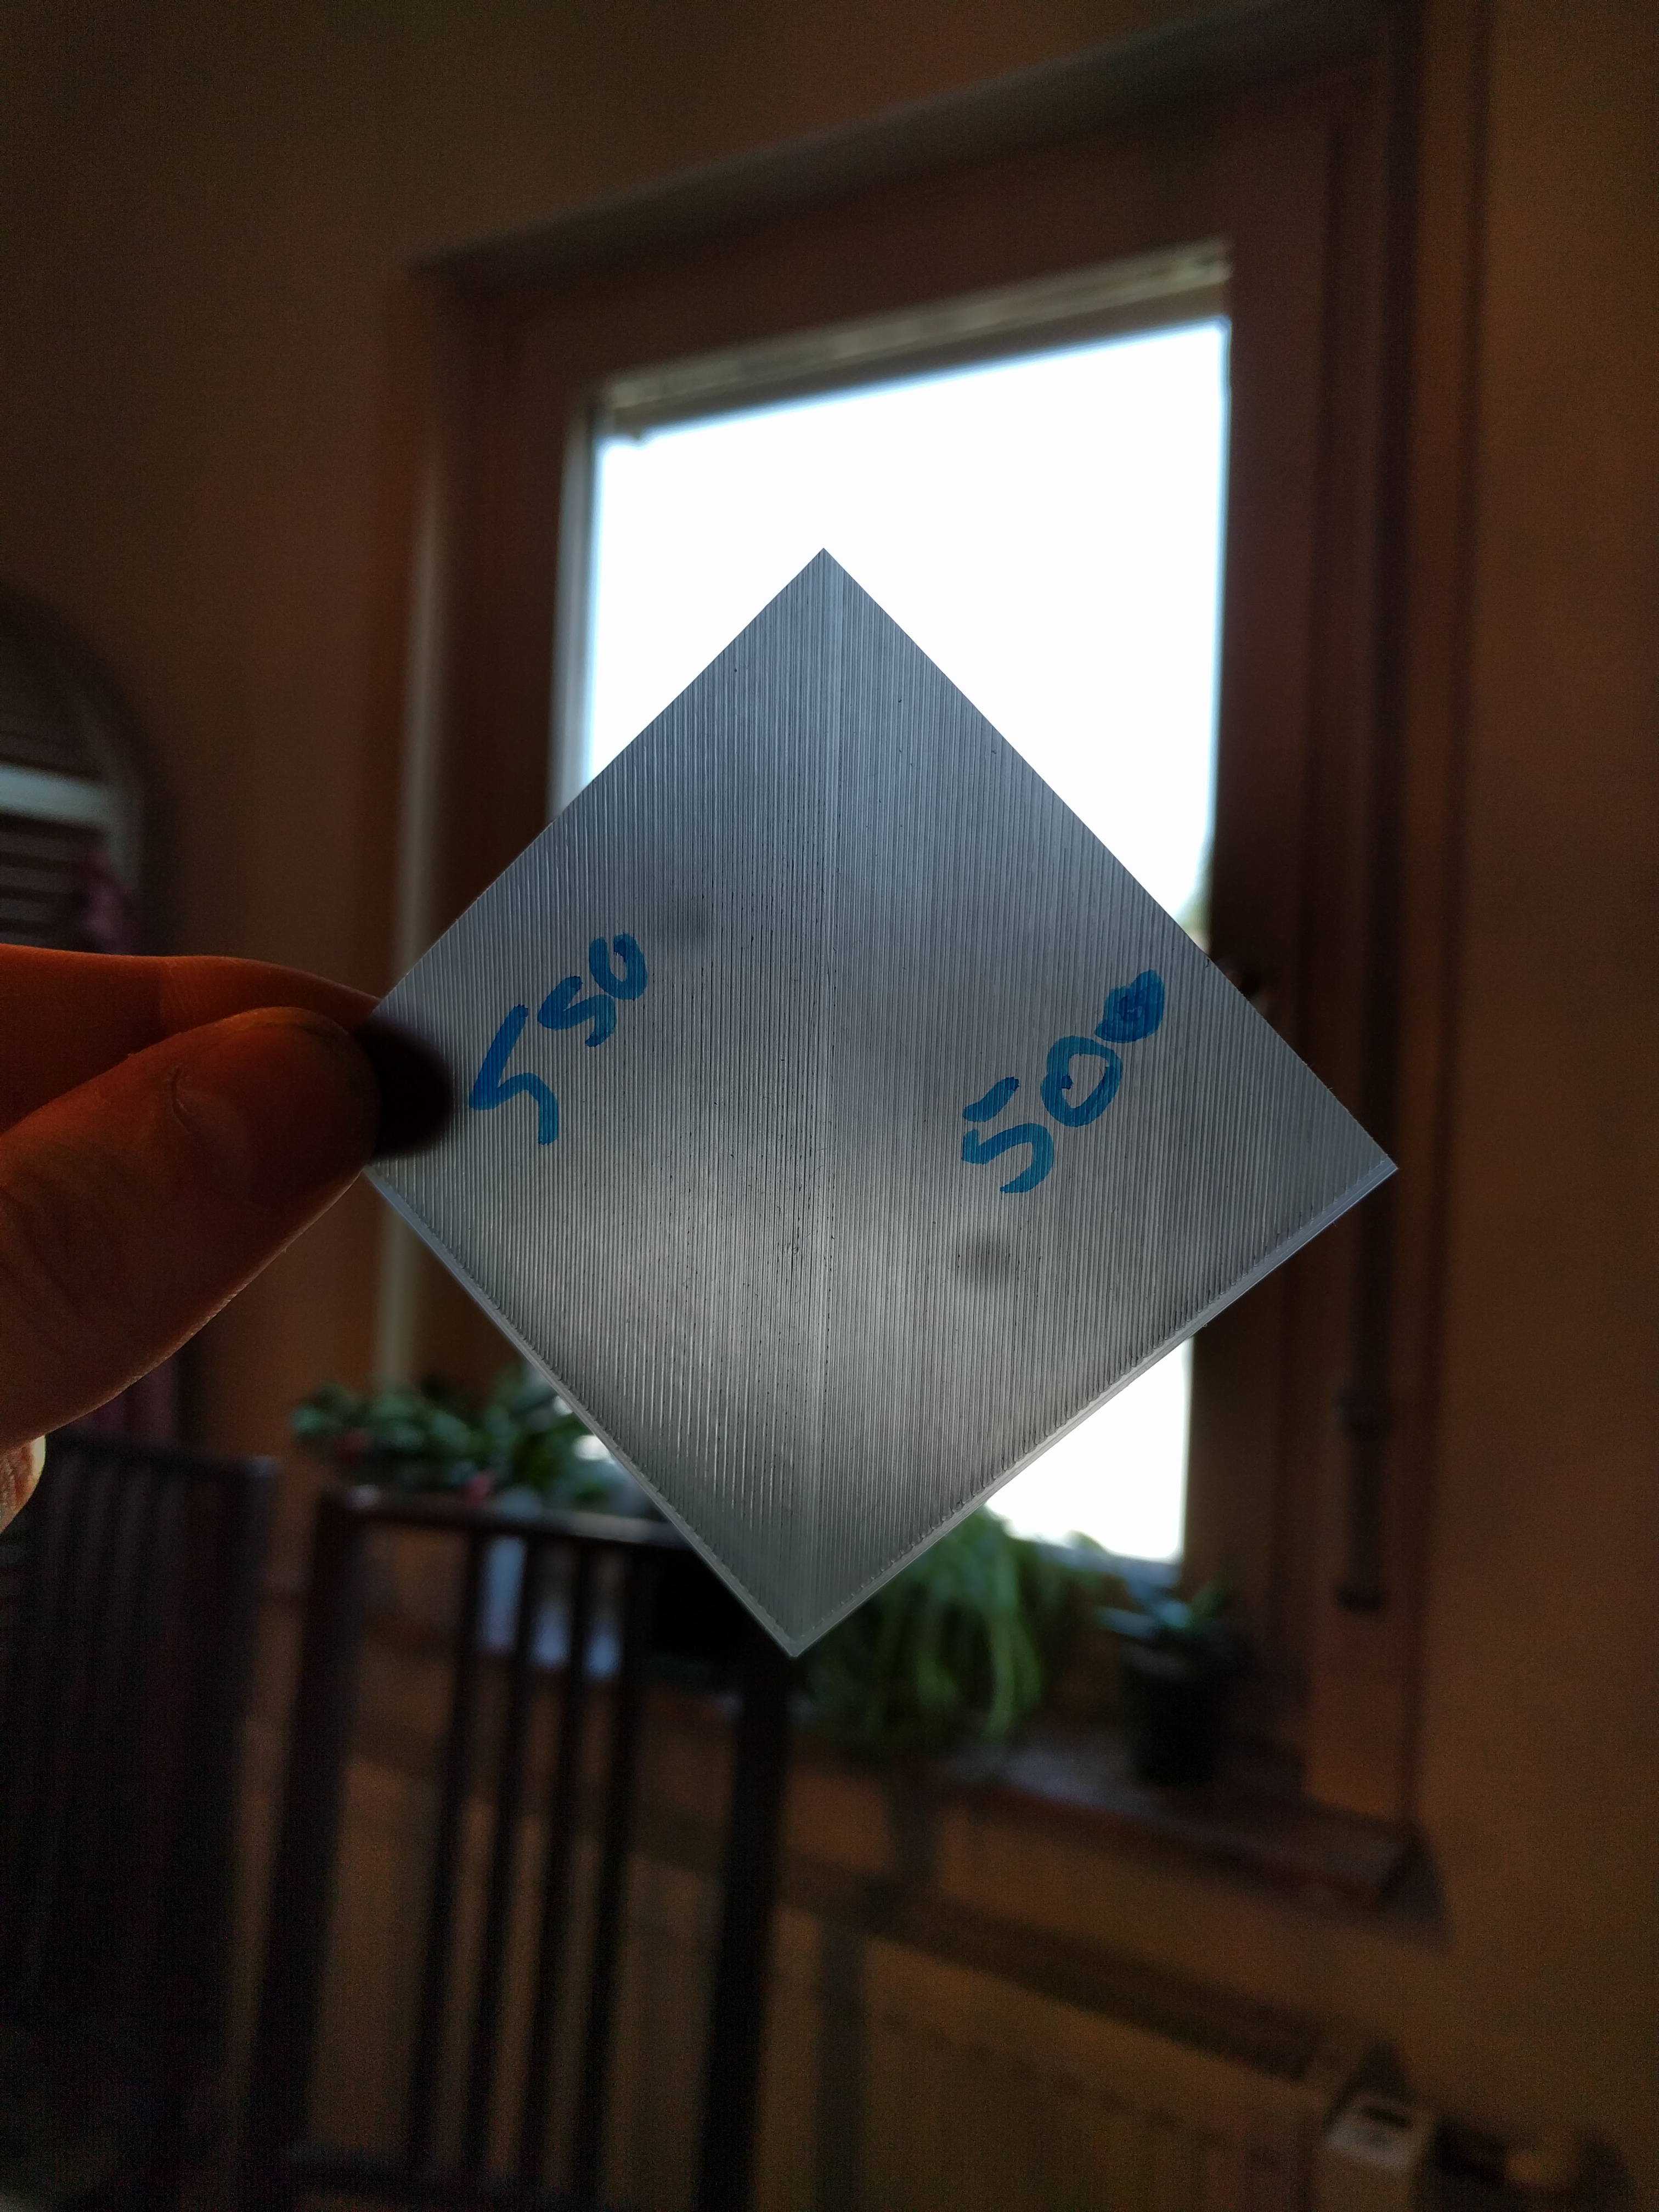
475 feels rough and not a 100% accurate look
500 is very rough
525 is smooth and looks accurate, also 0.200 thick
550 is even tougher
Here some pics:
Re: life adjust Z - my way
Last two pics:


Re: life adjust Z - my way
from the pictures -500µm and -525µm seem to be the best.
dem inscheniör is' nix zu schwör...
Re: life adjust Z - my way
Yea I think so too. Currently printing the Whistle which came with the SD Card 🙂
Thanks for your great calibration tool!
Re: life adjust Z - my way
I have printed a Benchy and I think the results are good.
Re: life adjust Z - my way
😛 yep. congratulations ! 😛
dem inscheniör is' nix zu schwör...
Re: life adjust Z - my way
Thank you all as I was loosing my mind getting this all adjusted. I started off using 0.2 feeler gauge then moved to using the big single layer printout. In any case this has told me that my bed is not level. The back too low, the front too high. So I need to make an adjustment of at least 0.05 mm on the back, and I see there is a fine adjustment. BUT while the Z adjust is in mm the bed fine tuning seems to be in um. So do negative values raise or lower it? And are 1000 um equal to 1 mm? So do I use something like -50 um to RAISE the bed 0.05mm, or am I backward?
Re: life adjust Z - my way
Wow life adjust Z. Thats a new one, I've never had to do that 🙂 Using V2calibration gcode done once was all I needed, for my live Z height adjustment.
My home built MK1 to MK2 printer worked out of the box with my preferred Slicer of choice from then on.. My bed I guess is very level.
Do you suffer from Z hops? I never see Z hops.
Nigel
Life is keeping interested and excited by knowledge and new things.
Re: life adjust Z - my way
... And are 1000 um equal to 1 mm? ...
yes, of course 1µm = 1 * 10E-6 m; 1mm = 1 * 10E-3 m.
➡ regarding the direction of the bedlevel correction: sorry, never needed it and don't know.
@nigel: life -> live. 🙄 noticed my typo after i couldn't edit the title anymore.
dem inscheniör is' nix zu schwör...
Re: life adjust Z - my way
Hello Jeff,
Thank you very much for such a brilliant way to calibrate the printer! I have one question - does this calibration take into account the "bed level correction" option found under "calibration"? My left side of bed seems to be slightly higher than the right side and, even though I lowered the left side by -50 in the "bed level correction", it doesn't seem to affect the printing quality - the left front corner of the square seems to be squished more. Thank you in advance!
Ok. it affects the bed, but it looks like the + and - are inverted in the firmware.
Taken from the latest manual:
6.3.9.1 Bed level correction (kit only)
A bed level correction is an advanced feature introduced in the firmware 3.0.6 and is
designed to allow advanced users to correct for the slightest imperfections in the first layer.
This feature can be found in Calibration - Bed level correction. For example if the first
layer seems to be ever so slightly more squished on the right side. You can virtually lower
the bed by -20 microns on the right side. Settings are available for Left, Right, Front and
Back. The limit is +-50 microns and even +-20 microns can make a huge difference. When
you are using this function, do small incremental changes. Negative value will act as
lowering the bed in the selected direction.
My squares indicate that negative value actually raises the bed, and positive lowers the bed. I'm almost certain it is that way - went through 10 squares, will post photos later.