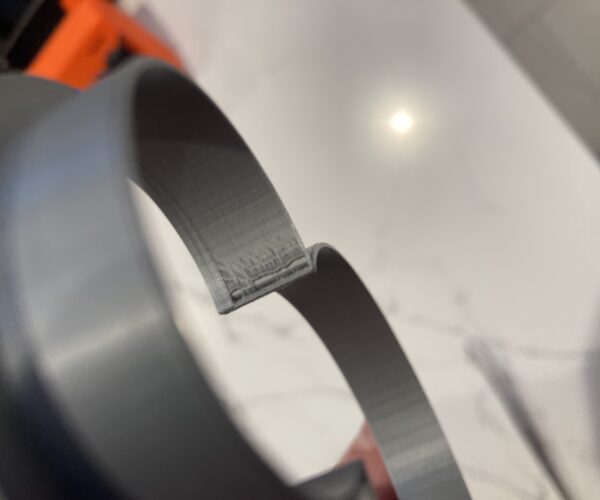
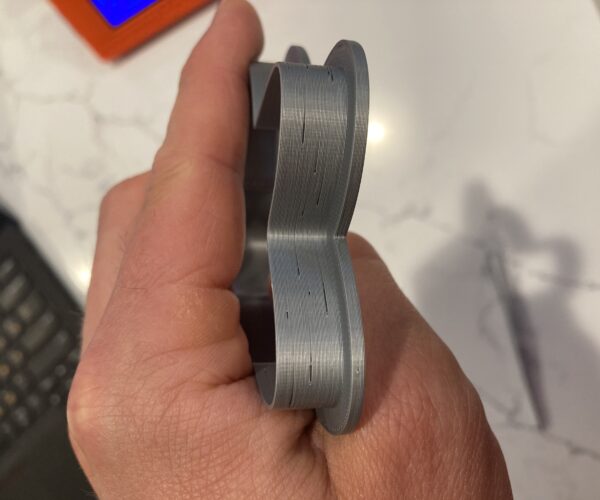
Large gaps on the seam
Hi everybody,
I got my prusa not so long ago and had issues with underextrusion at first. Ended up printing everything with 1.04 multiplier while I continue to talk to support to see if that's really an answer.
Meanwhile, i tried printing a couple items, and see issues with the seam. It looks like seam is melting away causing perimeter to fail. I tried changing the seam position, but it doesn't help. I've read on this forum that people adjust retraction and z-lift, but couldn't quite understand what should the new settings be. Can somebody advise, please?
Print settings: 0.2mm; 215C; 1.04 extrusion multiplier. I print using PLA the filament that came with the printer.
Here're a couple of images from my latest prints with different seam positions.
The project and STL are here: cutter
Best Answer by --:
@doctorshtein
Do i understand it correctly, that depending on the total wall thickness the slicer may choose different extrusion widths even though those are technically "perimeters"?
Yes - the short answer. The slicer does some obtuse math when planning moves and extrusions. When a wall is 1.5 mm thick, there are several solutions to build it: 0.5mm x 3; 0.45 mm x 2 + 0.6 mm x1; and so on. While the slicer will generally bias towards the settings, why the slicer selects one set of values over another?? I've given up trying to understand it - some things I've seen make zero sense. Yet other times everything is just as you'd expect. Other slicers have similar tendencies - though while Cura may be better than Simplify3d and Pslicer at some things, Simplify sometimes better than Cura, and then Slicer better at some than both the others. 3D printing at the consumer level is still in its infancy.
Seams are tough to diagnose exactly why certain features are the way they are. One attribute of a seam is how far the nozzle travels before it starts extruding. When seams are aligned, the nozzle is generally close by, on an inner perimeter or doing infill. When random, the nozzle must move farther. So when the nozzle starts pushing out filament, the characteristics of the flow are different depending on filament type and temperature (the nozzle temp is not maintained to a precise value - thermal mass helps, but when extruding the temp can drop, when traveling the temp can increase and overshoot; the cooling fan can kick on and drop the temp). Retraction, wipe, z-lift, even nozzle temp, play into making it all work as expected. Even the type of filament and it's characteristics have a role. So there is going to be variation that's beyond the printers ability to control, too.
In your examples, even the color of filament is having an effect. Metallic filled filaments like the Prusa silver visually magnify printing effects. The metallic pigments flow around making bright and dark areas that can accentuate printing artifacts. Where a matte filled filament will look quite good printing the exact same part and seams virtually disappear.
Back to wall thickness. Design and print whatever you want - there's no restrictions on making a wall 1.5mm or 1.487mm thick. The main thing to understand is that when building complex parts, e.g, stepped internal structures, those structures may impact the slicer and walls can be affected - the perimeters will change and you end up with visible changes to the external perimeters. It usually goes back to the slicer doing its best - but making compromises. And yes - Prusa is working on ways to make these things better. As is Cura and Simplify3d.
Here's an example of a part that was designed to force some of these wall issues:
And a comparison of what I finally decided was as good as I could do with it.
Sadly - each part requires a different solution.
RE: Large gaps on the seam
Walls way too thin. Next.
RE: Large gaps on the seam
Redesign with walls 2.5mm thick and then slice with the default settings.
Cheerio,
RE: Large gaps on the seam
Thank you! Will do that.
Can you help me understand, why is it happening on a thin wall? Looking at prusa's website they recommend 0.86 for 2 perimeters. I've got 0.85mm which is a bit less.
Is 2.5mm a minimal wall width for any model not in a vase mode?
RE: Large gaps on the seam
Always go larger for wall thickness. There are 'artefacts' in the way the slicer decides extrusion widths (true of most any slicer). If you do have a part with walls below the extrusion width, enable Thin Wall detection - the slicer then knows to not toss out smaller details.
I doubt its the wall thickness causing the warts. Other settings are usually more of an influence. Try using rear or aligned, then have a look at the seams in each format. Are the rear or aligned seams "better" than the random seams? If yes, then travel may have something to do with the difference: and looking at wipe, retract and lift may help.
ps: it is okay to have 1mm thick walls - absolutely no rule against it. Even a 0.6 mm wall is okay. You may get artefacts at certain values, but generally they just work.
RE: Large gaps on the seam
@tim-2
the first photo (in the post above) was for the "nearest", second for "random" and third for "rear". Rear is the best, but it also so happened that the "rear" was on a straight line, so dunno if that made a difference.
There are 'artefacts' in the way the slicer decides extrusion widths (true of most any slicer)
Do i understand it correctly, that depending on the total wall thickness the slicer may choose different extrusion widths even though those are technically "perimeters"?
RE: Large gaps on the seam
@doctorshtein
Do i understand it correctly, that depending on the total wall thickness the slicer may choose different extrusion widths even though those are technically "perimeters"?
Yes - the short answer. The slicer does some obtuse math when planning moves and extrusions. When a wall is 1.5 mm thick, there are several solutions to build it: 0.5mm x 3; 0.45 mm x 2 + 0.6 mm x1; and so on. While the slicer will generally bias towards the settings, why the slicer selects one set of values over another?? I've given up trying to understand it - some things I've seen make zero sense. Yet other times everything is just as you'd expect. Other slicers have similar tendencies - though while Cura may be better than Simplify3d and Pslicer at some things, Simplify sometimes better than Cura, and then Slicer better at some than both the others. 3D printing at the consumer level is still in its infancy.
Seams are tough to diagnose exactly why certain features are the way they are. One attribute of a seam is how far the nozzle travels before it starts extruding. When seams are aligned, the nozzle is generally close by, on an inner perimeter or doing infill. When random, the nozzle must move farther. So when the nozzle starts pushing out filament, the characteristics of the flow are different depending on filament type and temperature (the nozzle temp is not maintained to a precise value - thermal mass helps, but when extruding the temp can drop, when traveling the temp can increase and overshoot; the cooling fan can kick on and drop the temp). Retraction, wipe, z-lift, even nozzle temp, play into making it all work as expected. Even the type of filament and it's characteristics have a role. So there is going to be variation that's beyond the printers ability to control, too.
In your examples, even the color of filament is having an effect. Metallic filled filaments like the Prusa silver visually magnify printing effects. The metallic pigments flow around making bright and dark areas that can accentuate printing artifacts. Where a matte filled filament will look quite good printing the exact same part and seams virtually disappear.
Back to wall thickness. Design and print whatever you want - there's no restrictions on making a wall 1.5mm or 1.487mm thick. The main thing to understand is that when building complex parts, e.g, stepped internal structures, those structures may impact the slicer and walls can be affected - the perimeters will change and you end up with visible changes to the external perimeters. It usually goes back to the slicer doing its best - but making compromises. And yes - Prusa is working on ways to make these things better. As is Cura and Simplify3d.
Here's an example of a part that was designed to force some of these wall issues:
And a comparison of what I finally decided was as good as I could do with it.
Sadly - each part requires a different solution.
RE: Large gaps on the seam
Thank you, Tim!
This is very detailed and is very helpful!


