Re: First layer issues? Look here!
It is somewhere in the menu. For the front, back, left and right you could set a manual offset of very small steps in a small range. So if your middle is to high, you theoretically could raise the front, back, left and, right.
You will find the infos here:
https://help.prusa3d.com/l/en/article/TPGip0OmaP-bed-level-correction-kit-only
Oh and THANK YOU! You are the first to finally report back that my fix improves things:-) Have gotten no feedback yet what so ever. I am still 100% convinced that this is it.
Is this only for the latest FW? i have not installed that FW, still on the last gold fw.
have you compared with that FW?
Re: First layer issues? Look here!
The first layer issues have been here since day one of MK3
What is the last gold firmware?
Re: First layer issues? Look here!
The first layer issues have been here since day one of MK3
What is the last gold firmware?
really dumb question, do I need to do anything differently with the firmware or just print normally?
Re: First layer issues? Look here!
The first layer issues have been here since day one of MK3
What is the last gold firmware?
3.1.1 -- 201
Re: First layer issues? Look here!
The first layer issues have been here since day one of MK3
What is the last gold firmware?
3.1.1 -- 201
But 3.1.2 is also final?!
Re: First layer issues? Look here!
The first layer issues have been here since day one of MK3
What is the last gold firmware?
really dumb question, do I need to do anything differently with the firmware or just print normally?
Just print normally! If you did your xyz calibration with a very warm pinda, than I would repeat that. And obviously you want to tune your 1st layer height perfectly using PLA.
Re: First layer issues? Look here!
The first layer issues have been here since day one of MK3
What is the last gold firmware?
3.1.1 -- 201
But 3.1.2 is also final?!
3.1.2 is a beta
Re: First layer issues? Look here!
3.1.1 -- 201
But 3.1.2 is also final?!
3.1.2 is a beta
is the reason i'm not seeing much of a problem that my live z is 0.390?
Re: First layer issues? Look here!
I am still 100% convinced that this is it.
You were also 100% convinced the pindas were bad. Lol
Re: First layer issues? Look here!
Just print normally! If you did your xyz calibration with a very warm pinda, than I would repeat that. And obviously you want to tune your 1st layer height perfectly using PLA.
I think my problems lie elsewhere. I'm more concerned with the fact that PINDA is quite happy to record >1mm variances and tell me everything is okay, while prusa support says > .2 is cause for concern.
Re: First layer issues? Look here!
Hard to tell from one measurement. You have to compare two measurements. With stable temperature in between.
Re: First layer issues? Look here!
Hard to tell from one measurement. You have to compare two measurements. With stable temperature in between.
multiple G81s are stable, I've done them all cold so far. Spent quite a bit of time adding shims to the standoffs under the bed and now I'm within about .25-.3 front to back, a huge improvement already.
What material are you shimming with? May try this out myself.
My MK3 Parts: [Bowden] [New Shoes] [TPU Micro Springs]
Re: First layer issues? Look here!
Hard to tell from one measurement. You have to compare two measurements. With stable temperature in between.
multiple G81s are stable, I've done them all cold so far. Spent quite a bit of time adding shims to the standoffs under the bed and now I'm within about .25-.3 front to back, a huge improvement already.
What material are you shimming with? May try this out myself.
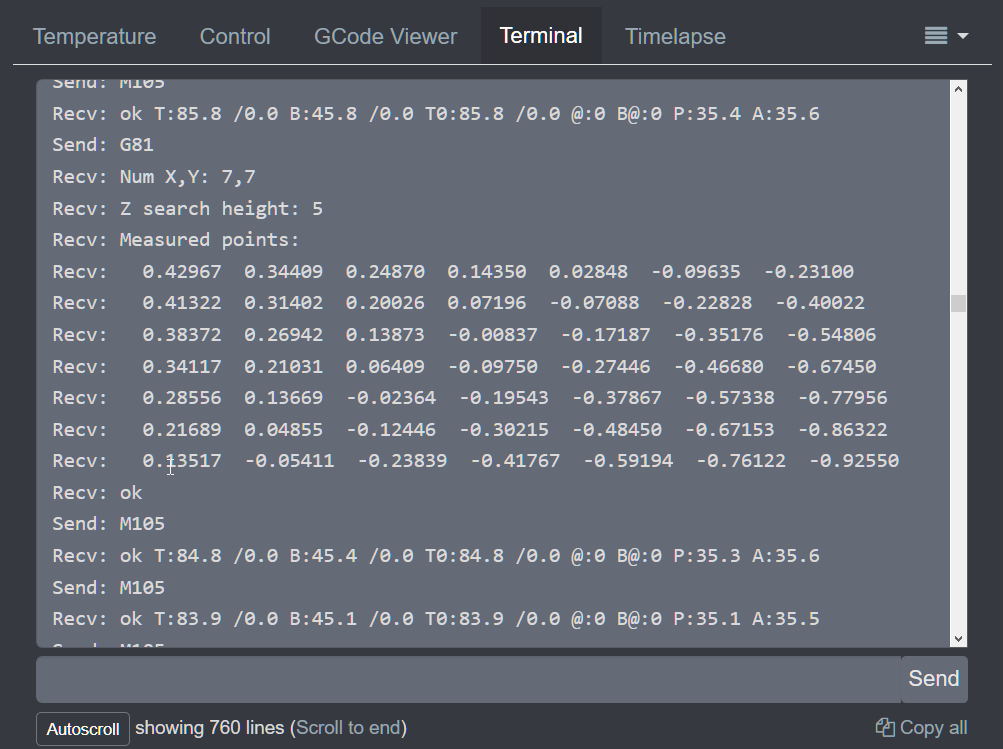
easiest method I came up with was to add layers of tape between the frame and the metal standoff, adding about .1mm per layer. This is what I got so far which is much better and closer to the .2 they suggest, except for the rear left.
![]()
Re: First layer issues? Look here!
I've used steel M3 shims with a .1mm thickness. Same results here, great improvement in terms of first layer consistency across the printbed. It's taken a good few hours to get within 0.3mm from minimum to maximum height though. Partly because adding a 0.1mm shim doesn't always translate into a 0.1mm higher bed but also due to the steel shims don't staying where you want them as they get intimate with the bed magnets 😆
Could you please share some pictures? What are shims looking like and how do you stack them?
Re: First layer issues? Look here!
Shims are essentially washers with a highly defined thickness, see attached picture. M3 shims have the identical inner and outer diameter as the spacers separating the heatbed and Y-carriage so you can place them there nicely. You add them at any points where the heatbed is lower compared to the highest point.
I did a load of G80+G81 measurements between each addition of shims and plotted the results in graphs. I first did some tests to ensure that the bed levels were at steady state before doing the measurements which is at least 10 minutes after the printer display states the temperature has been reached. I did the measurements at PLA bed temperature rather than cold to rule out any deformations occurring at temperature change.
It wasn't as easy as I estimated as sometimes the bed doesn't move at all when you add another shim so there's more trial and error. I suspected this was down to the torque you use to tighten the M3 screws in the heat bed but it may as well have been the temperature compensation issues discussed in this topic. In any case, make sure you put some thread lubricant on the threads and under the head of the bolt and to use the tightening sequence from the build manual to minimize bed distortions. The thread lubricant can also be used to stick the shims in place with a light coating on each side, it won't hurt. I started to make sure the bed centre was high enough because this one you can't reach without loosening the entire heatbed. Then you can adjust the edge points and finish in the corners.
I see I managed to get it the maximum and minimum level to within 0.15mm, not perfect so will have another go at some point but it's made a huge difference.
Do you have any idea by the way what algorithm is used to turn the 9 bed level measurements into a 7x7 matrix of points?
Re: First layer issues? Look here!
I've used steel M3 shims with a .1mm thickness.
this is exactly what I've been looking for, but haven't been able to find locally. In the end I went with the tape because as you said its a pain to get them to stick.
Now it looks like I may have to sand down a couple of shims in the rear because they're so high compared to the rest.
Re: First layer issues? Look here!
I finally found some on ebay that were reasonably priced although the majority was shipping. Turns out when I received them they were sent from a company on the same industrial estate as my work... M3 washers don't seem to be that common but I would advise you to look for them, either online or at local hardware stores. Sanding the spacers down will be a major pain and you won't be able to guarantee perpendicularity or flatness of the surfaces. It's also rather permanent and you will need some trial and error.
I checked if all the spacers were of equal height and they were so you can't mix them around and get a better levelling that way unfortunately.
The tape may just work fine although you may have some set as it warms up. Please let everyone know what your experience is because it takes quite some patience to play "where's my shim" with the magnetic heatbed 
Re: First layer issues? Look here!
Shims are essentially washers with a highly defined thickness, see attached picture. M3 shims have the identical inner and outer diameter as the spacers separating the heatbed and Y-carriage so you can place them there nicely. You add them at any points where the heatbed is lower compared to the highest point.
I did a load of G80+G81 measurements between each addition of shims and plotted the results in graphs. I first did some tests to ensure that the bed levels were at steady state before doing the measurements which is at least 10 minutes after the printer display states the temperature has been reached. I did the measurements at PLA bed temperature rather than cold to rule out any deformations occurring at temperature change.
It wasn't as easy as I estimated as sometimes the bed doesn't move at all when you add another shim so there's more trial and error. I suspected this was down to the torque you use to tighten the M3 screws in the heat bed but it may as well have been the temperature compensation issues discussed in this topic. In any case, make sure you put some thread lubricant on the threads and under the head of the bolt and to use the tightening sequence from the build manual to minimize bed distortions. The thread lubricant can also be used to stick the shims in place with a light coating on each side, it won't hurt. I started to make sure the bed centre was high enough because this one you can't reach without loosening the entire heatbed. Then you can adjust the edge points and finish in the corners.
I see I managed to get it the maximum and minimum level to within 0.15mm, not perfect so will have another go at some point but it's made a huge difference.
Do you have any idea by the way what algorithm is used to turn the 9 bed level measurements into a 7x7 matrix of points?
Awesome, got some of these on the way: https://www.amazon.com/gp/product/B00PGHX67Q/ref=oh_aui_detailpage_o00_s00?ie=UTF8&psc=1
What graphing software is that? Looks nice. 🙂
My MK3 Parts: [Bowden] [New Shoes] [TPU Micro Springs]