first layer issue + left corner not sticking
Hello,
I am new to 3D printing and just installed a 3MKS last week, at first glance successfully, followed all the instruction and first prints were fine, the ones from the SD card:
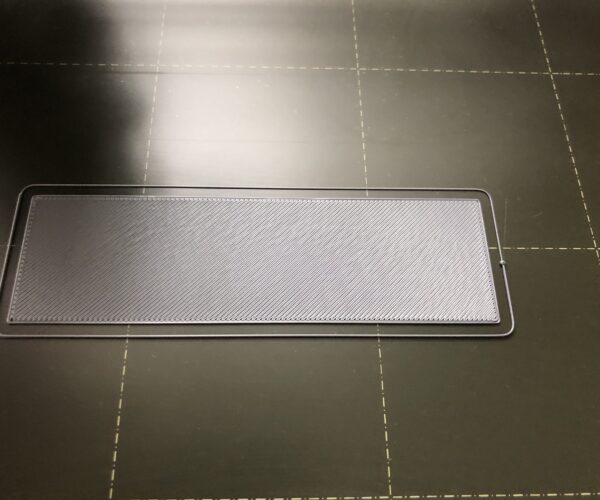
then I tried to print something that I designed, it was a logo on a flat rectangular base (120 x 40 mm) and the " fun" started:
at this point i recalibrated the first layer and in the end I've got it to stick to the bed but the first layer was not perfect, it still had some none sticking lines. And because of that I recalibrated everything, started with pinda probe, was calibrated with a zip tie, I lowered it to a credit card thickness away from the smooth PEI metal sheet.
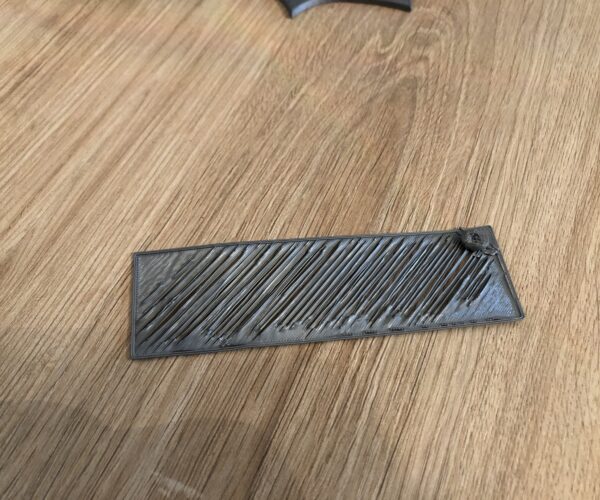
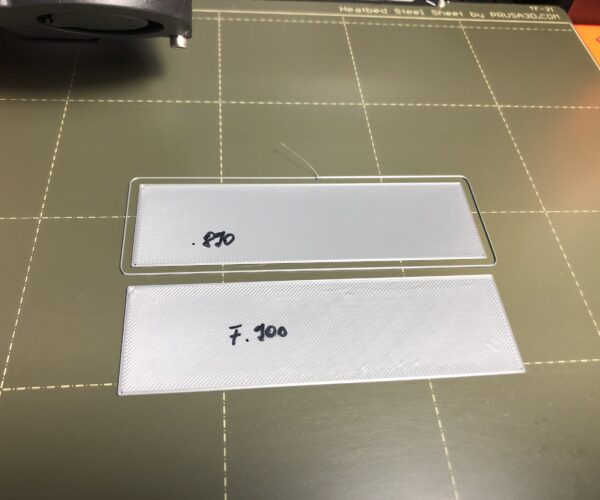
Before my questions this is the result that I've got with my first layer rectangle:
my first question is: is this acceptable? because on the smaller prints the first lier is spotles, all the lines are straight on all directions. I should mention that is a 0.3 mm layer and tried with diffrent speeds...20, 25, 35...same result.
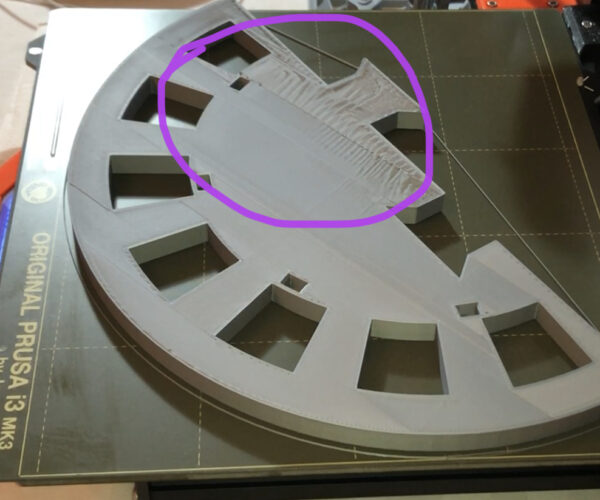
then I've printed a large piece and I noticed that my left side is not sticking very well, especially the left back corner, i've notice it before I've redone all the calibrations and while doing the z calibration, when the 4 points are looked, I've noticed a slightly difference (nozzle to bed) between the distance from the left front side of the bed. now the question is, how does the auto calibration is done, does it using the pinda to measure the distance from the bed and adjusts accordingly or measures in only one point and keeps that distance, if I have a lowered left rear corner that is normal not to stick very well.
Before I disassemble the bed and recheck the bearings tightening from that side, is there something that I didn't think of ?
this is a print before all the calibrations:
after recalibrating everything I have a better result but still that corner was a little removed.
live z is at - 0.825
the pei sheet was rigorous cleaned with dish washing soap while cold, rinsed with water, dried with paper towels before the big prints.
thank you in advance for any advice!
RE: first layer issue + left corner not sticking
Use Isopropyl Alcohol as the final clean on the smooth PEI sheet and avoid touching the sheet with your fingers afterwards so the surface remains pristine for your prints to stick to.
You failed to mention what filament type you were printing with. The Prusa supplied sample filament roll is Pruisament PLA.
Also your first layer appears to be a bit high still; it needs to be squished down a bit more. Its base underneath should be very smooth with little or no ridging when you remove it from the printbed. Have you followed the first layer calibration procedure documented in the Prusa mk3/mk3s handbook?
The prints in the later pictures appear to be curling up a bit and lifting on one side. Is there a draft of air coming from that side to cause your print to warp? If so then I'd advise that you place a windbreak on that side or even better, enclose your printer in a box.
RE: first layer issue + left corner not sticking
@jonathan-lin
Hi Jonathan, thank you very much for your replay.
- yes, forgot to mention that I used the PLA provided with kit.
- yes I followed the instructions for the first layer, twice actually, and you might be right, I'll try to lower the nozzle a bit. The problem is that the layers are so small, can't really understand how should look the final result. As I was saying the z is at -0.825 now, I tried multiple times to adjust the layer starting from .810 till .875 ... that number (.825) looked most accurate to me..
- I am using IPA for cleaning the bed, forgot to mention that as well, after each print with a new paper towel, while the steel sheet is cold. Tried with ipa and without it, same result, the only differences was after I set 7 x 7 mesh calibration instead of 3x3.
- the printer is in front of a big glass door, on a table, it might get more cold air since the temps around here was 6-8 C. I was thinking about that and I moved the printer in another room, away from windows but I had the same result...
Thank you again for trying to help! I'll redo the layer calibration and post here the result.
RE: first layer issue + left corner not sticking
I have textured sheet, printing with PETG - same issue - there are two spots on my bed that seem to not hold the print. I changed the orientation of the printed object so that I don't print on the "bad spots". They print fine if I avoid those areas, but that's not a good long term solution. It just works in my particular case at the moment. That may help you in the short term until you can figure this out?
I cleaned the sheet, I did all the calibrations and the 3x3 printed squares first layer bed leveling thing - all looked good, but the prints still curl up at 2 points on the bed. No idea why. (I'm trying to print the covid masks)
RE: first layer issue + left corner not sticking
@jonathan-lin
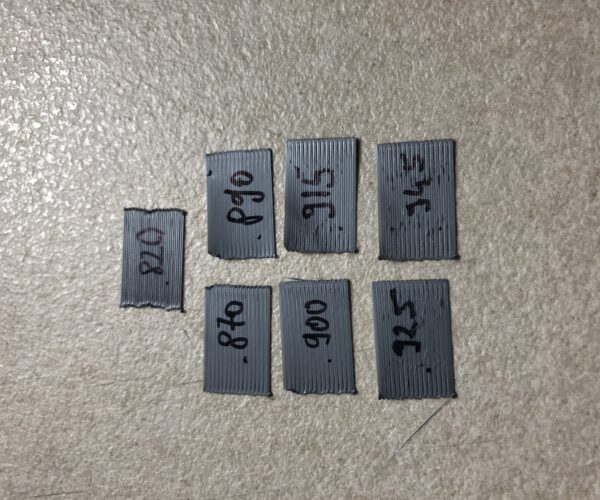
I've redone the first layer calibration and noticed that what was acceptable at my last calibration was not any more:
so I tried adjusting Z and compared with multiple choices, above .820 all the single lines were sticking very well but the final square was the problem, at . 945 the lines were to squashed so that was to max limit, I played between .820 and .945 till I found a good place
first it look acceptable at .900 and I tried to print a layer of .3 x 100 x 30 and still had some fuzzy areas on the bottom, I tried then with .890 and I had the best result so far, I think:
After this I've printed 2 small prints, a turtle and the gear spinner from the SD card, delivered with the printer, no problems in first layer but I did noticed an problem on the gear part, the outside of it is not smooth, there are some sort of scratches, is this normal?
I did print the mini Benchy and had no issue, before this recalibration 
RE: first layer issue + left corner not sticking
@sleepinggiant
Thank you very much for your reply, it seems that I solved the first layer print, at least on a small surface, I have to test again that corner with a big print or even I should move this first layer of 100 x 30 x .3 on that corner to test if will properly stick...
RE: first layer issue + left corner not sticking
@sleepinggiant
Try cleaning your textured bed with warm soapy water then rinsing with fresh and drying it.
RE: first layer issue + left corner not sticking
@george-buzea
The vertical scratches could be evidence of ringing; check that your x and y belts and rods are clean and reasonably taut. Also check the noise generated by x and y linear bearings as they move slowly over their smooth rods. If one or more of the bearings rattle then you may have lost a ball in one or more of the bearings and will need to replace them.
For prints having issues sticking to the left corner of the smooth bed plate; try washing your plate with warm soapy water, rinsing and drying it. Also try flipping the plate over to the second side and see if the problem area moves.
RE: first layer issue + left corner not sticking
@jonathan-lin
(I'm using textured sheet) Tried this already, thank j-lin. Also tried isopropyl alcohol. I have textured sheet 1 profile chosen/set on the LCD settings. It's hit-or-miss if it sticks or not. The PETG I'm using was in airtight sealed package, but is over a year old, so it could just be some weirdness caused by old filament?
In addition I changed so that mesh bed level check is like as high quality as it can go (in LCD menu, latest firmware I downloaded/upgraded to two days ago).
So the yellow revcloud areas highlight where my less sticky areas are (again, it's kinda random) so I ended up just modifying the STL to include little "brim tabs" (highlighted by blue circles) to hold down these narrow parts of these headbands so I could print without worry - but not needing brims all the way around.
RE: first layer issue + left corner not sticking
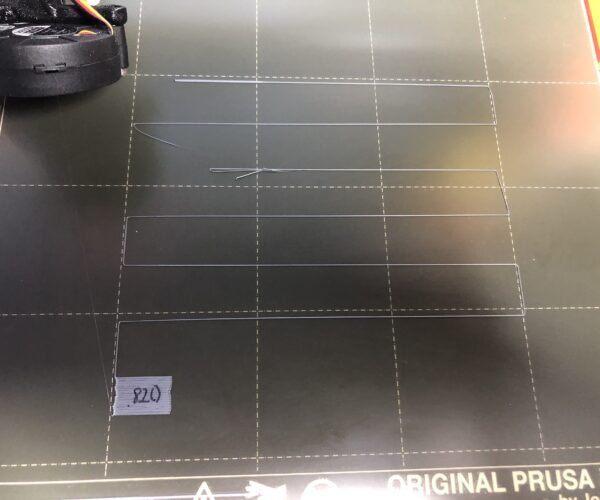
here's from first layer test how is this happening?
RE: first layer issue + left corner not sticking
@george-buzea
I've taken a closer look at your photos in your first post above and noticed something odd in the fifth photo. It looks like your heatbed PCB is mounted directly on the y-carriage frame without the required nine 6x6x3t spacers sitting between the heatbed and the frame.
Also the u-bolt over the bearing in the same picture appears to be non-centered and at a non-perpendicular angle to the bearing; the bearing could be a bit loose.
Can you confirm that you have installed the nine spacers as per steps 21 thru 25 of https://manual.prusa3d.com/Guide/7.+Heatbed++&+PSU+assembly+(Black+PSU)/1153?lang=en ?
You might want to reassemble at least that u-bolt and bearing assembly again ensuring that the u-bolt tops are even above the frame and are nyloc nutted down evenly tight but not too tight against each bearing.
RE: first layer issue + left corner not sticking
@sleepinggiant
Was the PETG stored in the airtight container with a good desiccant?
The first layer test picture appears to be a bit bubbly in places; that is possibly due to
- having absorbed water in the filament used (PETG, PLA? Tempuratures? details are missing)
- the nozzle being too close to the bed restricting the flow of the molten plastic out between the bed and the nozzle
- partial blockage of the nozzle
There is also a possible surface adhesion issue at the middle right of the plate.
The purge strip at the bottom left of the same picture looks to be a bit too squashed (i.e. too wide).
For your brim tabs in your other photo; make them round instead of rectangular. Round brims are less likely to lift.
Also use a straight edge to confirm the flatness of your print plate on the heatbed, you may have a dent or two in your plate that the automatic bed tramming is failing to compensate for.
RE: first layer issue + left corner not sticking
@sleepinggiant
interesting test, can I have the g-code for that or the printer settings? I can build de de g-code...
for the photos, instead pressing the insert/edit image button, press on the Add media button above it, in there you have 2 windows, 1 is for upload media and 1 to select what uploaded media you want to add in the post (media library) - both buttons are in top left corner of the window
RE: first layer issue + left corner not sticking
@jonathan-lin
indeed the u-bolt is not perpendicular, I was thinking about that but the y axis is running smooth, that's why I was asking in the firs post if the printer can calibrate small differences from diffrent points of the bed or measures just one and keeps that offset for all other points.
regarding you previous post, with bearing balls...yes I lost one ball, I actually found it on the table after the printer was installed but according to the manual one ball shouldn't be a problem..also don't know from which bearing dropped..
I'll redo the u-bolts of the bad, check them again and yes, the spacers are installed, the heated pcb is nor installed directly on the frame but on the spacers as in the manual.
Thank you again for helping me!
RE: first layer issue + left corner not sticking
@sleepinggiant
Was the PETG stored in the airtight container with a good desiccant?
The first layer test picture appears to be a bit bubbly in places; that is possibly due to
- having absorbed water in the filament used (PETG, PLA? Tempuratures? details are missing)
- the nozzle being too close to the bed restricting the flow of the molten plastic out between the bed and the nozzle
- partial blockage of the nozzle
There is also a possible surface adhesion issue at the middle right of the plate.
The purge strip at the bottom left of the same picture looks to be a bit too squashed (i.e. too wide).
For your brim tabs in your other photo; make them round instead of rectangular. Round brims are less likely to lift.
Also use a straight edge to confirm the flatness of your print plate on the heatbed, you may have a dent or two in your plate that the automatic bed tramming is failing to compensate for.
Thanks for great replay J-lin - I just tried a roll of new filament instead and it worked way better. I also clean the texture sheet with the green scratchy side of a dish sponge after each print, and it seems to stick pretty well.
The "old" filament was really doing lots of stringing, and no it didn't have dessicant in the bag I don't believe. Maybe it did, not 100% sure - but it was a little brittle compared to the new roll of PETG filament given to me by a friend so that I could print these face shields.
my square tabs could be circular, but they are sticking really well, so I'll just leave them - next time I need them, I will make the round perhaps.
RE: first layer issue + left corner not sticking
Put petg in a oven on 80 degrees for 5 ours, then the moister will go away.
For temperature and how long, search on the web what is needed, or other user can also give input on this.
At the moment i have petg in the oven on 80 degrees, the bag was not sealed very good, and wen i extrude it did not stream good but exploded.
RE: first layer issue + left corner not sticking
@george-buzea
I've taken a closer look at your photos in your first post above and noticed something odd in the fifth photo. It looks like your heatbed PCB is mounted directly on the y-carriage frame without the required nine 6x6x3t spacers sitting between the heatbed and the frame.
Also the u-bolt over the bearing in the same picture appears to be non-centered and at a non-perpendicular angle to the bearing; the bearing could be a bit loose.
Can you confirm that you have installed the nine spacers as per steps 21 thru 25 of https://manual.prusa3d.com/Guide/7.+Heatbed++&+PSU+assembly+(Black+PSU)/1153?lang=en ?
You might want to reassemble at least that u-bolt and bearing assembly again ensuring that the u-bolt tops are even above the frame and are nyloc nutted down evenly tight but not too tight against each bearing.
Hello again,
I have some new findings regarding the first layer calibration/bed leveling and the scratching on the surfaces of the prints.
1. first layer calibration and bed leveling
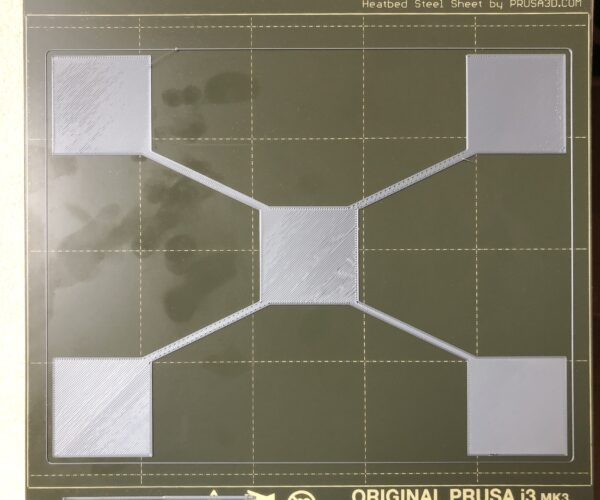
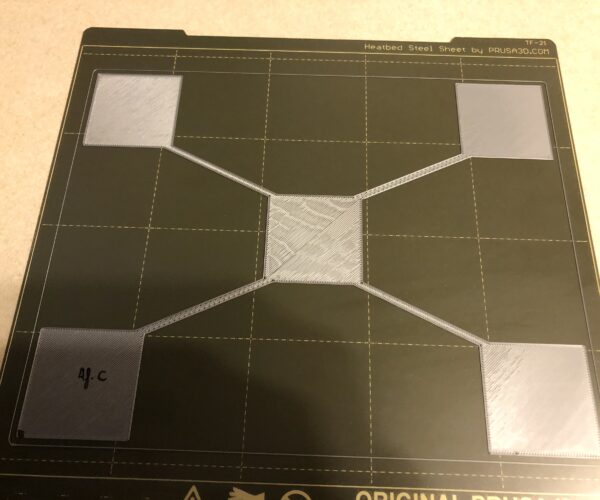
I disassembled the hot bed from the rail and tightened all the nuts of the u bolts with those in a upright position and the nuts all at the same level and with the same torque, before that I've made a test with 5 x 45 mm mm squares placed in each corner and middle, then printed them with PLA at .2 mm hight, this was the before result(215 degrees nozzle and 60 degrees bed):
the right low corner was perfect, left up corner the bed was to high, all the others the bed was to low, after this first test I cleaned the steel sheet and the bed, I found a pice of small PLA between the bed and the sheet so I decided to redo the test once everything was clean, this was the result:
none of them were perfect but the middle was the worst, at this point I've decided to redo the u blots and recalibrate everything, this was the result:
everything almost perfect besides a vertical line of 2.5 cm on the left side lower square and the top corner of the left side upper square. everything else was printed as a sheet and not as threads (once squares were removed from the steel sheet), besides those above mentioned areas, live Z cal is at -.975 if I remember well, i suppose I can get the nozzle a little bit down but for sure I'll spoil the other corners so I was thinking to replace the spacers with springs then I can tight individually more or less to get a balance but those small areas affected... I don't think I can fix with springs, it looks like those areas are passed the screws and near to the edge, like the hot bed is a little crooked, what do you think, worth a try to put those springs?
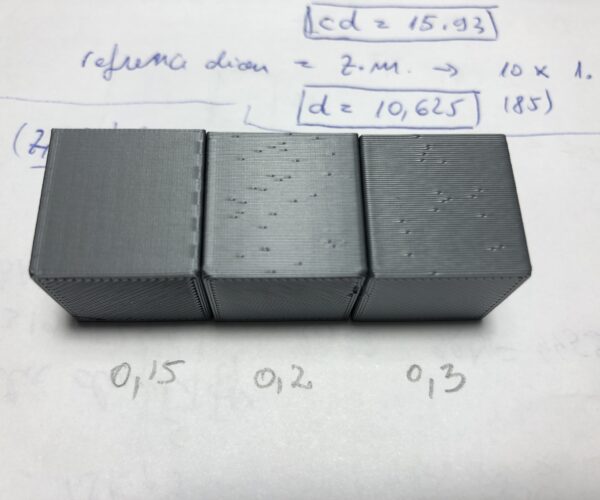
I should also mention that I've printed 3 small 20 mm cubes and measured all sides with a perfect 20 mm on all sides with my .15 mm precision caliper and this brings me to the second part of the story:
2. scratched surfaces
I've noticed that my problem reported earlier was not actually scratches but turns, the extruders is making a hard left or right to close a loop and thats why those things appeared, I don't think is related to any of the axes since I've printed 3 cubes, 20 mm size with the same PLA material, same settings but different height, .15, .20 and .30 mm with a .4 mm nozzle, the one that came with the printer and this was the result:
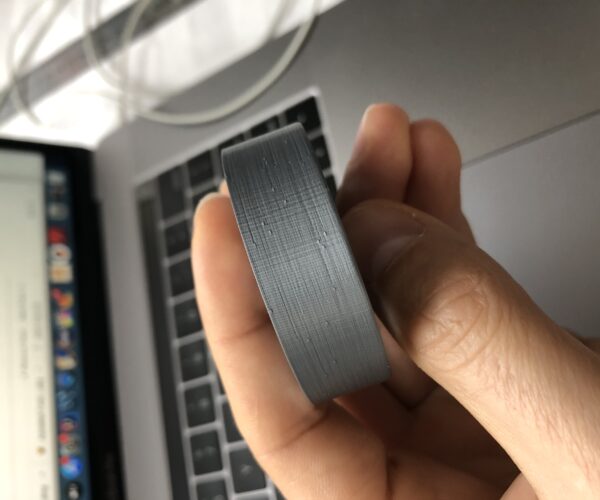
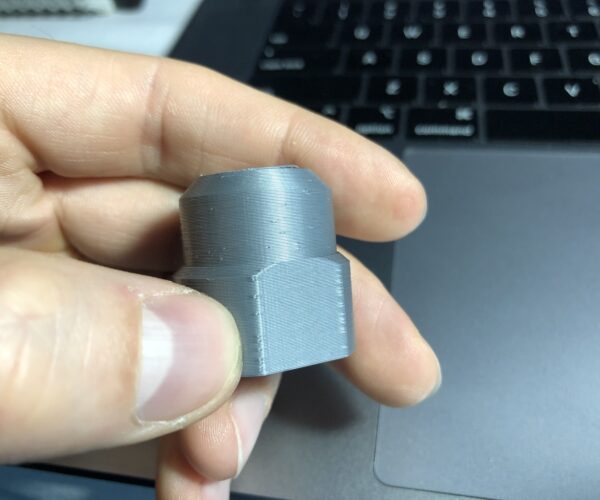
on the .15 those do not appear at all, I looked very carefully but on the others do appear and on the .3 mm those can be most visible that are turns, the I've printed another part ( an adaptor for some device) around 30 mm hight and 24-28 mm diameter with a wrench grab on the 28 mm diameter side and this was the result (PLA, .2 mm high, .4 mm nozzle):
at first glance you'll say that on the lower part (28 mm diameter side) there are no signs of those turnings but on the top side are visible, well no, the turns were made on the edge of the wrench grab cut, are still present on the lower side too:
do you still think that this issue is related to a miss-aligned rail or is something that I can overcome from the slicer?
Thank you very much for all your help
RE: first layer issue + left corner not sticking
I just could't hold myself two years after this post: those are just due to the nozzle shifting layers, they are normal. They're normally placed at the corners of the piece so you don't notice them, but sometimes their place is random.

