Dimensional Accuracy
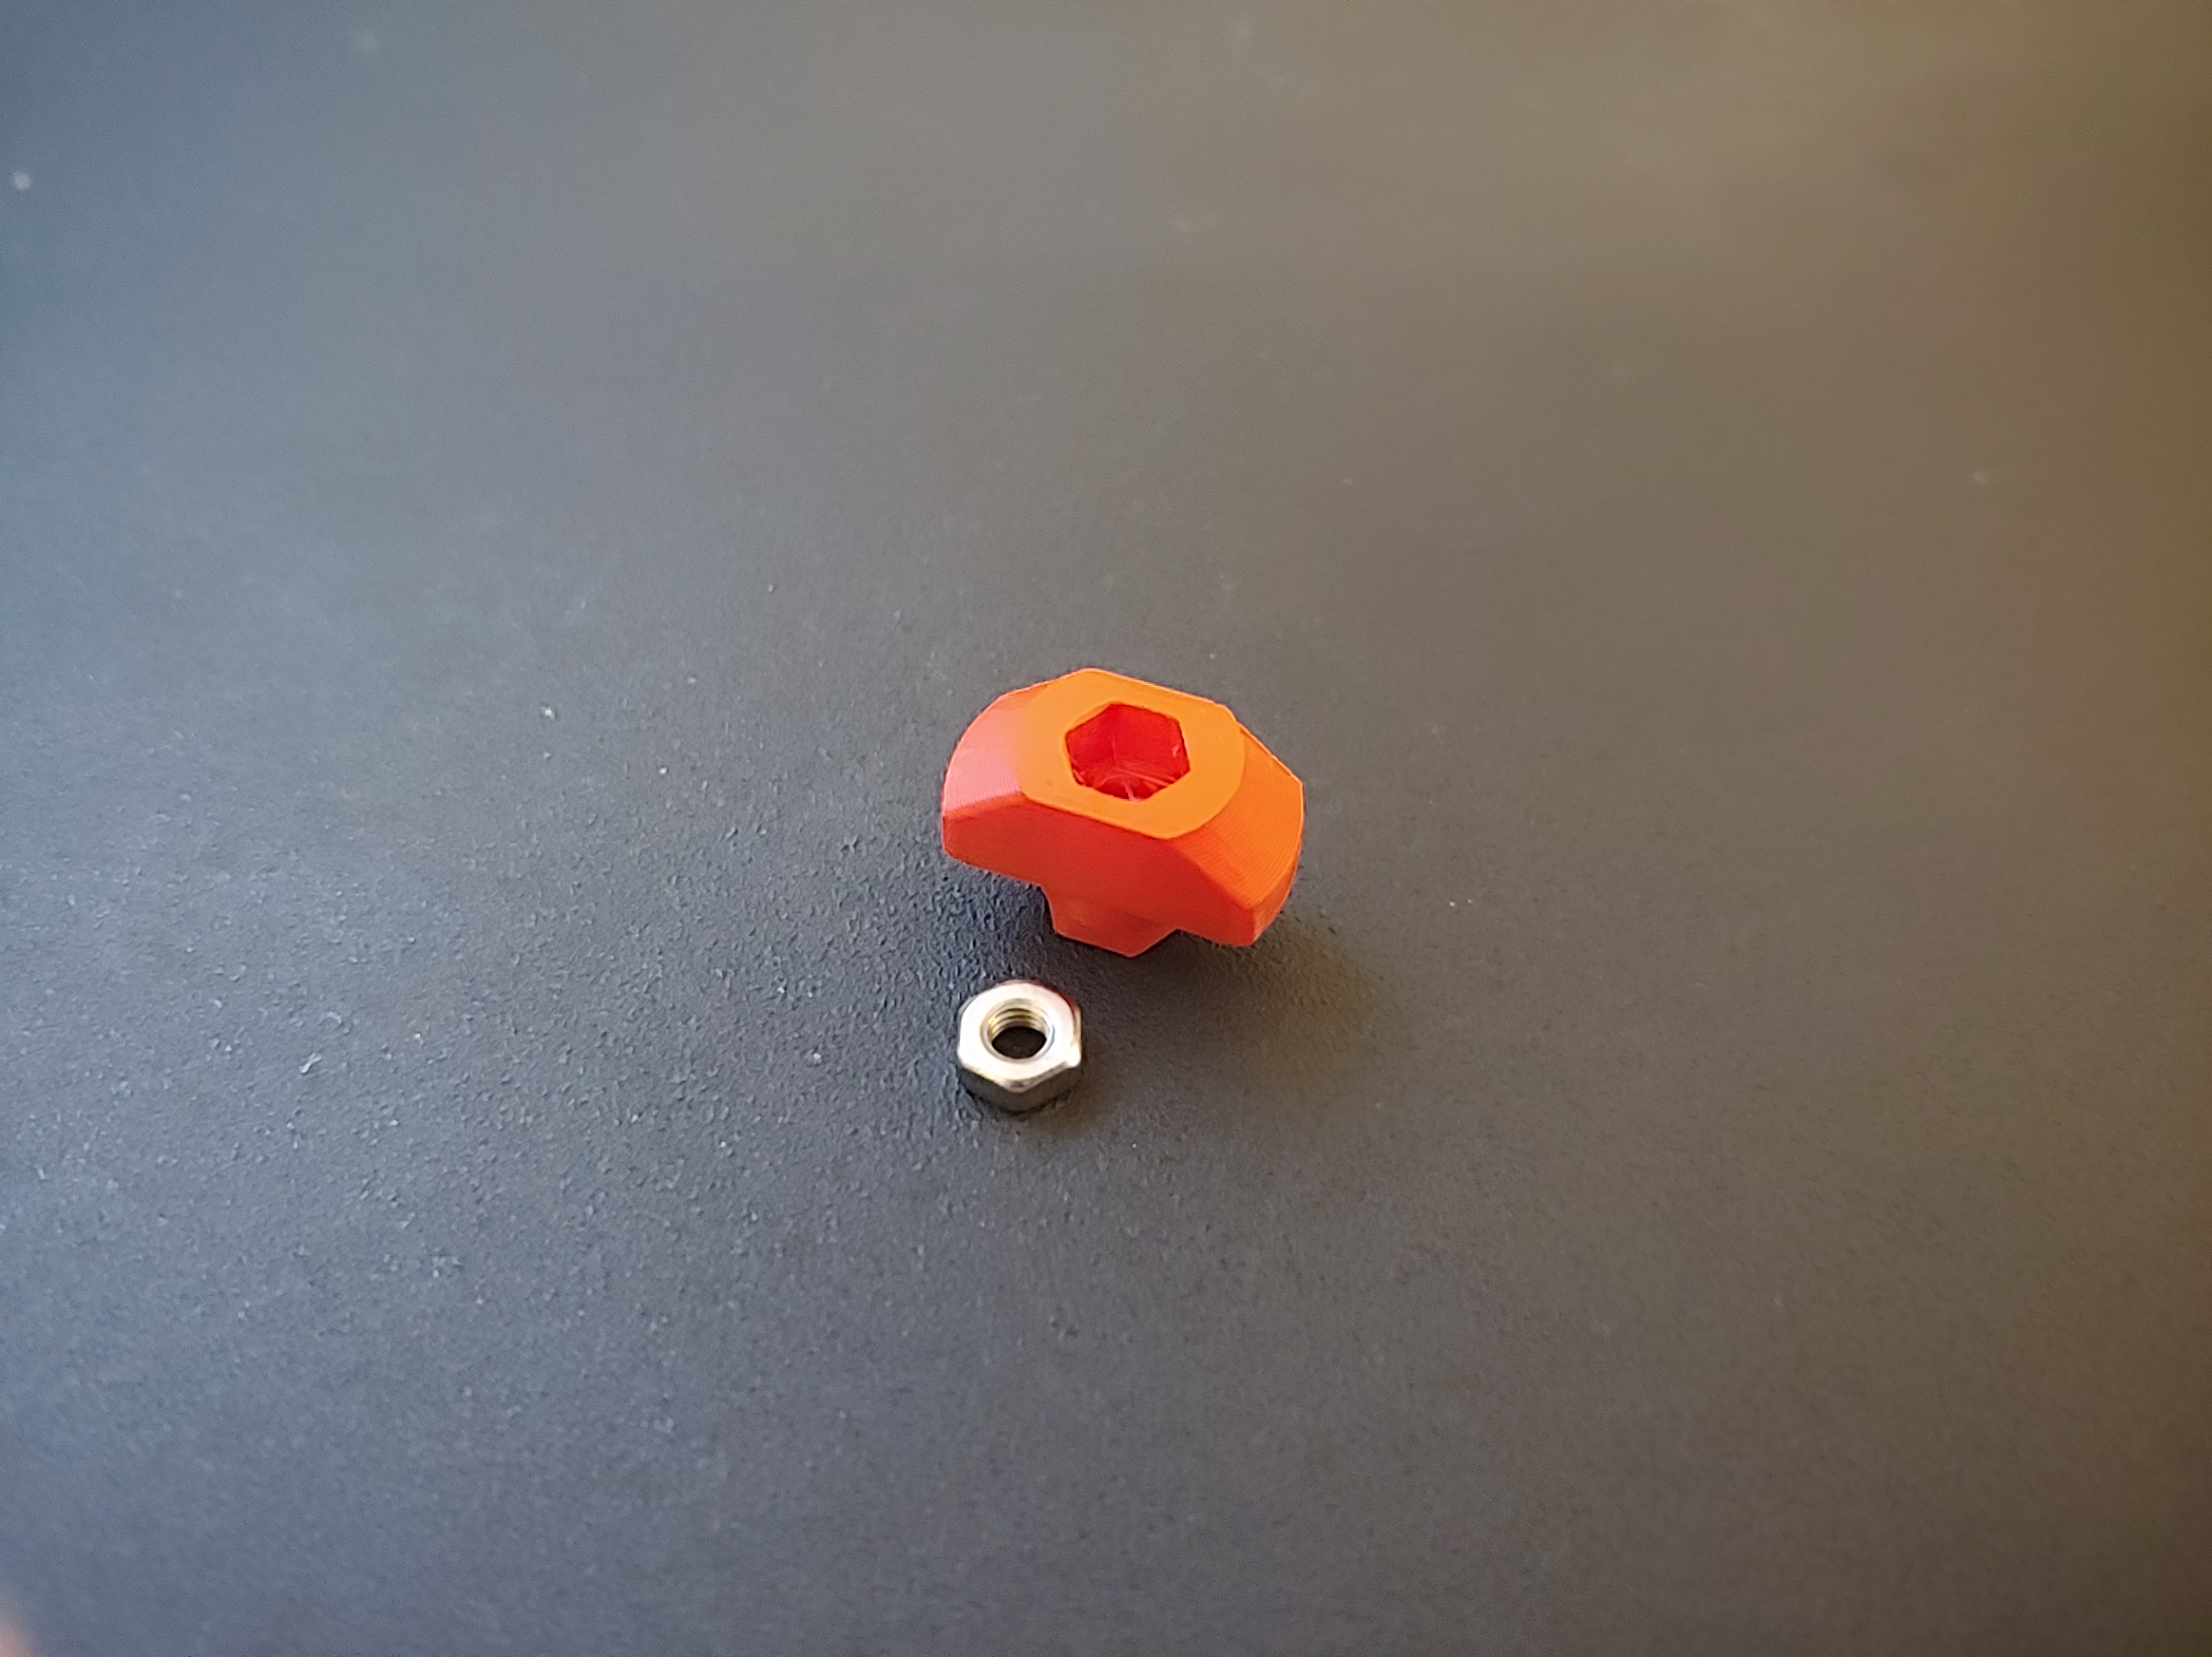
I recently assembled a MK3 printer shortly after Christmas and have been printing without issue. Today I wanted these hard feet found on thingiverse- https://www.thingiverse.com/thing:2805753 . After printing the part, I found that I was unable to place a M3 nut in the T nut part. Measuring the metal nut I had, I found it was 5.45mm across. When measuring the inner diameter of the nut slot on the printed part, I found it was 5.33mm across. There isn't enough room to get the nut forced in and then a screw to pull it the rest of the way in. Is there a way I could get better accuracy so that my parts would fit better?
My print was using Inland PLA+ filament.
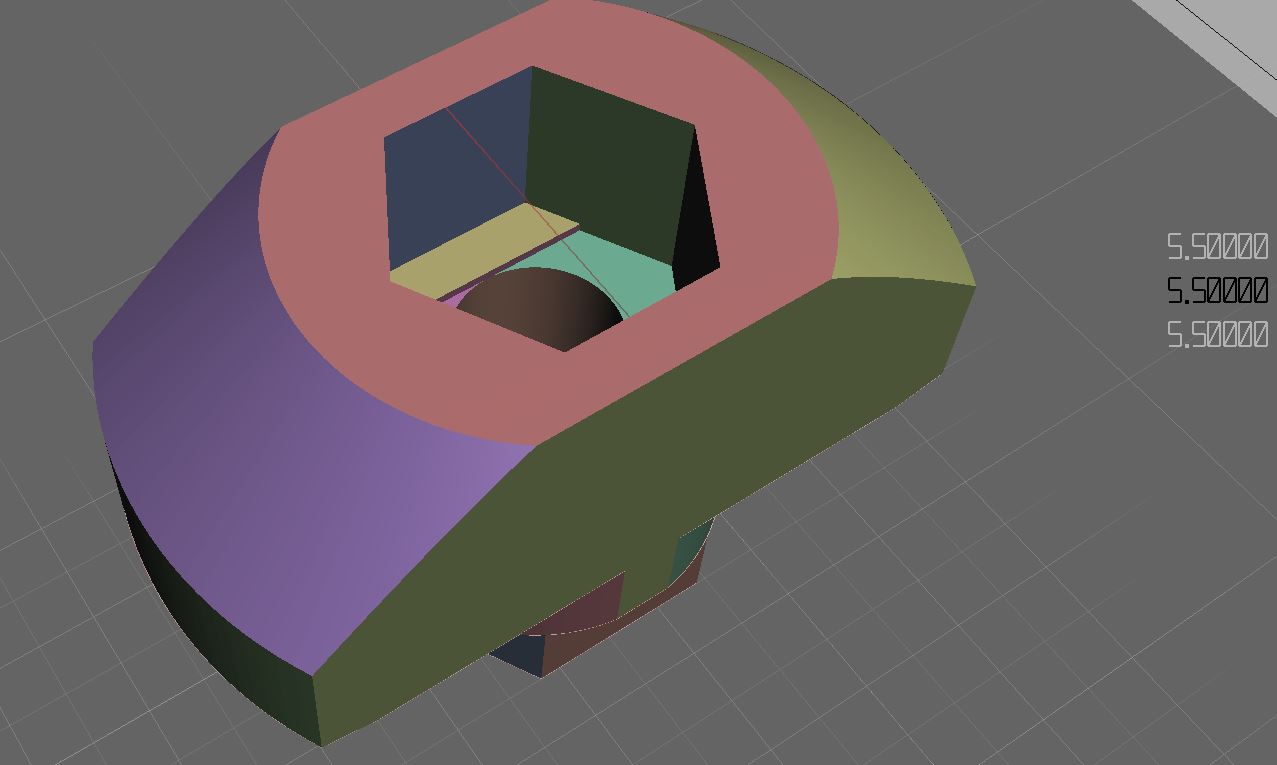
Measuring in meshmixer shows that it is supposed to be 5.5mm across.
Re: Dimensional Accuracy
i would start off by running 10mm of filament.
"mark 100mm from the cap of the extruder up.
preheat. then run 100mm filament in the settings/move axis see how close it is
I have a Prusa,therefore I research.
Re: Dimensional Accuracy
mark at 120mm, then run 100mm, makes measuring easier, especially if over extruding...
Joan
I try to make safe suggestions,You should understand the context and ensure you are happy that they are safe before attempting to apply my suggestions, what you do, is YOUR responsibility.Location Halifax UK
Re: Dimensional Accuracy
mark at 120mm, then run 100mm, makes measuring easier, especially if over extruding...
Joan
What command should I run to manually extrude? I did it from the octoprint UI and it was extruding way too fast.
Re: Dimensional Accuracy
just on the operator panel. you might want to shut it off and preheat before so the starting number is at 0
I have a Prusa,therefore I research.
Re: Dimensional Accuracy
just on the operator panel. you might want to shut it off and preheat before so the starting number is at 0
So I should go to Settings -> Move axis -> Extruder and then specify 100? Or is that a step number?
Re: Dimensional Accuracy
I would use Prontaprint,
Should be in your Prusa Tool list, it normally loads as part of the drivers.
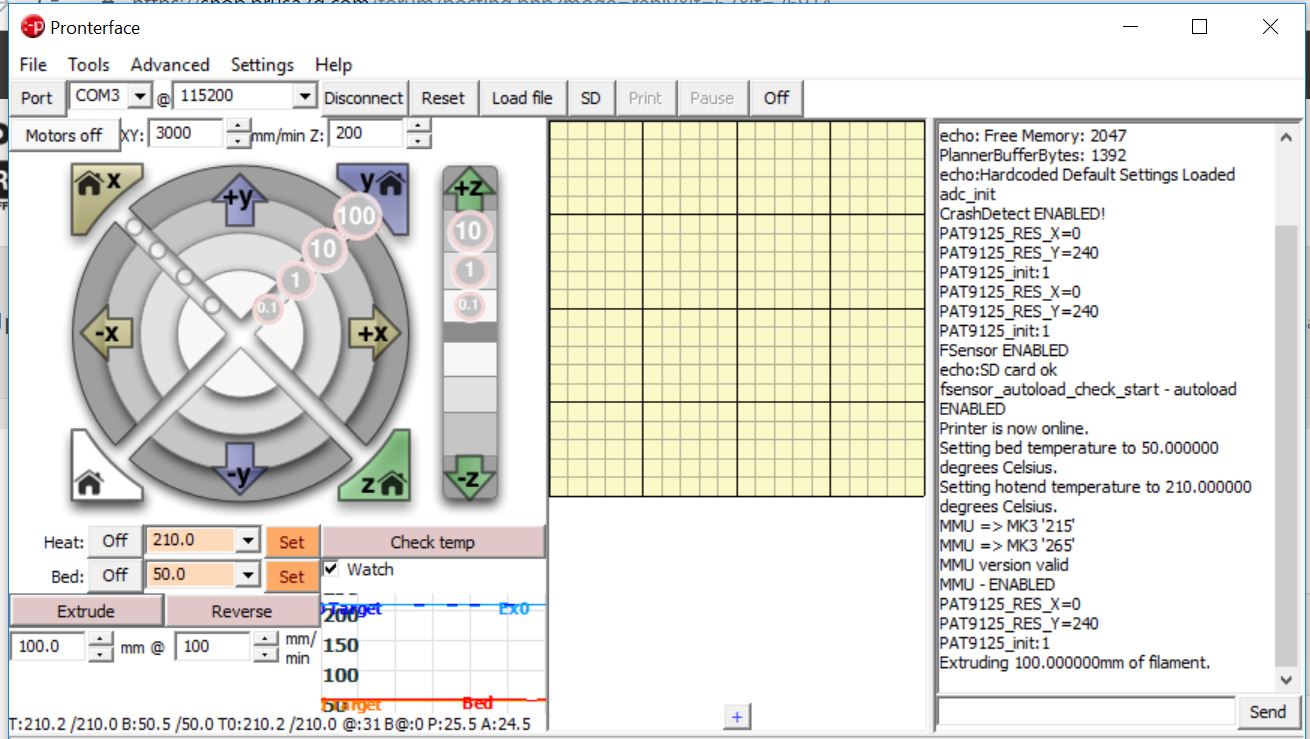
you can connect using USB Might need to turn off the internal RasPi interface, if you are using it...
prontaprint, once connected, can start the extruder heating by pressing the set button, and you can adjust the length to extrude and the speed of extrusion in the boxes to the lower left corner,
regards Joan
I try to make safe suggestions,You should understand the context and ensure you are happy that they are safe before attempting to apply my suggestions, what you do, is YOUR responsibility.Location Halifax UK
Re: Dimensional Accuracy
I would use Prontaprint,
Should be in your Prusa Tool list, it normally loads as part of the drivers.
Prontaprint.JPG
you can connect using USB Might need to turn off the internal RasPi interface, if you are using it...
prontaprint, once connected, can start the extruder heating by pressing the set button, and you can adjust the length to extrude and the speed of extrusion in the boxes to the lower left corner,
regards Joan
I was trying to use Pronterface yesterday, but it didn't seem to be working correctly. It never seemed to be sending the commands to the printer even when connected. Maybe it was due to the RasPi interface being on. I will try again when I get home this evening.
Re: Dimensional Accuracy
the Einsy processor is directed by firmware, to 'Listen' to EITHR the USB Port, OR the internal RasPi port, BUT NOT BOTH at the same time...
so this could be your problem....
drove me bananas at first...
thought the einsy was faulty... I don't have a RaspiW0 installed and my RasPi 3+ wouldn't communicate...
A friend pointed the error of my ways..
Joan
I try to make safe suggestions,You should understand the context and ensure you are happy that they are safe before attempting to apply my suggestions, what you do, is YOUR responsibility.Location Halifax UK
Re: Dimensional Accuracy
Print a calibration object (usually a cube) of known size, 20mm, for instance. Using a pair of dial calibers, check the dimensions of your print. If it's NOT 20mm, then you can go into your printer's firmware and make changes. You can also do this.via Gcode commands from Octoprint or pronterface, doing a calculation and entering new values for X, Y, and Z scaling. I've done this with my non-Prusa printers, but my box-stock Prusa i3 Mk3's printed a 40mm cube to within less than 0.1 mm, so I'm not touching them.
And sorry, I'm at work and I don't remember the specific formulae and Gcode commands, but you can search for both.
Re: Dimensional Accuracy
Okay, feeling particularly ambitious.
Print a cube of known dimensions.
In the 'console function' of your slicer, or Octoprint, execute an M503. This will retrieve your printer's settings. You're looking for Steps per unit: M92 X100.00 Y100.00 Z400.00 E140.00. Your numerical values will be different, of course.
Measure your calibration cube and execute the formula: Steps* dimension expected/dimension measured. For instance if your step value was 100 and the cube was 20mm and you measured 20.2mm, then you would calculate (20*100)/20.2. that gives you 99.01. If this was your X dimension, then you'd execute M92 X99.01, then do the same for the Y and Z axes.
After you've entered the new values, execute M500 to save them to your printer's firmware.
Print another cube and verify your changes. Hopefully, they're better.
Re: Dimensional Accuracy
The X, Y, and Z movements are determined by factory-manufactured belts and screws; it is very unlikely that they are off by any significant amount that you could measure with equipment available to most home users.
The earlier posts in this thread were more focused on how much plastic you extrude, which is probably the more productive path to follow.
Quantity extruded involves:
1) having an accurate dimension of your filament (you can't assume 1.7500). Measure with calipers, and check for both maximum and minimum "diameter", taking the average.
2) Have your extruder calibrated accurately - that's what the 100mm check was about.
3) If necessary, adjust further with an Extrusion Multiplier. Nominally it's 1.00 but going down to 0.95 is not uncommon.
If you reduce the X and Y motions to get a cube of exact dimensions, but your extrusion quantity was too high to begin with, then the holes you print inside a part will become even smaller than before - not what you are looking for.
You might want to try this part from Thingiverse. It's small and prints very quickly, but it gives you a check on both interior and exterior dimensions. https://www.thingiverse.com/thing:1622868
In your case, you are looking for an accurate hexagonal hole, but note that circular holes ALWAYS tend to come out small, even when everything else is calibrated perfectly. It's a function of the hot filament being pulled around a curve. Even the expensive commercial FDM printers do it. You have to purposely over-size the hole or plan on drilling.
The extruder steps are also determined by the mechanicals. That's why Prusa, Bondtech and Matt (from Matt's hub) don't recommend running extruder calibration on Mk3's. Extrusion multiplier is the variable that should be adjusted, as that can easily account for per-filament variation.
Re: Dimensional Accuracy
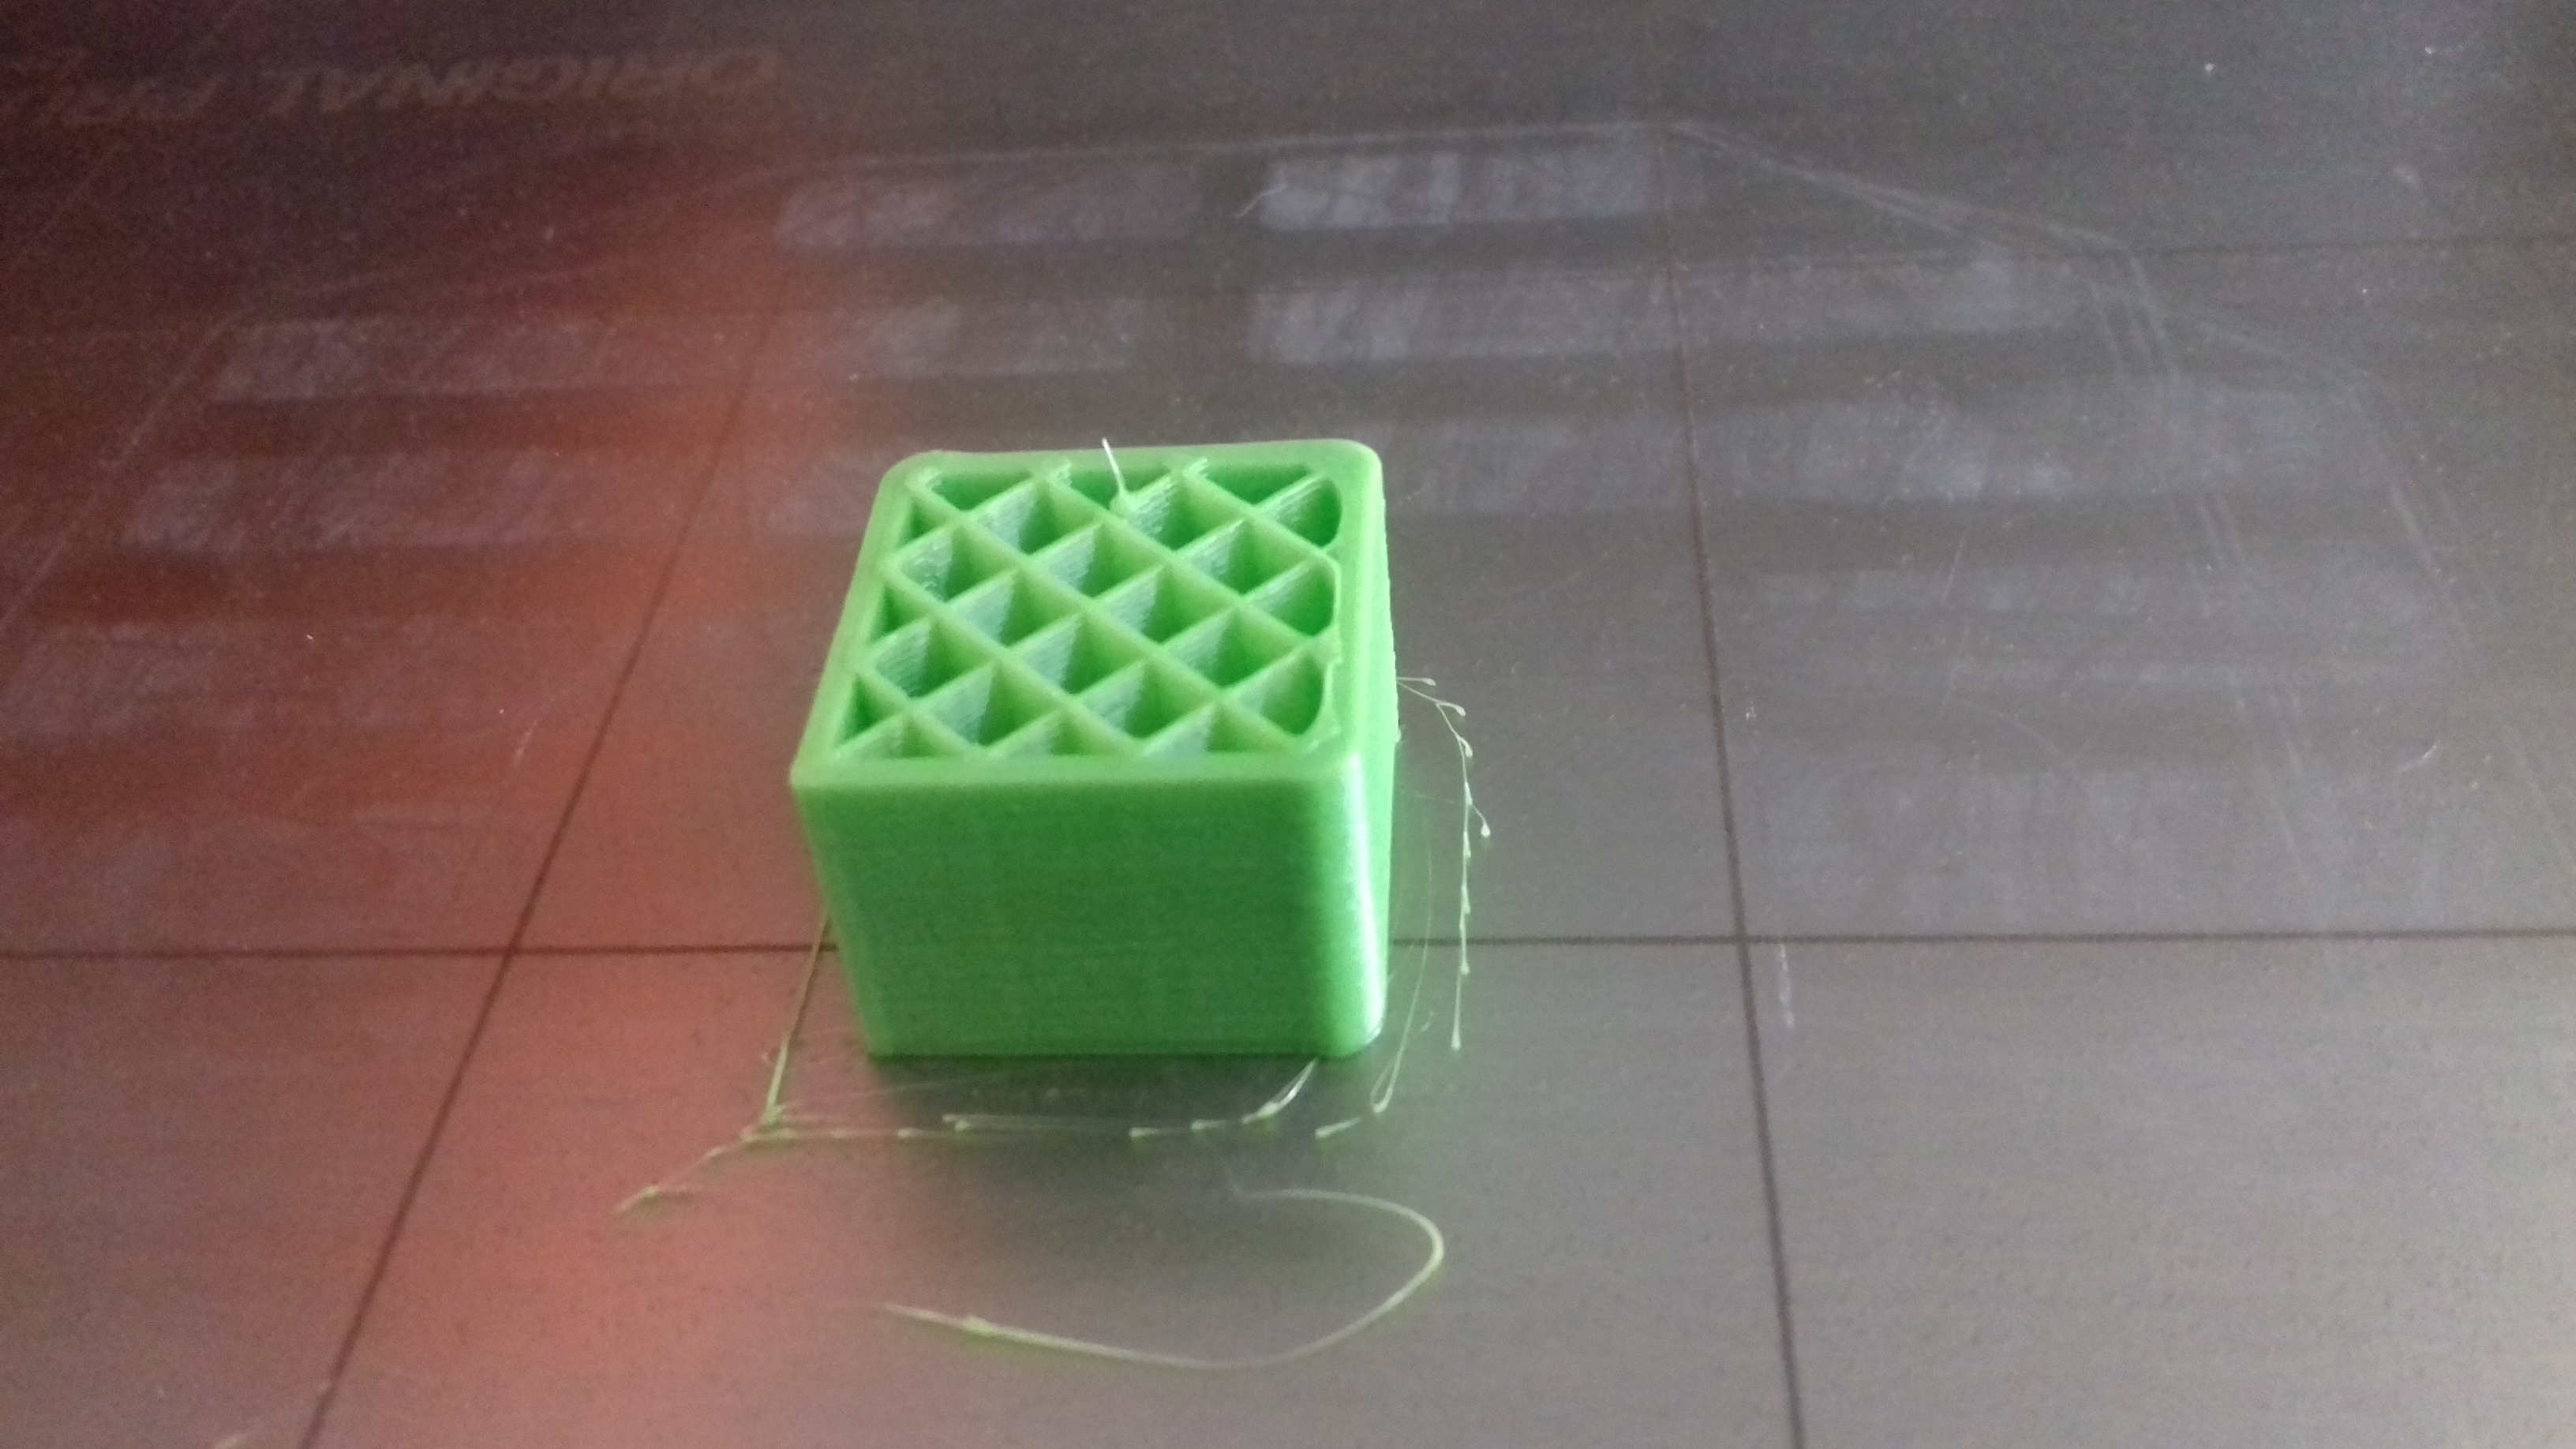
I printed the 20mm calibration cube and recorded some measurements. Afterwards, I checked the belt tension numbers on the printer and found them to be out of the 240 +/- 40 range. After adding some tension to both the X and Y and running the self test, I got the X in the 240 +/- 40 range, but even with the Y fully tensioned it is still at 300. It is quite taught though. I don't see how any more tension would help the Y.
I also measured 100mm of filament and had it extrude 100mm. It did extrude 100mm pretty much right on the dot (as close as I can draw a line on filament anyways 😉 ) .
Anyway, here is the 20mm cube I printed and this was before the belt tensioning adjustment. I don't think that would have an effect on my issue with the nut diameter though? I would think that would appear as ripples or some other artifact.
Re: Dimensional Accuracy
Well, just for fun I tried using an m3 screw with the nut to try to pull the nut into the hole. I thought for sure it wouldn't pull in. But to my surprise it pulled in without much effort. It felt like there was a little lip around the hole that made the inner diameter slightly smaller at just the top portion. I hope that made sense. Besides that, should I be concerned with the belt tension values I mentioned in my previous reply?
Re: Dimensional Accuracy
glad you at least got that screw in. I once tried to care about the belt numbers....I no longer care.. I did have a time where my prints looked real bad but it was my shafts and bearings going bad. I would think, as long as the belts feel good. that should be good enough
I have a Prusa,therefore I research.
Re: Dimensional Accuracy
Well, just for fun I tried using an m3 screw with the nut to try to pull the nut into the hole. I thought for sure it wouldn't pull in. But to my surprise it pulled in without much effort. It felt like there was a little lip around the hole that made the inner diameter slightly smaller at just the top portion. I hope that made sense. Besides that, should I be concerned with the belt tension values I mentioned in my previous reply?
Maybe.
I would take the belt numbers with caution, as they reflect the overall system. If you have really smoothly running carriages, then the belt values may never get close to 240 until things start breaking.
If you have a feeling that things might be a bit tight, then I'd ignore the belt numbers. Mine are at ~295, but my belts twang nicely and my prints are pretty good.
Re: Dimensional Accuracy
I am 100% sure you will need to tweak settings for each filament.
I made a flexi tire and it turned out way different when printed in pla and flexi
I have a Prusa,therefore I research.
Re: Dimensional Accuracy
My point of view is that having a 3D model with exact dimensions doesn't guarantee you absolute accuracy, regardless of how well calibrated your machine is. You have to take into account that the slicer will introduce an error through the slicing process itself. First of all it will slice at the preset extrusion width. A design should be made either with a tolerance (create a tolerance test for your machine and use that as a reference of what clearance you'll need in your design) or "dimensioned" to specific layer heights and extrusion widths. As an example for layer heights:
If your model has a height of 2mm and you use a 0.2mm layer height with a first layer height of same value you'll get 10 layers X 0.2mm = 2mm. However, if the same model is sliced with a 0.35mm layer height and a first layer of 0.2mm you'll get a sliced model of 0.2mm + 5 x 0.35mm = 1.95mm.
Same applies for horizontal slicing. Ignoring any overlap settings for the extrusion, if you have a model which is 2mm in X direction for example and slicer does an extrusion width of 0.45mm you'll get 2/0.45 = 4.444 lines which has to be either rounded up or down and it will result in a model X dimension of either 1.8 (rounded down) or 2.25 (rounded up). Applying this to your model you have a space of (7.9-5.5)/2 = 1.2mm between exterior and hex nut wall. Slicing that at a default extrusion of 0.45mm would give you 0.45 * 3lines = 1.35mm. Therefore the hole would be approximately 0.15mm*2 = 0.3mm smaller.
Lastly, there's the error in the mechanical movement of the printer. To what decimal accuracy can it reproduce coordinates? 0.01mm? 0.001mm? This in turn will translate to the final dimension of your print (ignoring any other parameters such as filament diameter, shrinkage etc).
I don't know the entire internal workings of a slicer software and this is a simplistic explanation, but basically you should design your model within the constrains of the slicing software and printer accuracy. But the easiest way would be to test out what clearance you can print with your printer when creating gaps and use that as clearance in all your models (e.g add a 0.2mm gap in all dimensions).
Re: Dimensional Accuracy
Same applies for horizontal slicing. Ignoring any overlap settings for the extrusion, if you have a model which is 2mm in X direction for example and slicer does an extrusion width of 0.45mm you'll get 2/0.45 = 4.444 lines which has to be either rounded up or down and it will result in a model X dimension of either 1.8 (rounded down) or 2.25 (rounded up). Applying this to your model you have a space of (7.9-5.5)/2 = 1.2mm between exterior and hex nut wall. Slicing that at a default extrusion of 0.45mm would give you 0.45 * 3lines = 1.35mm. Therefore the hole would be approximately 0.15mm*2 = 0.3mm smaller.
That's incorrect. When moving in X and Y there is no limit on where the nozzle can go. The X-Y space is NOT divided up into "cells" defined by trace width. The slicer will, for example, take the desired outside boundary of an object, and move the center of the trace for printing that outer boundary to he desired location minus half the trace width. It uses the full available resolution of the printer to do that (in fact, the slicer doesn't even know the X, Y, Z resolution of the printer; it sends dimensions rounded to the nearest 0.001mm, and the printer itself has to round those numbers to the available resolution given by the stepper motors and the belts).
When you have an object small enough in X and Y that there is no "infill" and the part is printed entirely with Perimeters, even then the slicer tries to adjust and make the external dimensions correct by placing the outermost traces correctly and over-filling or under-filling the inner traces.