A vey unhappy experience.
I am not given to complaining and mostly if I come across a problem I usually solve it myself. But (always a but) putting together this kit has so far been a nightmare. The nuts and bolts won't line up the holes for rods are too tight causing fractures when inserted. My feeling is that kit was put together on a late Friday afternoon. I have had to reprint many parts and I am still nowhere near finishing it. I have invested over 30 hours plus endless printing parts. Customer support is useless. A square nut cross-threaded and ripped through plastic and rotates it's a square nut. Customer support suggestion:-
"Yes, I understand, what I meant was to see if we can get the nut not to rotate. One option would be to apply a drop of glue to hold the nut in place, otherwise, a new part would need to be printed"
Glued together machine great. I think the answer may lay in my drill and Dremel or just send the thing back.
RE:
I tried replying to this a few hours ago, but after I typed it in and hit POST, the system errored out with a very terse 'something went wrong' message and would not let me log in for some time.
Anyway ...
Prusa support is usually very good, and if a plastic piece is bad, they usually will send you a replacement without any push-back. However, if you have another printer or can get pieces printed locally, that is usually quicker.
It's been quite a while since I assembled my kit, but when I did, actually before it arrived, I read TFM over and over (the on line version), including the comments, which covered about every tricky situation that would commonly arise.
I also prepared all of the plastic parts by de-burring anything that looked rough, plus chased out all of the holes.
Now, as to those flat nuts, and yes, they can be a pain, I learned back in my erector set days that those often have burrs on the edges and in the threads, and often need to be chased out by simply threading them onto a bolt and rotating them until they operate smoothly. If they do not fit into those rectangular slots, there may be burrs in the plastic, or even some stray filament pieces.
Above all, when assembling, if something does not fit correctly, STOP and find out why and fix it. Please avoid the temptation to simply 'get a bigger hammer' and force things. Those plastic pieces from Prusa are rugged and perform well, but they cannot take a joke if abused.
RE:
I assembled my kit about 3 months ago.. MK3+.. I spent about 5 hours reading all the user comments on the assembly. Really paid off. The biggest help was the suggestion to pull all the nuts into the backs of the plastic pieces first.. and then put the plastic piece in place and do the assembly. The nut cutouts are designed to be very hard to press fit so they don't turn or fall out when the screw is inserted. Cross threading a nut is a usually, but not always, a user error. You can feel when that happens. Just be gentle and feel the threads meshing.
I had some issues getting some of the bolts in .. maybe cursed a few times at the nut not staying in the proper place, but I always ensured those square nuts were well into place. You can push them into the slots with a small slotted screwdriver and then if they are mostly in, you can insert a hex screwdriver head into the plastic hole then through the nut and pull the nut into proper alignment. Be very patient. I didn't sand or clean up any printed part and everything went together well.
Generally there are ways to align the nuts .. so look at the user suggestions.. With so many kits out there, someone has had most problems possible and posted a solution.
Reprinting parts would really suck as I didn't have another printer.
RE: A vey unhappy experience.
I am not given to complaining and mostly if I come across a problem I usually solve it myself. But (always a but) putting together this kit has so far been a nightmare. The nuts and bolts won't line up the holes for rods are too tight causing fractures when inserted. My feeling is that kit was put together on a late Friday afternoon. I have had to reprint many parts and I am still nowhere near finishing it. I have invested over 30 hours plus endless printing parts. Customer support is useless. A square nut cross-threaded and ripped through plastic and rotates it's a square nut. Customer support suggestion:-
"Yes, I understand, what I meant was to see if we can get the nut not to rotate. One option would be to apply a drop of glue to hold the nut in place, otherwise, a new part would need to be printed"
Glued together machine great. I think the answer may lay in my drill and Dremel or just send the thing back.
I would recommend that you return the printer.
RE:
I am not given to complaining and mostly if I come across a problem I usually solve it myself. But (always a but) putting together this kit has so far been a nightmare. The nuts and bolts won't line up the holes for rods are too tight causing fractures when inserted. My feeling is that kit was put together on a late Friday afternoon. I have had to reprint many parts and I am still nowhere near finishing it. I have invested over 30 hours plus endless printing parts. Customer support is useless. A square nut cross-threaded and ripped through plastic and rotates it's a square nut. Customer support suggestion:-
"Yes, I understand, what I meant was to see if we can get the nut not to rotate. One option would be to apply a drop of glue to hold the nut in place, otherwise, a new part would need to be printed"
Glued together machine great. I think the answer may lay in my drill and Dremel or just send the thing back.
Having built 4 Minis and 5 Mk3 printers, I have never experienced the troubles you are having. Building a kit does require a certain level of comfort and experience with following directions. Support has always solved my issues vis chat on the shop. I too would recommend you return the printer.
--------------------
Chuck H
3D Printer Review Blog
RE: A vey unhappy experience.
Having built 4 Minis and 5 Mk3 printers, I have never experienced the troubles you are having. Building a kit does require a certain level of comfort and experience with following directions. Support has always solved my issues vis chat on the shop. I too would recommend you return the printer.
IIRC (correct me if I am wrong) at least one of your Minis was an off-price clone that you reviewed here some time ago. (Please accept my apology if it was someone else.)
While I was reading the review of the clone, I was thinking over and over that I was so glad that when I decided upon a printer, I got the 'full price' kit, and not one of the clone kits that were selling for 1/3 to 1/2 the price on Ebay at the time. (And those Ebay listings used the Prusa brand, although a quick look-see could tell that they were not of Prusa origin.)
I have not built as many as you have, but I have built one MK3S for myself (new original Prusa from the factory), plus the MMU2S (open box, bears not included) and I coached another user (she's here but does not post that often) through a MK3S assembly (open box, Ebay).
The one thing I will say is that the MK3S kits were much better as far as Prusa's attention to detail in both the parts and the instructions than the MMU2S.
The MMU2S required far more reading between the lines and futzing around than did the MK3S.
I've also done quite a few Heathkits over the years, plus some Knight Kits, and I consider the Prusa instructions to be superior to those.
However, I do agree with you that a successful build requires following the instructions to the letter, plus the careful and critical application of the hints posted by the users in the comments. It also requires quite a bit of attention to detail and PATIENCE! I say over and over that if something does not fit, or something does not look right, STOP, find out why before continuing!
In my case, the MK3S printed the Prusa logo and tree frog just fine after assembly. With some careful futzing and adjustment the MMU2S successfully printed the multi-color 'coin' things and the sheep on the first attempt, with careful monitoring, of course.
RE: A vey unhappy experience.
I, too, spent some time cursing Prusa during assembly of my kit. But I was also a major contributor to the issues I was having, and once I worked through them and got the thing operating correctly, I ended up being very happy with my purchase. The key is to go slowly and be careful, especially if you don't have another printer with which to replace any parts that you break.
I will say that some of the printed parts are not as strong as they could be, which I think was a factor in the issues that I had. There were no such issues with any of the parts of the Bear upgraded version I built afterward, the parts are simply beefier and better designed.
RE: A vey unhappy experience.
I made a mistake by going on to social media and was cursed by the keyboard warriors telling me that I had not followed instructions and I should never have bought a kit as I was not competent. Not very helpful but then again I should have known better. My posting was out of frustration as I had read so many times how easy it was and it's not easy. However, I accept that nothing is perfect and after a good session with my drill, sandpaper and my Dremel I have made some progress and I am full of hope. What frustrated me more than anything was some of the hidden square bolts would not and still will not align despite my best efforts. I have overcome this by using a 2.5mm nut and bolt which seems to work and is holding nice and tight. Inserting the rods was a nightmare and they would only go in if you bashed away far too hard risking fracturing and breaking the component. I eventually overcame this by smoothing the internal with a Dremel but being very careful not to overdo it.
I think I just had one of those kits which was not quite up to standard (late Friday job) and I have had some feedback confirming there appears to have been a slight drop in quality control. I have dealt with customer services before and was eventually impressed by them sending me a replacement pinda mine was defective. My Mini is great and I love hence the move to an Mk3. I am not at all inexperienced and I am very careful. I maintain and keep going 10 other printers so I pretty much know what I am doing. But (the inevitable but) on this occasion customer services were a waste of time. Kept saying tap the rods in gently despite me saying they won't go in and the best one was suggesting I glue the square nuts in place. One of the nuts and bolts cross-threaded because they would not line up and this caused the nut to rotate as they were jammed together. Glueing it in place was possibly the most ridiculous thing I had heard and at that stage, I gave up. I should add that I spent many years as an antique restorer so I pretty much know how to do things.
Thanks, everybody for your help and suggestions.
RE: A vey unhappy experience.
I will say that some of the printed parts are not as strong as they could be, which I think was a factor in the issues that I had.
I'm curious. Which pieces, specifically, appeared to be insufficiently strong?
The only piece that I found insufficient, and had to be replaced, was the original fan shroud. I believe the original was ABS.
It started sagging and deforming after a fairly long run of ABS pieces (for a model RR boxcar) and I replaced it with a remixed one printed in PC Blend. Of course it has not deformed since.
One of the Y rod holders cracked when I tightened the clamping screw, and my X idler end cracked inserting one of the smooth rods. For the former, I remain convinced that was not my fault and the part is just flimsy as I was not overtighening them. The latter I was absolutely getting too aggressive and was mostly or entirely to blame. I pressed on with the assembly and the printer doesn't seem to care that those parts are cracked. After a couple test prints and fighting with getting the belt tension right, the replacements were the first things I printed although I have yet to tear the printer down to actually replace them. Like I said, it doesn't seem to care.
Last week I replaced my fan shroud and extruder cover with the "Delta P" modified versions, and upon removal I noted that my original shroud had deformed and was starting to droop. Have been printing since early March, mostly with PETG but with a few ASA prints (mainly fan shrouds) thrown in too.
RE: A vey unhappy experience.
I would really like to help but you need to give specifics. The support sucks is not something I can help with and it not my experience.
If you post a single problem at a time and maybe we can help.
--------------------
Chuck H
3D Printer Review Blog
RE: A vey unhappy experience.
Yes, Netpackrat, it seems like a few of the recent complaints have to do with the pieces holding the rods, and the relative difficulty of installing the rods.
RE: A vey unhappy experience.
Yes, Netpackrat, it seems like a few of the recent complaints have to do with the pieces holding the rods, and the relative difficulty of installing the rods.
Having built the Bear, one thing of note is that the designer was quite adamant in his instructions that the print settings be followed exactly, and that the process of calibrating the extrusion multiplier be performed for each spool of filament in order to get accurate parts. I have done this 3 times now for different spools of PETG, and I have found that whether or not it makes a difference depends entirely on the spool of filament. In a couple of cases I found that calibrating the multiplier did make a measurable difference in the accuracy of the extruder, and in the third it didn't make much difference at all. The case where it didn't make a difference and one of those where it did, were two individual spools of black PETG from the same manufacturer purchased at the same time.
Since I kind of doubt that Prusa is calibrating each printer for each individual spool of filament being used in their 600+ unit print farm, based on my results at home, I would expect there to be some normal variation in the printed parts in those places where tolerances are close, such as in the fit of the smooth rods. We are talking very small differences in extrusion width, which you would need a micrometer to measure consistently. So while I am sure that all of the parts shipped should be usable, some of them are going to cause the end user more difficulty than others.
RE: A vey unhappy experience.
The extrusion multiplier is something I have seldom played with. I really have not had the need, in most cases, to touch it.
I've heard of such things as carefully measuring a spool of filament with a dial caliper or micrometer and then using the EM to compensate, but again, I've never seen the need to do it.
Now in the thread about water resistant prints, one suggestion by other users and in one of the cited articles was to increase the EM, and 150% was cited, which sounds like a bit much to me.
For one test print (below) extrusion of 125% and 100% infill resulted in a very ugly and disappointing print. Backing the infill off and using 125% EM resulted in a print that was visually similar to the test case using normal parameters, but obviously using more plastic.

RE: A vey unhappy experience.
@JSW I have never had mess with the extrusion multiplier either.
--------------------
Chuck H
3D Printer Review Blog
RE: A vey unhappy experience.
You are correct. I have built two mini clones of different manufacturers. I have 6 minis.
Having built 4 Minis and 5 Mk3 printers, I have never experienced the troubles you are having. Building a kit does require a certain level of comfort and experience with following directions. Support has always solved my issues vis chat on the shop. I too would recommend you return the printer.
IIRC (correct me if I am wrong) at least one of your Minis was an off-price clone that you reviewed here some time ago. (Please accept my apology if it was someone else.)
While I was reading the review of the clone, I was thinking over and over that I was so glad that when I decided upon a printer, I got the 'full price' kit, and not one of the clone kits that were selling for 1/3 to 1/2 the price on Ebay at the time. (And those Ebay listings used the Prusa brand, although a quick look-see could tell that they were not of Prusa origin.)
I have not built as many as you have, but I have built one MK3S for myself (new original Prusa from the factory), plus the MMU2S (open box, bears not included) and I coached another user (she's here but does not post that often) through a MK3S assembly (open box, Ebay).
The one thing I will say is that the MK3S kits were much better as far as Prusa's attention to detail in both the parts and the instructions than the MMU2S.
The MMU2S required far more reading between the lines and futzing around than did the MK3S.
I've also done quite a few Heathkits over the years, plus some Knight Kits, and I consider the Prusa instructions to be superior to those.
However, I do agree with you that a successful build requires following the instructions to the letter, plus the careful and critical application of the hints posted by the users in the comments. It also requires quite a bit of attention to detail and PATIENCE! I say over and over that if something does not fit, or something does not look right, STOP, find out why before continuing!
In my case, the MK3S printed the Prusa logo and tree frog just fine after assembly. With some careful futzing and adjustment the MMU2S successfully printed the multi-color 'coin' things and the sheep on the first attempt, with careful monitoring, of course.
--------------------
Chuck H
3D Printer Review Blog
RE:
The extrusion multiplier is something I have seldom played with. I really have not had the need, in most cases, to touch it.
I've heard of such things as carefully measuring a spool of filament with a dial caliper or micrometer and then using the EM to compensate, but again, I've never seen the need to do it
I expect that to a large extent, necessary is in the eye of the beholder. I did it mainly because the printing instructions for the parts I was making called out the procedure as necessary, and I did see a measurable difference in the accuracy of extrusion in a couple of to spools I did it for. The one where I didn't, it was on the second printer (the Bear), so it might be interesting at some point to repeat the procedure with the same spools on both printers, to get some idea if it's the variance between spools of filament, or if the one machine is just more accurate than the other.
But yeah, the process is basically as you mention. You measure the filament diameter with a micrometer (maybe take an average of several measurements), enter that exact diameter into your slicer, and then print a calibration cube in vase mode. You measure all 4 sides of the cube, take an average, and then using the measured thickness, the expected thickness, and the measured filament diameter, you can calculate your actual extrusion multiplier and use that in your slicer instead of the default multiplier of "1" along with your measured diameter.
I mentioned it in the first place, not to argue that it's necessary, or that it's something Prusa should be doing, but just to illustrate one possible reason some people are having more difficulty with the smooth rods than others. As for it being part of the Bear print specs, that's probably got more to do with the fact that they were written by a Swiss engineer for whom the standard "it just works" Prusa was not good enough, so he designed his own frame and extruder for it. Of course he specified to calibrate the extrusion multiplier with each spool used. 🤣
RE: A vey unhappy experience.
and I did see a measurable difference in the accuracy of extrusion in a couple of to spools I did it for.
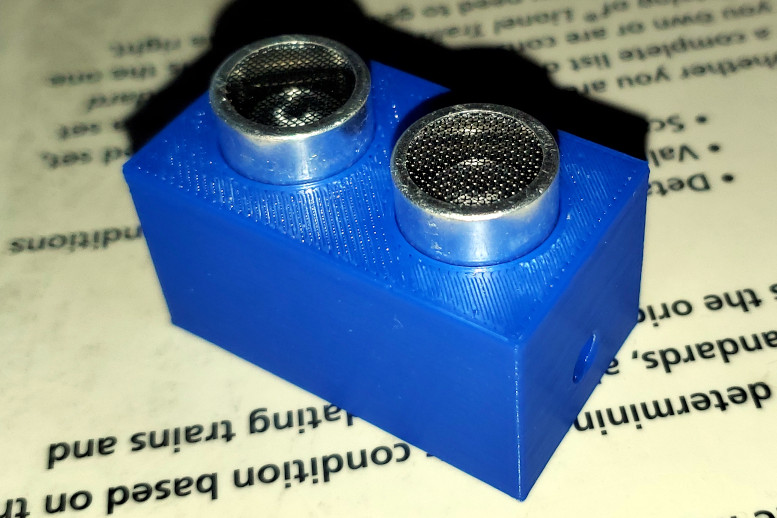
Again, out of curiosity, about what ranges of correction were you typically using for the extrusion multiplier? A couple of percentage points? Tens of percentage points?
In the blue pieces above, I could definitely tell by the fit of the sensors that the holes were very slightly smaller in the one printed with the EM of 125%, but it was not as much as I might expect, as 125% EM will imply a bead volume increase of 25%.
My hunch is that it's only a few microns of difference between the one printed with all defaults and the one printed with the EM of 125%. It's most definitely a more snug fit.
RE: A vey unhappy experience.
and I did see a measurable difference in the accuracy of extrusion in a couple of to spools I did it for.
Again, out of curiosity, about what ranges of correction were you typically using for the extrusion multiplier? A couple of percentage points? Tens of percentage points?
In the blue pieces above, I could definitely tell by the fit of the sensors that the holes were very slightly smaller in the one printed with the EM of 125%, but it was not as much as I might expect, as 125% EM will imply a bead volume increase of 25%.
My hunch is that it's only a few microns of difference between the one printed with all defaults and the one printed with the EM of 125%. It's most definitely a more snug fit.
Yeah it wasn't a huge difference. One of the profiles I deleted when I used up that spool of filament, the other I still have a few feet of so it is still in my slicer, multiplier of just over 1.02. So yeah, not a big difference. Then again, if you are trying to push a precision steel rod into a tight hole, a small difference can be the difference between a relatively straightforward assembly, and feeling the need to be more forceful (and higher risk of breakage).
As I said, I saw a measurable improvement in accuracy of wall thickness when I ran a second calibration cube for verification, but it had to be measured with a micrometer. And no, I don't still have the numbers. I have only done it for spools that I was printing printer parts with. I didn't bother doing it with the ASA I used for fan shrouds, figured if I ran into issues of fit I could always do it later and re-print. But on a spool of PETG where I was going to be using a significant portion, or even most of it for printer parts, the small investment of time seemed worthwhile.
RE: A vey unhappy experience.
I made a mistake by going on to social media and was cursed by the keyboard warriors telling me that I had not followed instructions and I should never have bought a kit as I was not competent
I think that tells more about social media than it does about Prura printers.
Inserting the rods was a nightmare and they would only go in if you bashed away far too hard risking fracturing and breaking the component
That sounds horrendous.