The fatal flaw in the Prusa MKX
So, while cleaning some junk out of my print head nozzle, I accientally snapped off the tool and it got stuck. However, the printer started extruding again nicely so I printed on knowing full well I would have to replace the nozzle at some point. I went to the prusa help to check how to do it, no problem, take things apart, heat the nozzle, use your pliers that came with printer to unscrew the nozzle, awesome! Simple! NOT! 👿
Deconstruction was easy enough, but when it came to unscrewing the nozzle I just could not do it. The pliers shredded the top of the nozzle in a few places and after much stuffing around, I decided no way, I need better tools. Also, geting hold of the heater block either has the hotend cables, or the PINDA probe in the way. I didn't have a socket set any more, so I bought a new one the next day, plus so heavy duty pliers, and a multigrip tool. Ok, I should be set! Get the thing ready, try again, Nope! Too much is gone from the nozzle for the sockets to work anymore. The pliers can't hold it and the multigrip mangled it. Only solution, remove the heater block and whatever is attatched to it, basically the whole hotend.
I didn't want to deconstruct the whole extruder assembly, but the life of me I couldn't get the hotend out. In the end I had to painfully twist the rod that holds the heating block out, I couldn't just turn it around because the PINDA probe blocked it. After a lot of issues, it was finally out, I had the tube, the heating block and the nozzle (Completely mangled at this point). I could get a better grip on things, but now I had no heat. After trying the nozzle over and over, I thought I would try the tube, and what do you know, IT SNAPPED!!! 😮 Now, I have no, printer, no heater block and no tube.
So, after speading around $250 AU for new tools and replacement parts, I can't say I am overly happy with the way this went. The replacement instructions are quite frankly sh*t! Never, ever, use the pliers on the nozzle, get some sockets, that is my main lesson from this to start with.
So, some general questions for the Prusa team:
Why does the tube between the heat sink and the heating block have to be so thin? It is basically designed to break.
Why design the extruder system with something blocking the removal of the hotend system? With all the cabling and the PINDA probe, it is almost impossible to get the tools you need in place to get a good grip on the heater block.
This is a massive flaw in the design in my opinion. The instructions also need to be updated, with correct pictures, screw directions (someone mentioned the nozzle needs to come out anti-clockwise?)
I have since found more information on the forums, like:
Use a socket set.
Heat the extruder to the highest temp it will go.
If you can afford it, buy a completely constucted hotend.
Not Happy. 👿
Re: The fatal flaw in the Prusa MKX
Sorry to hear it,
I have change it several time and I have always just done what this guide has shown and it works for me.
http://help.prusa3d.com/mk2-nozzle/mk2-changing-or-replacing-the-nozzle
Re: The fatal flaw in the Prusa MKX
I have also replaced the nozzle using the Prusa directions without issue.
One caveat, though. I was always taught to use the right tool for the job. For example if you need to 'hammer' something use a hammer not the head of a socket wrench 😮
So when I read and saw the instructions to use needle nose pliers to unscrew a soft metal hex head nozzle I immediately grabbed my 7mm 12-point combination wrench (spanner) and it worked effortlessly on the heated nozzle in combination with the supplied wrench on the heating element.
Note: If you do not have a metric wrench set with a 7mm then, in the US, a 7mm 12-pont combination wrench starts at about $1.99 at Home Depot. A little more at Sears or Lowes.
- MK3s w/Mosquito Hotend- Mini w/Copperhead Hotend- XL - 5 tool -OpenScad -3d Builder -FreeCAD -Alibre -OctoPrint/x3(Pi3B)
Re: The fatal flaw in the Prusa MKX
So, some general questions for the Prusa team:
Why does the tube between the heat sink and the heating block have to be so thin? It is basically designed to break.
Why design the extruder system with something blocking the removal of the hotend system? With all the cabling and the PINDA probe, it is almost impossible to get the tools you need in place to get a good grip on the heater block.
This is a massive flaw in the design in my opinion. The instructions also need to be updated, with correct pictures, screw directions (someone mentioned the nozzle needs to come out anti-clockwise?)
Prusa doesn't make the hotend.
The tube between the heatsink and heating block is thin to reduce the heat transfer between the two halves.
Maintenance on the hotend is a lot more painful than it probably should be, but you're nowhere near suggesting an actual fix.
Re: The fatal flaw in the Prusa MKX
One caveat, though. I was always taught to use the right tool for the job. For example if you need to 'hammer' something use a hammer not the head of a socket wrench 😮
So when I read and saw the instructions to use needle nose pliers to unscrew a soft metal hex head nozzle I immediately grabbed my 7mm 12-point combination wrench (spanner) and it worked effortlessly on the heated nozzle in combination with the supplied wrench on the heating element.
You may have noticed I mentioned I didn't have a socket set, no, I am not in the US. I would have prefered to use my adjustable spanner at least, as the spanners had were all to big. My adjustable spanner, even though small wouldn't fit in the area due to the placement of the PINDA probe. I now have a socket set, but by following the official instructions and using the supplied pliers I had already damaged the nozzle to a point where the socket couldn't get hold of it and I didn't even try that hard with the pliers. A couple of turns showed me it wasn't going to work, but that was enough to shear edges off the nozzle. This isn't my first 3D printer, I know to use the right tools, but all the tools I had were unsuitable and it was too late to get more. So I followed the instructions, which, don't work.
Re: The fatal flaw in the Prusa MKX
So, some general questions for the Prusa team:
Why does the tube between the heat sink and the heating block have to be so thin? It is basically designed to break.
Why design the extruder system with something blocking the removal of the hotend system? With all the cabling and the PINDA probe, it is almost impossible to get the tools you need in place to get a good grip on the heater block.
This is a massive flaw in the design in my opinion. The instructions also need to be updated, with correct pictures, screw directions (someone mentioned the nozzle needs to come out anti-clockwise?)
Prusa doesn't make the hotend.
The tube between the heatsink and heating block is thin to reduce the heat transfer between the two halves.
Maintenance on the hotend is a lot more painful than it probably should be, but you're nowhere near suggesting an actual fix.
I didn't say I had an actual fix, I am not an engineer, just annoyed at the situation where following the official instuctions screwed the nozzle. I thought I would let people know that following the instructions is a bad plan. Also, the thin tube is not standard, the actual E3D hotend has a thicker tube and Joseph Prusa himself said they had sent custom design instructions for it, if I remember correctly from my reading of the blog. The reduction in size to reduce heat seems more than a little redundant considering it is attatched to a giant heatsink. The extruder design is flawed, I don't know how to fix it, but someone needs to look at it and that is mostly what I was pointing out. My old 3D printer has a must simpler design, and was simpler to change, but it didn't have the feeding options, the built in PINDA probe or anything else around it. It had it's flaws for sure, but I didn't have to worry about tiny tubes that are prone to snapping at the slightest tension.
Re: The fatal flaw in the Prusa MKX
Sorry to hear it,
I have change it several time and I have always just done what this guide has shown and it works for me.
http://help.prusa3d.com/mk2-nozzle/mk2-changing-or-replacing-the-nozzle
Yup, those are the instructions I was following. My impatience let me think the pliers would do in a pinch since I didn't have a spanner that fit or a socket set I could use, after all, that is what the official documentation said to use.
Re: The fatal flaw in the Prusa MKX
Jerry was correct when he said: "...use the right tool for the job."
A long time ago, my uncle was with a world famous admiral. They were inspecting a bran new navel ship that was about to be delivered to the U.S. Navy. As they walked down one of the gangways there was a civilian mechanic removing a small nut with a pair of pliers. The admiral stopped, turned to the head of the shipyard said: "That fellow does not know how to use his tools, fire him."
While waiting for my MK3, I've read all the assembly and use manuals. Each time I saw the instruction mention using pliers rather than a socket or a wrench to remove the nozzle that story of the fired worker would come to mind.
Now we all have used pliers instead of a wrench or a screw driver to pry something free; but it's wrong. Unless there is a good reason, the proper tool should be specified.
A small point but attention to details..........ah, enough preaching. Let's get back to the fun stuff...... printing.
This is kind of the point. While I do know how to use my tools, the correct tools were not available at the time, but since the official document said pliers I tried it. Now, I did the wrong thing, I know that, but what about everyone else who doesn't know? Who will look at the document and use the pliers? Or those like me that didn't have or will not have the correct tool available and think, well, Prusa said it was ok, I will try... Printers are not my Job, so your Admiral can't fire me, they are not a lot of peoples job, I think two things need to happen. The official document needs to be changed so that people do not make the same mistake and someone a lot smarter than me needs to work out a better head design for these printers. Especially since they are meant for home use by everyone, that means people who don't have a clue about tools, mechanics or electronics. The area to work in is too cramped and the tube is too thin, that is not a solution, just two of the problems that need to be looked at.
Re: The fatal flaw in the Prusa MKX
1. Always use sockets to screw/unscrew if you want to be completely safe, I scratched my head when I saw those pliers in the instruction and would never do that.
2. You can grab the heat block with an adjustable wrench but grab it on the short sides where there are no cables attached.
3. Always be sure to have the heatblock heated when removing the noozle
4. Take extra care that you unscrew in the right direction, given that you are screwing "from below" you have to switch direction in you mind, it looses clockwise and tightens anticlock wise. Try it on a spare noozle first with a thumbnail or so, I failed to do this once and was very surprised to find myself with the nozzle in the tool socket and the shaft inside the heatblock... 🙁
5. Always use socket tools - no not even a wrench, if you want to be sure to not damage the noozle the safest bet is to use sockets.
Did you actually read any of this or just thought you would throw your 2 cents in?
Re: The fatal flaw in the Prusa MKX
To be constructive, I would suggest that Prusa Research included a set of simple tools to exchange nozzles, something like this:
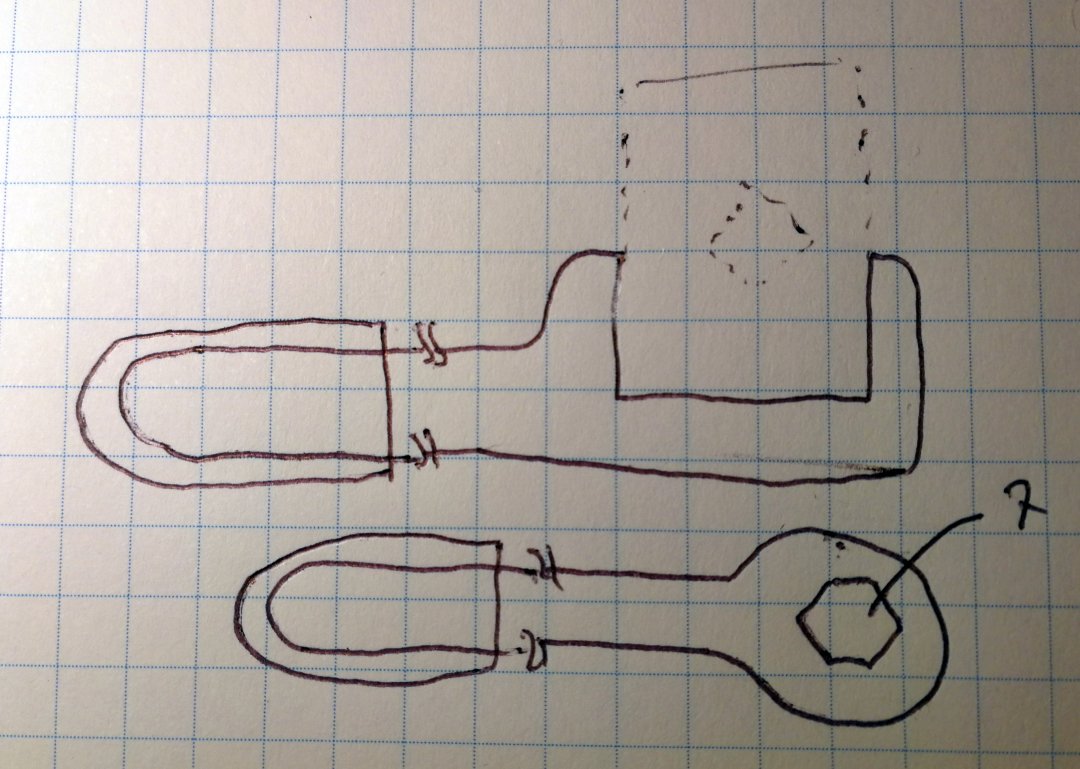
(Sorry for my paper and pen CAD system...)
If the tools is punched out of 1.5 - 2mm stainless sheet steel and the handles has a handle of thin silicone rubber, the tools would be ideal for replacing nozzles when the extruder is hot.
Stainless is a bad heat conductor and silicone rubber can handle the high temperatures. The heat block tool is angled to make it easier to access the nozzle with the nozzle tool.
I am sure that this tool set could could be made at a low price considering the number of printers sold from PR. 😀
(I would be happy to be a beta tester... 😉 )
Have a look at my models on Printables.com 😉
Re: The fatal flaw in the Prusa MKX
Did you actually read any of this or just thought you would throw your 2 cents in?
why so hostile? I just put together some suggestion which help me remove the noozle without any problem, something you are apparently not able to do - sorry I tried to help you, won't happen again 🙄
Re: The fatal flaw in the Prusa MKX
I didn't say I had an actual fix, I am not an engineer, just annoyed at the situation where following the official instuctions screwed the nozzle.
It's OK, you don't have to be an engineer to suggest a fix. Nobody's requiring you to be an engineer. Just suggest a fix.
You wouldn't want to be one of those people who just complains about stuff but never suggests any fixes, would you?
To be constructive, I would suggest that Prusa Research included a set of simple tools to exchange nozzles, something like this:
You guys and your "special tools".
How about we just put local disconnects for all the wires coming off the hotend, and make it easier to pull the hotend off the carriage so you can comfortably work on it outside the printer with whatever "special tools" you want?
Re: The fatal flaw in the Prusa MKX
Well, to change a nozzle, you need a replacement nozzle. So why not by a "special" E3D nozzle spanner at the same time: https://e3d-online.com/e3d-7mm-nozzle-spanner
Peter
Please note: I do not have any affiliation with Prusa Research. Any advices given are offered in good faith. It is your responsibility to ensure that by following my advice you do not suffer or cause injury, damage…
Re: The fatal flaw in the Prusa MKX
Did you actually read any of this or just thought you would throw your 2 cents in?
why so hostile? I just put together some suggestion which help me remove the noozle without any problem, something you are apparently not able to do - sorry I tried to help you, won't happen again 🙄
Why so hostile? Because every says the same thing, use a socket set... YAWN! Yes, if you read what I said I didn't have any other tools available and because the Official Instructios said the pliers would be fine, I tried it. It went badly, so one of my suggestions is, don't use pliers and change the official instructions so that they do not show pliers being used.
Re: The fatal flaw in the Prusa MKX
I didn't say I had an actual fix, I am not an engineer, just annoyed at the situation where following the official instuctions screwed the nozzle.
It's OK, you don't have to be an engineer to suggest a fix. Nobody's requiring you to be an engineer. Just suggest a fix.
You wouldn't want to be one of those people who just complains about stuff but never suggests any fixes, would you?
I put suggestions in. FIX THE INSTRUCTIONS! That help? Maybe you should actually read what I wrote before you coment.
To be constructive, I would suggest that Prusa Research included a set of simple tools to exchange nozzles, something like this:
You guys and your "special tools".
How about we just put local disconnects for all the wires coming off the hotend, and make it easier to pull the hotend off the carriage so you can comfortably work on it outside the printer with whatever "special tools" you want?
Don't pick on the one guy that has put something useful into this entire discussion.
Re: The fatal flaw in the Prusa MKX
Well, to change a nozzle, you need a replacement nozzle. So why not by a "special" E3D nozzle spanner at the same time: https://e3d-online.com/e3d-7mm-nozzle-spanner
Peter
Thanks Peter, two constructive comments, my faith in society is restored (Not sarcasm). I do have a socket set now though and I would say, they are the best option.
Re: The fatal flaw in the Prusa MKX
I do have a socket set now though and I would say, they are the best option.
Personally, when I change a nozzle (about every 8 weeks), I also replace the sock.
Remove front fan and nozzle, remove the front 2 screws of side fan, remove the MUX (MMU), remove the 2 screws holding the front extruder cover and remove that cover.
Then I loosen the extruder, so it is hanging by the wires. Then remove the old sock and heat to 250 degrees.
I use adjustable pipe grips to hold front and real of the heat block and an 8mm ring spanner to undo the nozzle.
I don't bother to cool the extruder at this point, but it may be a good idea to do so...
I then unscrew the heat break from the heat block and clean the heat sink.
Screw in the nozzle as far as it will go then back off a quarter of a turn.
Replace the heat break and hand-tighten.
Pipe grips and 8mm ring spanner to tighten the nozzle.
Turn off the heat and install new sock while cooling.
When cooled and with the fans off, I clean bot sets of fan blades and the extruder covers.
Then reassemble.
Being consistent with this I usually find that I don't have to change the Live Z at all - unless I am switching to a different nozzle type.
Peter
Please note: I do not have any affiliation with Prusa Research. Any advices given are offered in good faith. It is your responsibility to ensure that by following my advice you do not suffer or cause injury, damage…
Re: The fatal flaw in the Prusa MKX
I do have a socket set now though and I would say, they are the best option.
Personally, when I change a nozzle (about every 8 weeks), I also replace the sock.
Remove front fan and nozzle, remove the front 2 screws of side fan, remove the MUX (MMU), remove the 2 screws holding the front extruder cover and remove that cover.
Then I loosen the extruder, so it is hanging by the wires. Then remove the old sock and heat to 250 degrees.
I use adjustable pipe grips to hold front and real of the heat block and an 8mm ring spanner to undo the nozzle.
I don't bother to cool the extruder at this point, but it may be a good idea to do so...
I then unscrew the heat break from the heat block and clean the heat sink.
Screw in the nozzle as far as it will go then back off a quarter of a turn.
Replace the heat break and hand-tighten.
Pipe grips and 8mm ring spanner to tighten the nozzle.
Turn off the heat and install new sock while cooling.
When cooled and with the fans off, I clean bot sets of fan blades and the extruder covers.
Then reassemble.
Being consistent with this I usually find that I don't have to change the Live Z at all - unless I am switching to a different nozzle type.
Peter
If you added some pictures to this it would better than the instructions available from Prusa. 😀