Multi Material Upgrade working well
My experience with the Multi Material upgrade for the Mk2s Original Prusa Printer. I use the 3D printer for Railway Modelling. I am experienced, have been 3D printing for 5 years, and owned about 7 machines in that time, two built as kits. Retired and older than I would like! Based in the UK. Hope this might be of interest to anyone thinking about this upgrade.
Mk2s bought ready assembled in September 2017. Ordered MM (Multi Material) upgrade shortly after which arrived October 2017. Have not had a failed print yet with the Mk2s. This is key - start with a machine and filament which are working well! Waited until start February to upgrade. All went well until I started assembling the Multiplexer (where all four filaments meet). You push four metal tubes into the housing and then screw on a QSM fitting which holds the PTFE tube. Two of the metal tubes were never going to line up and pushing the filament through them by hand was only just possible with lots of friction as they caught on the ends of the tubes. Friction is the enemy of good filament feeding! This was simply not going to work.
I found Prusa support is extremely good.. After a short on-line chat I was informed that they would add a new Multiplexer - with tubes pre-fitted - to my next order. I ordered two spools of filament and paid the £8.10 carriage (but with the discount these two spools cost no more than two discounted spools from Filamentive in the UK). The new part arrived three days later and now the filament could be pushed by hand through all four holes easily. Any undue friction here and the printer will never work. I assume the tubes are now factory-fitted on new MM kits. However, I failed to pull two of the PTFE tubes out of the old QSM fittings so simply cut them off - MISTAKE! (Never built a Bowden machine before).
Although the instructions are very well illustrated and written I managed to put a connector on the wrong pins! However the self-test picked this up and after sorting this out (and having trouble cramming all the new stepper motor wiring into the existing pcb box) the printer passed the self-test.
Next tried to print one of the supplied objects - a gear ring. This failed to change colour after several layers and began 'air printing'. Time to try something simple to find out what was wrong. I printed four small blocks - one in each colour to make the machine change colour on each layer. These failed halfway through - no filament feeding. Was it too much tension on the Bondtech feed gears which was stripping the filament? I backed these off and then tried tightening them in stages. It made no difference the two centre reels kept jamming.
Then I realised that by shortening two of the PTFE tubes feeding into the Multiplexer by 11mm, I had made a mistake. The machine expects these to be a certain length when it is feeding in the filament ready to print. Two new lengths were cut to the correct length and installed (I now know to press the end of the QSM fittings to release the PTFE tube!). This cured the problem and I was able to print the four blocks. All the springs on the Bondtech gears were set with a piece of plastic to 4.4mm (space between the housing and the washer).
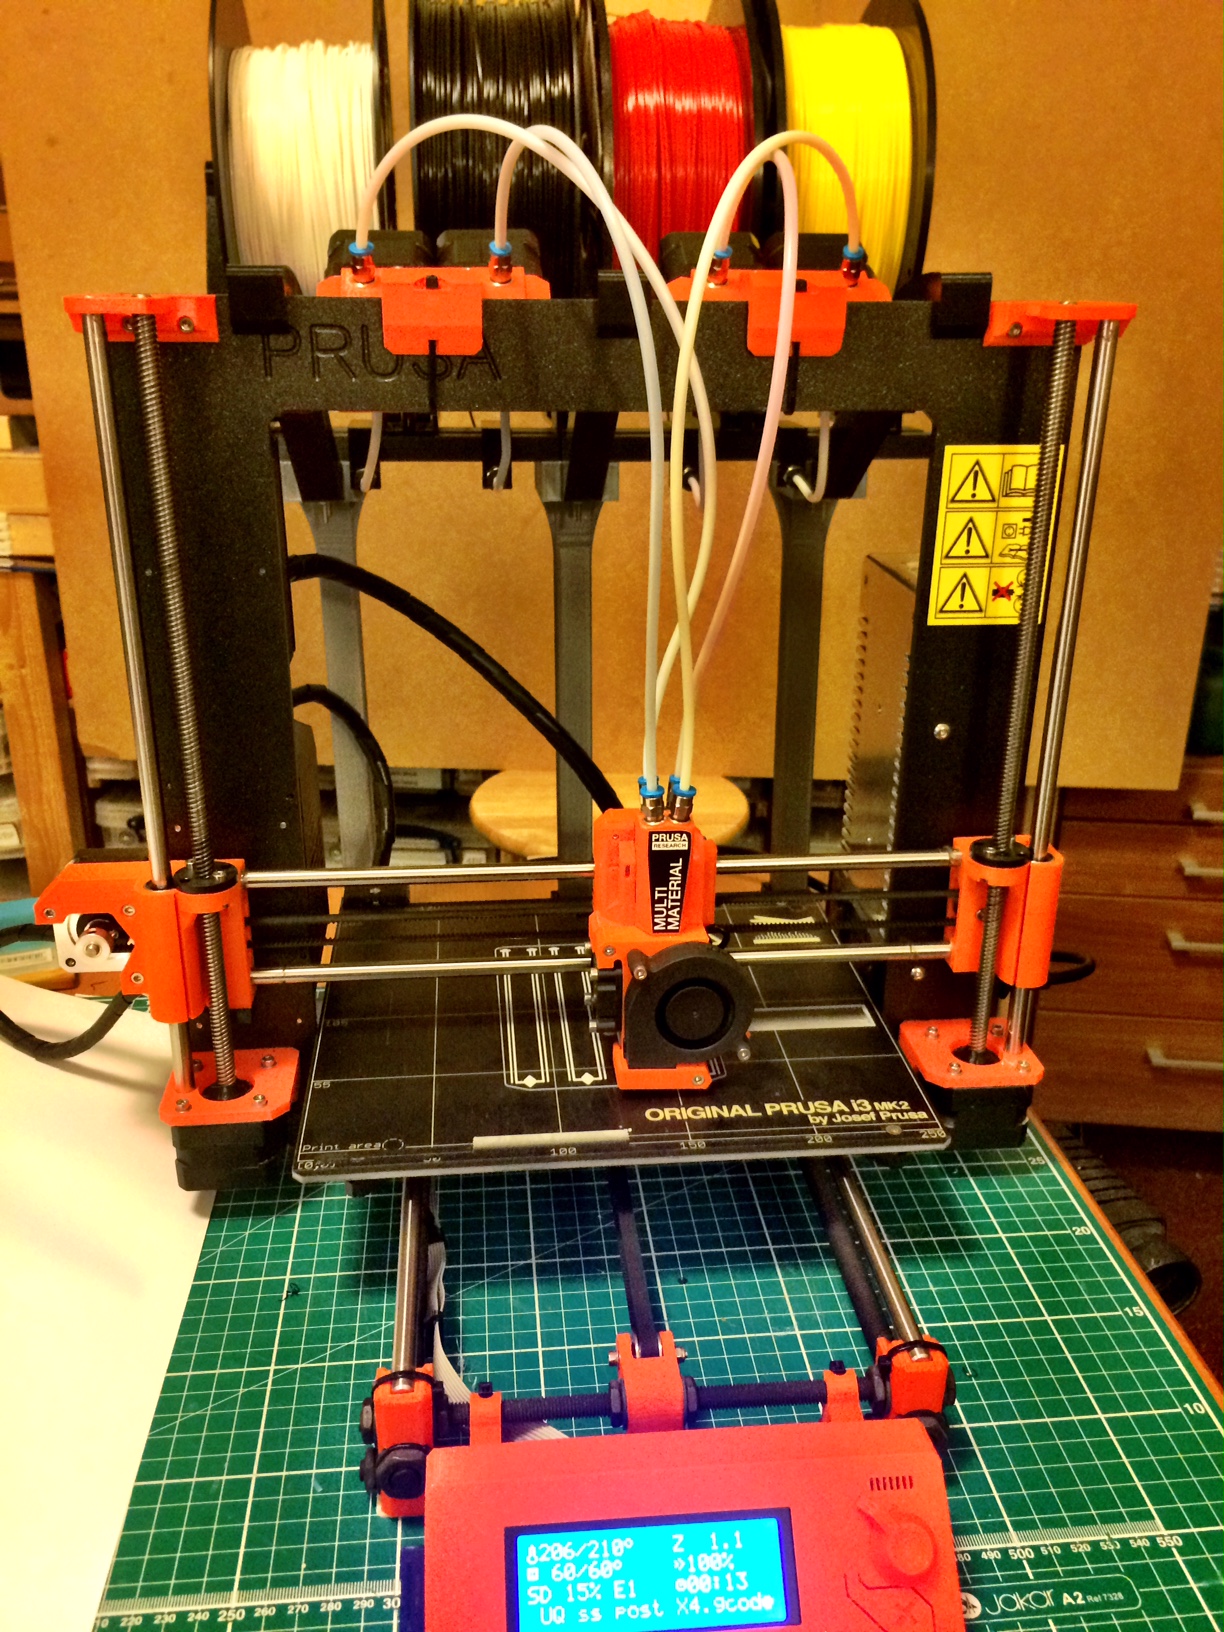
Next up were the spool holders. Prusa design not good as they introduce more friction (remember this is the enemy) and take up mega space and the filament catches on the cable bundle going to the print head. Those supplied with my upgrade were the early Perspex version. I re-designed them to run on the ball races supplied by Prusa (608 skateboard bearings) and added some PTFE tubes to the motors. Brackets and supports 3D printed (pm me if you would like a copy of the files).
Subsequent prints were good. Next job to design a coloured object. Below are some photos of the machine with spools and one of the first prints.
Overview of machine and spools. Multiplexer is where the four filaments are held prior to being pushed into the printhead.
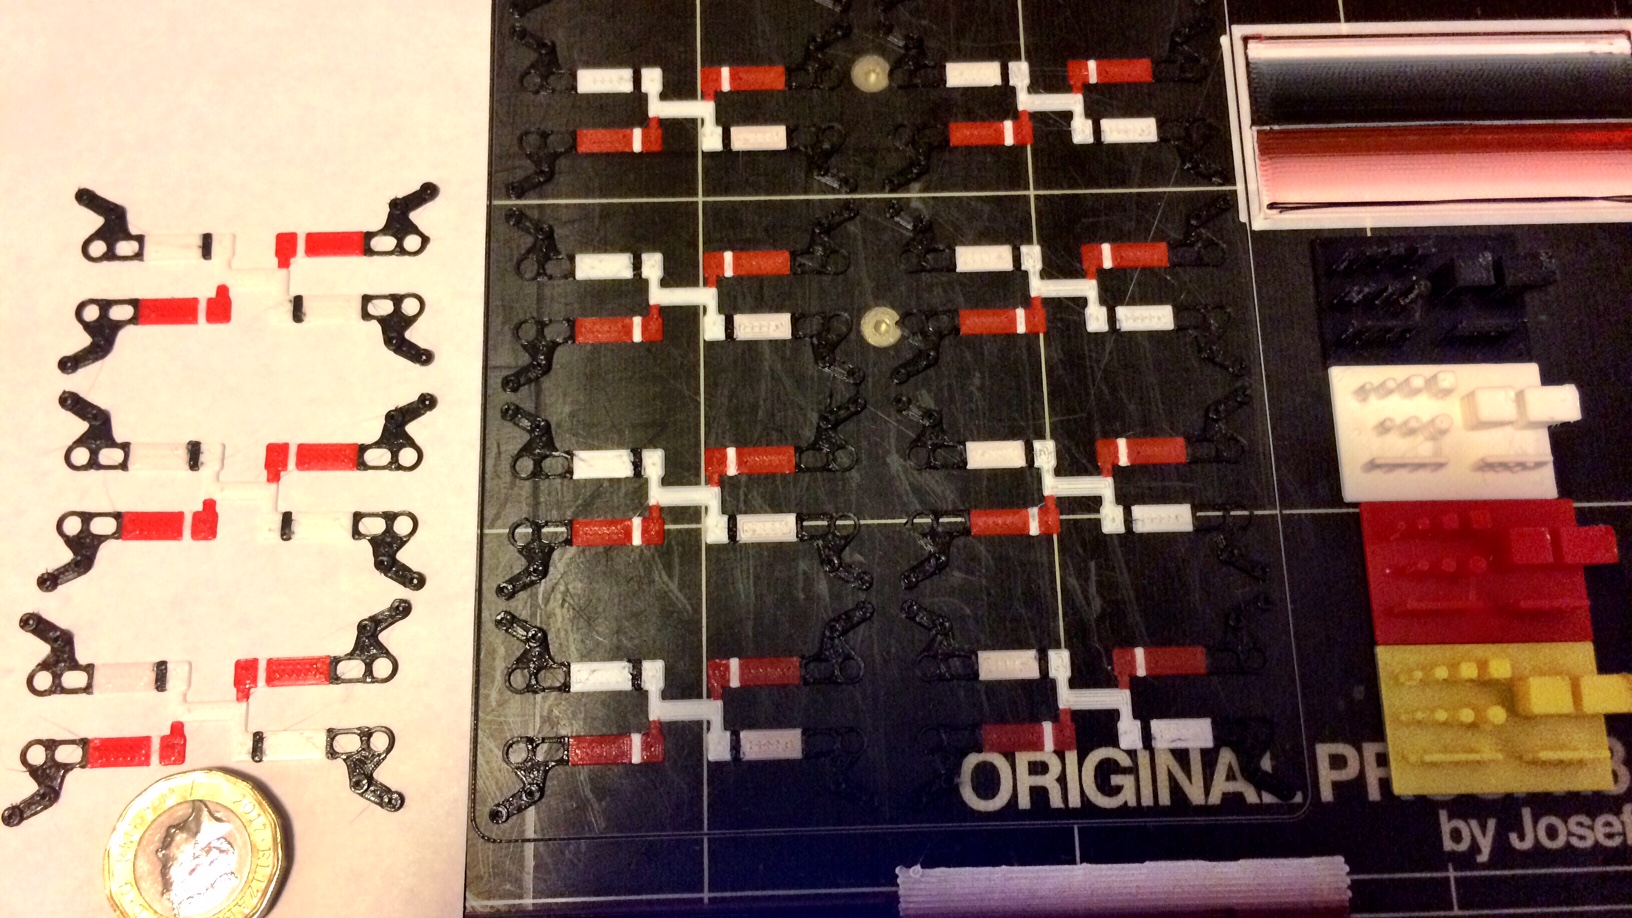
4mm scale multi-coloured signal arms on the printbed. Pound coin bottom left for size comparison. The rectangle to the rear right is the 'waste tower' used by the printer to push out the old colour and get the new one printing. The four coloured items to the bottom right are my test pieces printed to check each filament and feeder before trying full colour. I am very pleased with the way the signal arms printed with a standard .4mm nozzle. I understand the boffins at Prusa are working on the settings for a .25mm nozzle.
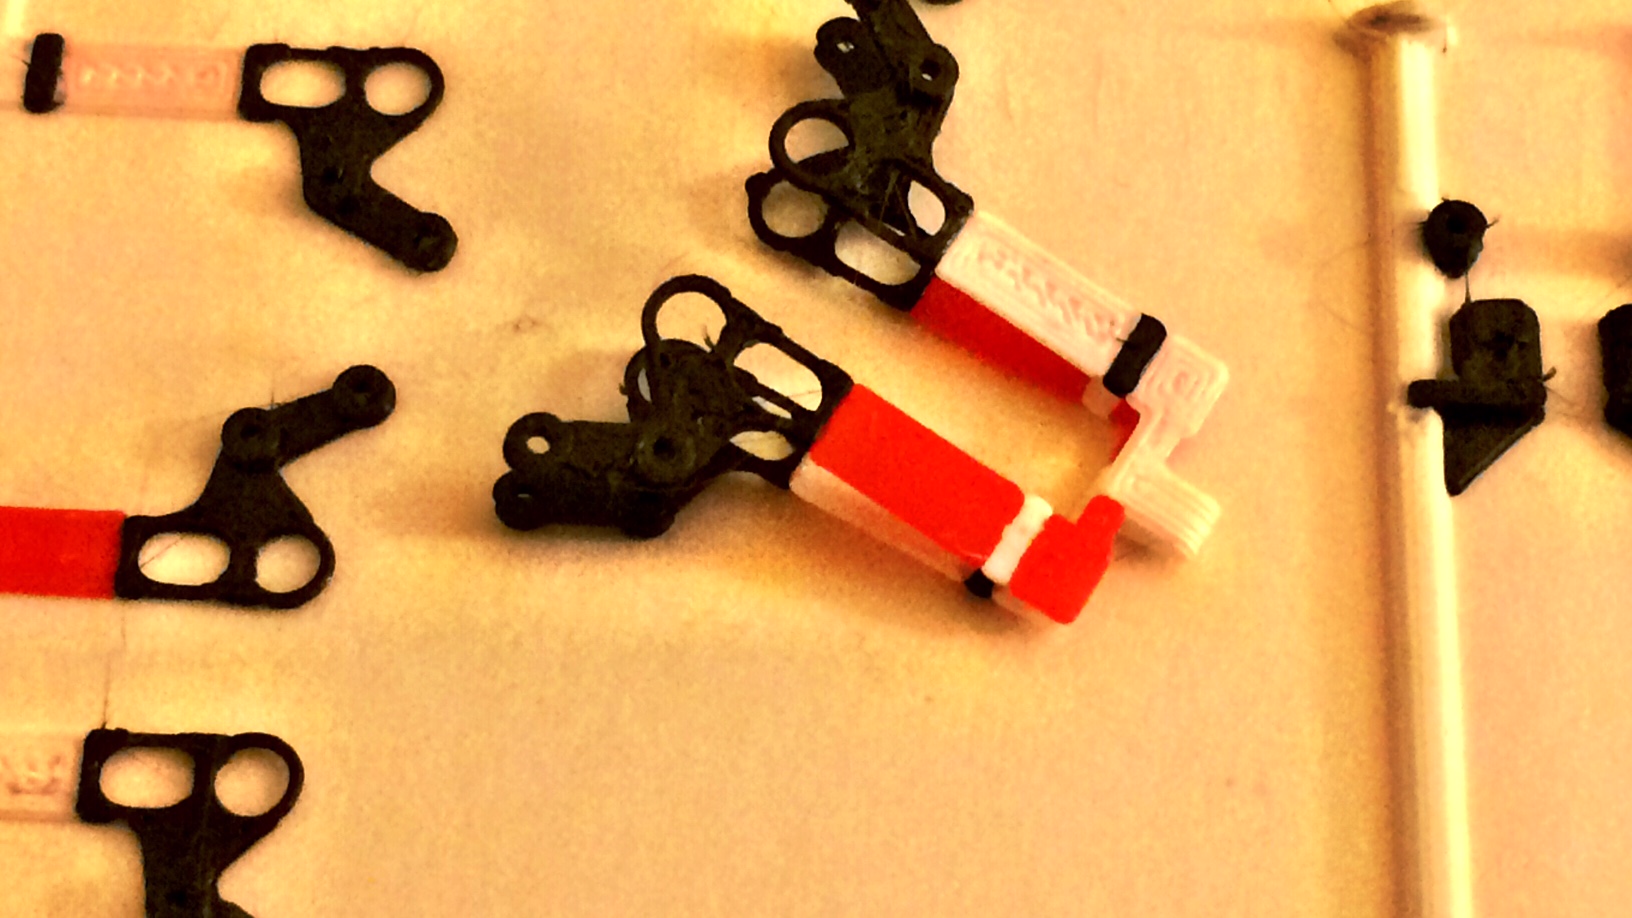
Close up of signal arms, designed to fold over and encapsulate the red/blue (green) lenses. Total length of arms is just 24mm. To the right is the top of the signal post with the arm pivot and lamp housing printed in black.
Overall I am very pleased with the upgrade. I've printed for two days and it has been reliable, no filament problems of any kind. Drawing multi-coloured objects is done in Sketchup Make 2017, where each coloured part is saved as either a group or a component. These are then saved out separately as .stl files, and cleaned up (mesh fixed) through Netfabb ready for printing. Sliced with either Prusa Control or Prusa Slic3R Multi Material version. Printed at .15mm layer height.
CONCLUSION
This upgrade can work well, but you need to start with a machine which has been working well and with filament which is known to work. Ensure a friction-free path for the filament and start testing by printing a single colour with each filament.
Bob
Re: Multi Material Upgrade working well
Interesting post Bob, thanks for sharing. I have made similar experiences. Happy printing
Re: Multi Material Upgrade working well
Yes, thanks for that. I think I am ready to order the MMU now.
I get the impression that it is just too easy to go down the wrong rabbit hole in trying to find a solution to a problem with 3d printing. Indeed I did the same thing with an issue I had with the MK2s. Eventually you need to "reset" to a known starting point, a working baseline, and start again from there.
However, in briefly skimming the posts describing issues with the MMU it appears to me that the dimensions and tolerances of some parts might be problematic, but that fundamentally the MMU works as described.
Re: Multi Material Upgrade working well
Hi again,
to be honest? I am not sure if it is yet recommended to order the MMU upgrade. Have you scanned all the posts? Have you maybe gone through the assembly instructions? If not, I'd recommend to do that and to open those Q&A sections, where a high number of questions has popped up. You will get the right feeling about the issues that are still being experienced. And yes - Quality control seems to be the main issue - otherwise I cannot explain the fact that some basic issues have been experienced. I suppose that the company right now is under so much strain due to the success and order volume, that internal processes are being neglected.
Anyway - it is good to have such a forum to exchange views and information. Good luck
Re: Multi Material Upgrade working well
Fair point. I must admit to not having looked at the Q&A section for the MMU. I will do that first.
Without knowing certain fundamentals about the company it's difficult to know why PR hasn't been more active in this forum. Perhaps some of the hysteria has put them off, but of course they could've dealt with that early on if they wanted to.
Re: Multi Material Upgrade working well
I think I'm one of the few people that actually has 2 multi-material upgrades.
The first one was ordered the moment it was announced.
It was impossible to print with it. Constant clogs, often the filament wouldn't even go through the multiplexer without jamming.
The parts (and especially the multiplexer) were very badly printed. I couldn't even screw the multiplexer to the printer head because nothing aligned. I ended up having to zip-tie it. Needles to say it was an extremely disappointing experience. It took me about a week of experimenting before I decided to reverse the "upgrade".
Since then I bought an MK3 for my more important printing, so the older MK2S can be used for tinkering.
I decided to just try to purchase a new MM kit. The idea has always intrigued me and the pull was too strong.
When that arrived a little over a week ago I installed it right away.
The printer has been printing with multiple materials every day, in total wel over 30 hours and I've experienced very little issues.
The print quality has worsened somewhat, that is something I've noticed, but... multi-material, I mean, come on! 🙂
(There aren't any <0.15mm included with the slic3r settings and I have to admit I haven't tried because I just assume it's for a good reason, so that is probably a part of it)
So... ymmv.
I'm glad I decided to try again, but I've had to purchase 2 kits to get to that point.
There probably are few people stupid enough to waste their money on the same thing twice 😉
But I doubt I will be upgrading my MK3 to multi-material though, it's just too problem-prone at the moment imho.
XL (5T) / CORE One / MK3S+-MMU3 / MK3S / Mini / SL1S
Re: Multi Material Upgrade working well
But I doubt I will be upgrading my MK3 to multi-material though, it's just too problem-prone at the moment imho.
But not so with your latest MMU?
Re: Multi Material Upgrade working well
But I doubt I will be upgrading my MK3 to multi-material though, it's just too problem-prone at the moment imho.
But not so with your latest MMU?
The problems I've experienced with the previous kit (and everyone else's experiences) just left me scared to "sacrifice" the printer I have that is working well.
I would've never even attempted to install an MM kit if I didn't have my spare MK3.
Don't get me wrong, I'm glad the "MK2S-MM" (which started as MK2) is printing well and I now have the ability to do cool multi-color prints!
It's just that it's all still too fragile at this moment.
Plus the impact on the print quality is not something I'm willing to make for all my printers, I do need higher quality prints once in a while.
XL (5T) / CORE One / MK3S+-MMU3 / MK3S / Mini / SL1S
Re: Multi Material Upgrade working well
I‘m also an owner of the first MMU generation and I have had nothing but frustration, clogging and fail print - even if printing just one colour!
To get my MK2S back to its original performance I kicked off the MMU completely and now the printer runs great again as it was before the upgrade!
I cannot recommend the MMU at all!
Re: Multi Material Upgrade working well
This is good news and I can see where people may run into trouble starting out with the MMU. I have a long history of building things our of wood and metal, but this will be my first 3D printer.
Still waiting on my order, but I canceled my order for a MK3 MMU. I do plan on reordering once I have some experience with the printer and hope to see more successes with the MMU and good news from the MK3 update.
Re: Multi Material Upgrade working well
There are so many negative postings about the MMU that I thought I would post my relatively positive experience.
I have been using 3D printers almost daily for 6 years, and I can well understand the frustration of those for whom the MMU has proved a nightmare. There are simply too many variables to make it easy to give advice remotely.
With the MMU I think there are a number of vital variables which can be controlled....
1 ensure you are using filament which you KNOW prints well. The MMU will not cure filament problems and I have bought filament which has refused to print correctly after a whole days trying.
2 ensure a friction free path through the multiplexer for all four filaments. Remove it and push filament through. If it binds it won’t work.
3 check the pressure on the Drive gears, too little or too much and they will,slip and click. Use a gauge such as syrene strips to make them all the same.
4 start by printing a single colour with each filament, if this works continue, if it doesn’t find out why one or more don’t work
5 try different temperature
6 try a print with four small blocks, one of each colour. This will check out correct filament changing.
Finally I do feel,for,those of you having problems. Nothing worse than paying for something which is not working, but you do need to be methodical in trying to resolve things.
Re: Multi Material Upgrade working well
Sorry! My apologies to those who have sent me private messages (as I requested) for details and .stl files of my spool holder. I have only just seen these and will post more details and where I have put them in the next few days. I have the Keighley Model Railway Exhibition this weekend where I am demonstrating what can be done with 3D printers in railway modelling, so it may be early next week before I have time to put them somewhere.
Bob
Re: Multi Material Upgrade working well
Thank Robert for the advises. It reassures (me and other) .
And are you order the 2.5 kit for MMU / MK2S ?
Re: Multi Material Upgrade working well
Claire, I am using the MM kit with a Mk2s. All working perfectly (still) so I will not be upgrading further at this stage. My view is that if it works - leave well alone!
Bob
Re: Multi Material Upgrade working well
You could post the .stl files to www.thingiverse.com and tag them Prusa MMU spool holders or something similar. That might save you a bit of time over individually mailing out the files.
Re: Multi Material Upgrade working well
Claire, I am using the MM kit with a Mk2s. All working perfectly (still) so I will not be upgrading further at this stage. My view is that if it works - leave well alone!
Bob
Robert, what filament works good for you?
Re: Multi Material Upgrade working well
I am using filament from Prusa, Rigid Ink, and Filamentive. The white is currently Filamentive PLAr (recycled), all other are PLA.
I think it is important to ensure you can print well with each colour/filament before trying multi-colour prints.
I have now had one jam! I didn’t bother clipping the end of a filament when loading it. It jammed. You then need to throw away all the filament to where it has been ground down by the feed gears. Clipping the end at an angle is therefore important to loading the filament.
The volume of requests for the .stl files is so low (2 so far) it is just easier to attach them to an email request. Bob (at) rmgledhill.co.uk
Bob


