RE: First layer issues
@racenviper
May I kindly ask you to redesign the caps again?
maybe 2 versions
What needs to be done:
- move the screw holes 1mm down (on 2nd version 2mm down)
- lower the part around the bearing 1mm down and put bearring 1mm down - (on 2nd version 2mm down)
I can print them and do the tests. I do not have 3d editing skills 🙁
RE: First layer issues
Sure, did you remove the bearing caps and the first layer was perfect?
RE: First layer issues
Exactly - layer was perfect, I reported this to Prusa support including your nickname and link to this thread.
Sure, did you remove the bearing caps and the first layer was perfect?
RE: First layer issues
Thanks for doing this. I hope this is a fix.
Exactly - layer was perfect, I reported this to Prusa support including your nickname and link to this thread.
Sure, did you remove the bearing caps and the first layer was perfect?
--------------------
Chuck H
3D Printer Review Blog
RE: First layer issues
Dang, after few good prints this issue appeared again (no cap on the z) 🙁
notice the brim, as it changes the spacing
One of good prints from before, note the marve logo is raised at 0.2mm above surface (skipping the 1st layer), anyway everything looks great on this particular print

RE: First layer issues
Added a 2mm clearance model.
RE: First layer issues
Thanks, will try it!
Anyway look at previous post, the picture with marevel logo looks the layer is pretty consistent and nice, while the second - first layer again have issues with no cap, I am going to check whenever it is caused by possible movement of z screw or something else. The issue is being quite annoying now
Added a 2mm clearance model.
RE: First layer issues
Update,
2mm clearance did not help also. Anyway thanks for the slt, I had to test it.
Next step is to replace hall sensor - I dont know what else to do, I contacted Prusa support to identify issue, will do some test with existing hall sensor hovewer as I have no measurement tools this will be very subjective. Then I will replace hall sensor and do the test again
RE:
I will replace the hall sensor (with cooler soon), it requires to disassembly the hotend including nextruder, so I am quite afraid if I can assembly it correctly, unfortunately there is no guidance for XL - how to disassembly the hotend, so I will have to be careful.
In meantime I made a testgrid for testing the XL first layer, attaching link:
https://www.printables.com/model/568150-prusa-xl-printer-test-grid
this will help you to test the consistency of your first layer print.
I will update you later on when I will finish replacement and done some tests.
RE: First layer issues
There is actually a test grid on the USB that came with the printer
RE: First layer issues
I struggled mightily with my XL's first layer adhesion - so much so I was really worried about the money I spent. It was terrible and few prints would succeed. I tried a variety of things, but when I finally changed from the textured bed to the satin one, my prints became 1000x better.
RE: First layer issues
https://www.printables.com/model/538384-prusa-xl-first-layer-test/comments
I saw in the comment of this printable that Prusa support suggested they heat the bed to 80c for 10 minute before starting a print and it solved their issue.
I tried it and it gave me a decent first layer across the whole bed.
Annoying to do, but worth a try if you have issues.
RE:
I had similar problems with not perfect first layers on the textured sheet. Some suggestions from my own experiences with the Prusa XL (2 Tools). I've tried different things but the tipps below were most beneficial:
- Run again the "Tool Offset Calibration" in menu "Calibrations & Tests".
- Ensure that all nozzles are absolutely clean i.a. no minor filament should be at the nozzle tip or at the edges of the nozzle! Even minor residues can affect the print quality negatively.
- Clean the print sheet accurately e.g. for the textured steel sheet with 90% Isopropyl alcohol - IPA (not the beer 😉) > see Prusa guidepost
- Ensure a room-temperature environment. Lower temperatures like in not-heated cellars might have an additional negative effect on the print quality esp. of the first layer. I suggest either heating the room or use the printer in an enclosure.
Attached is an example from two different print jobs of 3 parts. Both print jobs used the exact same slicer settings and positions on the print sheet. Print 1 with unsatisfying first layer (printed parts in the image on the left). Print 2 after running the Offset calibration again and cleaning the print sheet with IPA according suggested steps 1 and 2 above (printed parts in the image on the right).
Hope it helps. Let me know if this improves your issues as well.
RE: First layer issues
Additional checkpoint I have missed in my suggestions from yesterday:
- Before the print starts, during the first heat-up phase of the nozzle (usually to 170fiC), clean resp. remove as much filament flowing out of the nozzle as possible.
I have experienced that residues of filament on the nozzle also affect the first layer quality negatively. The automatic nozzle cleaning process from Prusa for the XL before printing does not guarantee that the nozzle is clean enough. Filament that rests at the tip of the nozzle causes the sensor to not go down on the heatbed as desired.
RE: First layer issues
Can someone make a gcode piece for:
Set bed temp to 80 celsius
wait 10 minutes
So I will put int into slicer to attach to gcode before actual print? Will test my 1head XL, there is no chance to get good print at it... the 1st layer still unsticking etc.
RE: First layer issues
Weird. I have had some issues with poor first layers and fixed them. It was all user issues and lose screws on the bed.
--------------------
Chuck H
3D Printer Review Blog
RE: First layer issues
Can you take a photo what kind of screws were loose?
RE: First layer issues
Hello everyone,
I'm also facing some first layer issues and hoping to find some help here. For x-mas I got myself a 0.4mm nozzle instead of my original 0.6mm nozzle. After changing the nozzle my first layer is constantly a little bit too low. At first I thought that my filament is not dry enough, so I dried it for several hours at 55 C. The issue remained. Then I thought maybe I should redo all of the software calibration like z-axis and loadcell calibration. But the problem is still the same. The I thought maybe the nozzle isnt seated corretly in the nextruder so I loosened the nozzle-screw and tried to push the nozzle all the way in.
At the end the problem still remains and I'm kind of hoping someone of you has another hint for me.
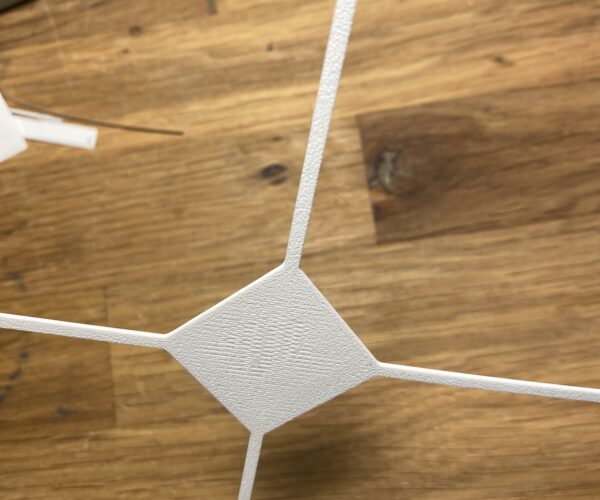
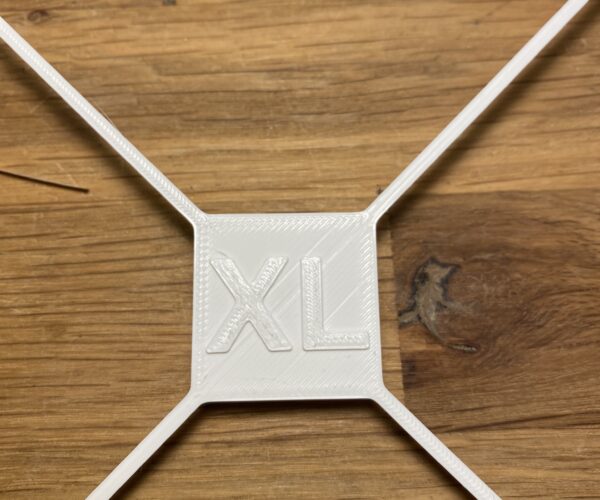
I inserted my last print. Its the first layer test sliced by prusa for the IS software and my 0.4 mm nozzle (Link). The first picture shows the underside. As you can see is shows a zig-zag pattern, a clear indication of the nozzle extruding too close to the bed. The second picture is the top of the print.
Kind regards Tom
RE: First layer issues
I tightened the screws on the bottom heat bed that anchor the PCBs. If I take a photo, it will be a couple of weeks. I am out of town.
Can you take a photo what kind of screws were loose?
--------------------
Chuck H
3D Printer Review Blog


