Having a hard time with print in place files
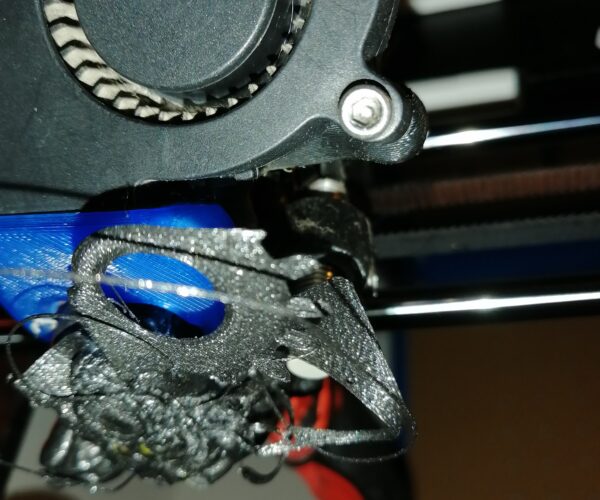
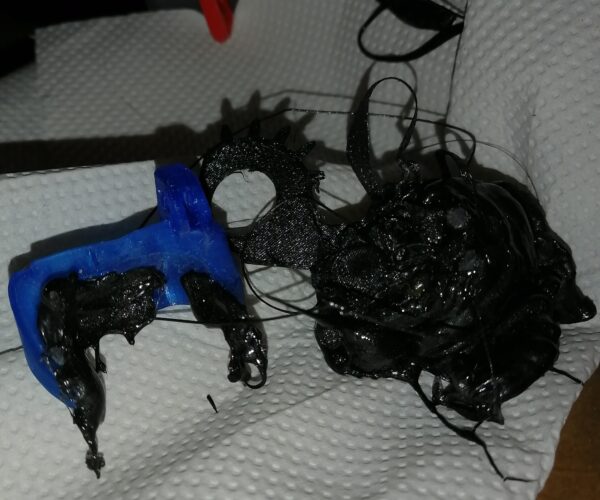
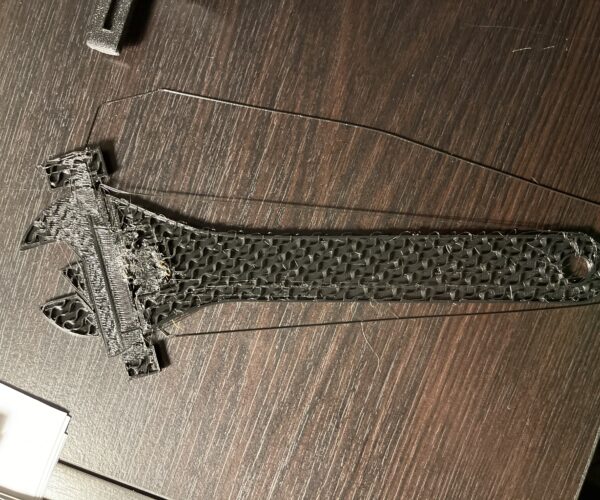
Every time I print, It comes fused together and the parts don't move like they are welded! I tried lower temp on my filament. I don't know all the other settings that well yet. Im still so new at it. Any help would be appreciated
RE: Having a hard time with print in place files
Hi XbigJoe,
there can be many reasons for Print problems, for instance, My last Print In Place effort failed with the parts fused together, but I expect my cause is different to yours... 

Some pictures may help
regards Joan
I try to make safe suggestions,You should understand the context and ensure you are happy that they are safe before attempting to apply my suggestions, what you do, is YOUR responsibility.Location Halifax UK
RE: Having a hard time with print in place files
A larger gap between moving parts would help.
i3 Mk3 [aug 2018] upgrade>>> i3MK3/S+[Dec 2023]
RE: Having a hard time with print in place files
@john-13
It would help if you explain how to do that. Thank You
RE: Having a hard time with print in place files
@xbigjoe
You haven't given us much to go on but it looks like a printing glitch which I have no solution for you. Can you print a normal part? I suggest you try to get a good print of a simple item before attempting a moving part item.
Otherwise, if you designed the part - make the moving element smaller in your design. I suspect the file is something you got off the internet in which case you might not be able to edit the component parts. I haven't done this but if it came from the internet there is a chance you can split the model into Objects or Parts via Prusaslicer (use the menu icons). You might be able to select the moving part and make it a little smaller.
i3 Mk3 [aug 2018] upgrade>>> i3MK3/S+[Dec 2023]
RE: Having a hard time with print in place files
Is the wrench you try to print this? https://www.thingiverse.com/thing:139268
I might give it a go with my mini during the weekend. I have a mini too, and I have succeeded in printing fish-bone gears, although I had to make some adjustment. Last weekend I ran bunch of test prints and adjusted settings to get more precise prints (like elephants foot compensation, added 0.1 mm into it after going over the test prints with a Vernier caliper). With PETG, I have found that "Avoid crossing perimeters" helps to keep things in hand during the first few layers. Your failed wrench is suffering from something else, I think. Also, you might try adjusting extrusion multiplier just a little, like from 1 (assuming it is untouched) to say, 0.98. That will cause your printer to extrude little less of the material which helps to separate moving parts, but I don't think your problems are related to that, based on the picture of the wrench.
Anyway, if your model is available, someone more experienced (I'm not that person) can take a shot at it and then compare results with you.
RE: Having a hard time with print in place files
What filament are you using?
I've experimented with those print-in-place ball/roller bearings that you see on the 'usual suspect' sites. I've had the best luck with plain vanilla PLA filament, second best with ABS, and worst with PETg.
Also I've found that the results get worse, not better, by reducing the layer thickness. 'Normal' settings such as .2 and .15 work much better than .1, .05, etc.
RE: Having a hard time with print in place files
@jsw
In some ways it makes sense that if you drop the layer thickness results in in-place printed parts get worse.
Printer squeezes plastic, so it will spread wider, thus parts will touch themselves more easily. Now, normally printers compensate for the layer thickness, so the material wont actually spread so much, but even if the wall thickness stays the same, the wall is straighter than with thicker layers, so if they tend to stick together with normal layer thickness, they will stick more with thinner layers.
One possibility is (of course) that the volume compensation won't work properly when you print thinner layers thus your walls get beefier (and the part is wider and longer).
You could print a small rectangle with different layer thicknesses. I don't think you need to try every step, just try e.g. 0.1 and 0.2, those measured with vernier caliper will tell if there's a difference. If they are of same width, then I think the compensation works and you just face the issue of "straighter" walls.
In-place printed moving parts are rather tricky. Looks like one of my issues was that the default elephant foot -compensation was not enough. I have now added 0.1 mm to it (checked test parts with vernier caliper). I haven't tried to rerun the test print after latest adjustments, just verified that the elephants foot has practically vanished from the parts I have printed.
I use PETG for all my prints at the moment.
RE: Having a hard time with print in place files
I have tried to calibrate my Mini (has SPINDA now) so that when I print something, the part sizes are close to what they are supposed to be and overall the printing of even in place printed systems with moving parts would work. For now I think I got it to close to what i wanted.
I have used 30 mm XYZ test cube ( https://www.prusaprinters.org/prints/39965-30mm-test-cube) and all in one 3D printer test ( https://www.thingiverse.com/thing:2656594 ), Temp tower (don't remember which it was, in the end I kept the temperatures as is), and for functional in-place printed thing, Herringbone gears: https://www.prusaprinters.org/prints/3119-herringbone-planetary-gear. Naturally, a Vernier caliper is needed.
Basically looks like my mini prints parts as +0.15 - +0.2 mm larger than they are. Also, noticed that the elephant foot compensation (0.2) was not enough, increased it the 0.3 (after measuring the part). Lastly I have printed several herring bone gear sets. Without any changes, the gears are just about solid. The center part can be almost pushed so that it looks to be separate, but the six small gears are fused to the outer ring. After setting the Extrusion multiplier to 0.9, gears were easy to separate and it runs freely. There was quite a lot of play, so 0.9 was clearly overdoing it. After few tries 0,975 I almost got gears free, but not all of them despite using considerable force. At 0.95 I got all gears free by pushing them with my fingers firmly and the gear works smoothly with little play in it.
I'm using PETG (Prusament Neon Green) and I have "Ensure vertical shell thickness" and "Avoid crossing perimeters" set. Slicer is 2.3.0 rc2, mini has 4.3.0 rc1 firmware.
All models have been sliced with Prusa slicer for the Mini. Looks like I more or less achieved my goals and the prints come out as they are designed to be. I have printed few other things as well, one of the pretties was the decorative piece ( https://media.prusaprinters.org/media/prints/49762/stls/494037_f48be482-8fa5-4c4f-a544-dc234cc44e54/christmas-tree-ornament-zigzag-by-slimprint.stl) which turned out nicely. Slicer seemed to use the vase-mode after the base of the part was finished.
After the Extrusion multiplier change to 0.95, the parts have shrunk ever so slightly, the are now about 0.1 - 0.15 mm larger than intended.
Have I done this correctly or is there some setting which I should also consider? So far the quality of the prints is quite good, the Benchies it turns out are pretty nice. Frogs do have slight stringing in the toes, but not too bad. I'm happy that the Herringbone gear now comes out nicely, and the dimensions of the parts are about what they are supposed to be. I intend to use this for mechanical parts, so dimensional accuracy is of some importance to me.
