Removing Heatbed Cable Cover
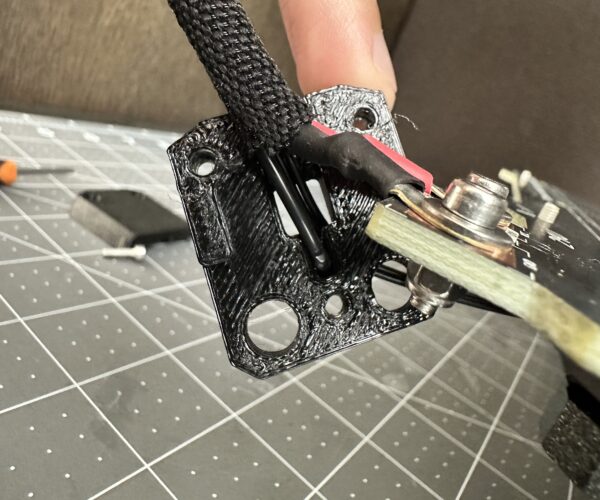
I'm going to be putting my MK4 in a Lack Enclosure V2, and I want to add the 60 degree heatbed cable cover, but the current cover has one of the heatbed cables passing through it in a little hole, don't know if this is normal or if there is an easy way to remove the cover without having to disconnect one of the cable ends and/or cutting the cable? I'm mid print right now but will add pictures in a bit.
RE: Removing Heatbed Cable Cover
There doesn’t seem to be a way to get round this, there are a few posts on other 3D printing forums, though no one has suggested a fix or uploaded a new cover. All of my thoughts were around adding an angled plate to the top cover with a couple of holes for a cable tie, because the amount of clearance needed is very little.
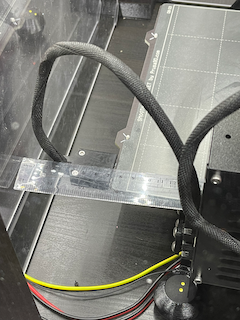
In fact I think I may just have got away with it, by putting the door opener at the top of the enclosure, which gives a couple of extra mm’s, though the heat bed wire is very close to the back of the enclosure.
I would rest easier with a proper printed solution.
RE: Removing Heatbed Cable Cover
Its the heatbed thermistor cable.
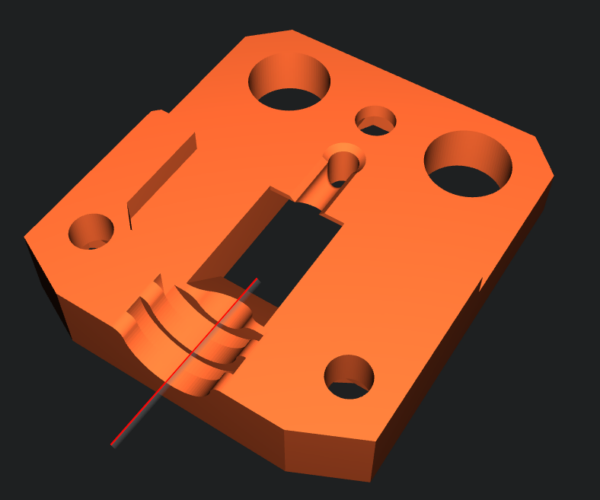
The only way to remove this is to disconnect it from the xBuddy board, then remove the cable from the textile sleeve all the way back to the heatbed cover, before feeding it through the cover hole to release.
RE: Removing Heatbed Cable Cover
I anticipate having this same issue, and I appreciate you bringing it to my attention.
You probably bought an assembled model, right? What I would do (and plan on doing) is physically destroy the cover by cutting a channel to get the wire out, and then remixing the cover so that it has a permanent channel (and your 60deg cable exit).
I don't quite understand why Prusa decided to do this.
RE: Removing Heatbed Cable Cover
After looking at it longer, yeah. Cut a channel on the heatbed cable cover bottom where the heatbed power cables exit.
This is the best place to make the channel, structurally, because it's thin (less infill) and because the two bolts that serve as a cable clamp will keep the piece together.
Use a tiny hobby saw for best results (i.e. an x-acto blade saw), and be sure to keep the wires out of the way.
You'll need to remix the model to get a right-angled print for it. And I'm surprised no one has done so yet.
RE: Removing Heatbed Cable Cover
I don’t think removing the bottom heatbed cover will be enough, because the nylon support will have nothing to anchor to. I really don’t think it would be a good idea, to leave the nylon support unanchored. Has anyone seen any more info on this.
RE: Removing Heatbed Cable Cover
So after many an hour (3 days!), I have designed a heatbed cover that well, it’s the one I’m going to use.
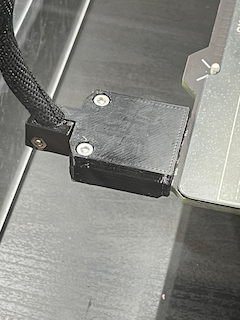
It doesn’t change the original bottom heatbed cable cover bottom, and adds a 90 degree vertical piece, with a side mounting cover, to the original top cover.
This is the first real thing that I have had to work on to complete, and I have learned loads about blender, so it has been useful.
 Mk4 Heatbed cover for Lack enclosure.
 Reference Distance in Lack enclosure
RE: Removing Heatbed Cable Cover
Sorry thought I had added some pictures.... I have posted my design to Printables.com here is the link if you want to try it out, or just have a look: https://www.printables.com/model/515664-prusa-mk4-heatbed-cover-lack-enclosure


