Upgrading an MK3S+ to an MK4
I have an MK3S+ which lives in an Original Enclosure, and I got an upgrade kit to make it into an MK4 in September.
The MK3s+ has a number of add-ons:
- an MMU2;
- an onboard Raspberry Pi 4B ( https://www.printables.com/model/9284-prusa-i3-octoprint-raspberry-pi-case);
- a camera, connected to the Pi.
I thought it might be of general interest if I were to document the upgrade, so – if the moderators are in agreement – I will do by replying to myself here.
I've taken a while to start because I wasn't sure how to begin, given all the add-ons. Also, I'm waiting (who isn't?) for an MMU3 Upgrade, but that's like waiting for Godot. So now I've started.
RE: Upgrading an MK3S+ to an MK4
The first step was to get the MK3S+. out of the enclosure. I detached the cables from the printer to the PSU at the base of the PSU:
I then detached the cables from the printer to the control panel:
Finally, I snipped through the ties holding the cables in place. So there's my MK3S+, free again:
RE: Upgrading an MK3S+ to an MK4
Oh, I printed all the upgrade parts back in September. I hope.
RE: Upgrading an MK3S+ to an MK4
I'm now following the official upgrade guide. It seems to be following the usual Prusa pattern, so I'm hopeful it will see me through the worst of what is to come. It hasn't mentioned any add-ons yet, though. Any comments I have on the upgrade guide I will make through the provided mechanism in the guide. I will only mention here anything (like the add-ons) which might not be expected to be in the upgrade guide,
RE: Upgrading an MK3S+ to an MK4
I have reached the chapter on printer disassembly. No mention yet of removing the MMU2, so I have taken this upon myself. The cables on the back of the MMU2 do not seem to be easy to release.
Since I don't know yet what is required for the MMU2 to MMU3 Upgrade I am reluctant to use brutish force. I will try to detach the other end of the cable in the Einsy.
RE: Upgrading an MK3S+ to an MK4
In the Einsy, the MMU2 is attached via two power cables and a data connector:
RE: Upgrading an MK3S+ to an MK4
Hit the wrong button before I'd completed the previous answer, and it won't let me edit it any more. So I'll start again.
In the Einsy, the MMU2 is attached via two power cables and a data connector:
I seem to remember them being a right bugger to attach when I installed the MMU2 because my fingers are so big, but the came of quite easily. The locations of the cable attachments in the Einsy are as follows:
So now it's back to the upgrade guide and printer disassembly!
RE: Upgrading an MK3S+ to an MK4
Actually, that's not quite accurate. Since I have an Original Enclosure the PSU is still attached to the back of the enclosure, whereas those without an Original Enclosure would still have the PSU attached to the frame, so it wouldn't look quite as naked as in the photo above.
RE: Upgrading an MK3S+ to an MK4
By this point I have realised the "upgrade" is actually a rebuild. I can forget about all my add-ons for the time being, I think, and see if they can be retrofitted when I'm finished with the rebuild.
RE: Upgrading an MK3S+ to an MK4
End of day one. I remembered that Prusa sent an improved heated thermistor set shortly after the upgrade kit was delivered. I hope that is the one that I installed 🙃 .
And so to bed. I hope to be finished with the upgrade before New Year!
RE: Upgrading an MK3S+ to an MK4
I was going along quite nicely, following the upgrade guide. I had duly enjoyed my first jelly baby reward. And then it happened! For the following steps, please prepare: X-end-clip (2x)... Some mistake, surely? I only printed one.
I remember being annoyed that Prusa didn't provide the 3D models to be printed as a 3MF file. And I didn't want to use the Gcode files they had provided (why? I forget). So I put together my own 3MF files without taking care to note that three or four objects needed to be printed more than once. It was in the documentation, of course (albeit in very small letters), but I'm a software engineer: I don't even write documentation, let alone read it 😱
For the benefit of anyone else, I repeat here the objects that have to be printed more than once:
- x-end-clip-r2 (2x)
- idler-swivel-r2 (2x)
- y-rod-holder-r2 (4x)
I have ordered the missing parts online and I will now pause all operation until they arrive.
RE: Upgrading an MK3S+ to an MK4
oh man, bummer! I printed all mine months in advance and I double and triple checked the counts before I took anything apart lol. It was helpful I was doing two upgrades so I had one working printer while I did it. it's great upgrade though.
RE: Upgrading an MK3S+ to an MK4
One of my MK3S+ printers had an MMU2S but I excised it during the upgrade. I have a 5T XL lol so not really any need for it. One thing to check is if the MMU will work with the MK4 yet. Last I saw they were having issues with stringing but that might have only been with the MMU3, not sure though. I'd definitely just get the MK4 working first though before you try to go MMU.
RE: Upgrading an MK3S+ to an MK4
I’d come to that conclusion myself after I consulted Prusa support. As they said, the only documentation they provide for an MMU2 to MMU3 upgrade assumes that you are installing the MMU3 on a pristine machine. So I won’t be trying to work with the MMU2 first.
I envy you your XL. I should have at least considered that as an option.
RE: Upgrading an MK3S+ to an MK4
The XL has gotten better with firmware and slicer updates but it has a way to go. for simple filament swaps it works fine and is FAR superior to the MMU. I mean a few seconds for a tool change vs a minute lol However the main reason I bought it was to use soluble filaments and I'm still trying to dial that in, but I'm getting there. I think it's more software and configuration at this point so I'm hopeful. It's pretty cool being able actually use TPU + other materials now, which is also another big reason I got the XL. Given how the MMU works, I never ever expected TPU to work in it lol
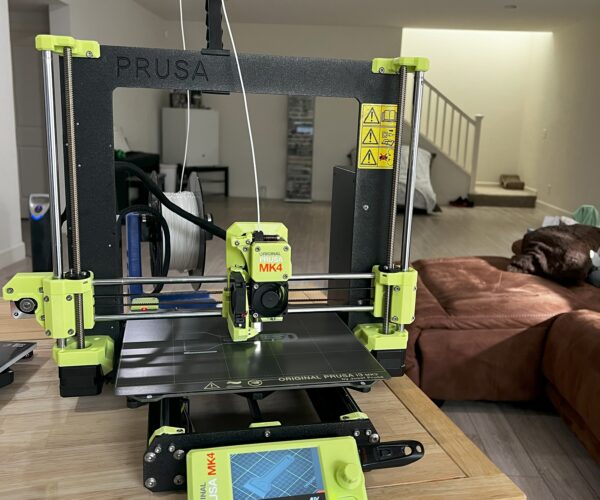
Are you doing the standard colors for the parts in your upgrade? I opted for something a bit more fun lol, a lime green ABS. Though I ended up doing the Y carriage rod holders in prusa orange petg since ABS wasn't a good choice for those because it doesn't have the flex that petg does.

Since the XL is still new and I bought it assembled it's still using the plain old black. Once I've had some time in with it I might reprint some of the parts.
I’d come to that conclusion myself after I consulted Prusa support. As they said, the only documentation they provide for an MMU2 to MMU3 upgrade assumes that you are installing the MMU3 on a pristine machine. So I won’t be trying to work with the MMU2 first.
I envy you your XL. I should have at least considered that as an option.
RE: Upgrading an MK3S+ to an MK4
Are you doing the standard colors for the parts in your upgrade?
One of the things I didn't understand when I printed the parts out was which ones should be which colours. So I did them all in black and will therefore be transitioning from traditional Prusa black and orange to all black. Something else would have been nice, but I keep reminding myself that it doesn't really matter. I think yours looks cool, though.
RE: Upgrading an MK3S+ to an MK4
I wanted ABS for temperature tolerance, and the lime green was a nice bonus.
I'm going to eventually do the XL in something fun too, but I just want to get some time in on the stock prusa assembled machine first.
Are you doing the standard colors for the parts in your upgrade?
One of the things I didn't understand when I printed the parts out was which ones should be which colours. So I did them all in black and will therefore be transitioning from traditional Prusa black and orange to all black. Something else would have been nice, but I keep reminding myself that it doesn't really matter. I think yours looks cool, though.
RE: Upgrading an MK3S+ to an MK4
I've now got the missing parts that I had printed. The quality isn't as good as what I had printed myself but beggars can't be choosers.
Greasing the bearings is clearly something you have to have done before if you want to do it properly. I've done my best.
I've discovered that I am expected to use two old pairs of rods from the MK3S+: Prusa only delivered one pair but the instructions talk of three pairs.
RE: Upgrading an MK3S+ to an MK4
When I did my two MK3S upgrades to mk4 I had discovered scratches on my x and y rods so I ordered another set of each for both printers. Yeah the greasing thing was hit or miss, but you just have to try to make it look like the picture. definitely take your time with the instructions. They do work. They do have you do the rod inspection before you take the printer apart for exactly the reason I ordered new ones.


