Hardware to Inspect i3 MK3
Hello everyone,
I'm new to 3d printing and Prusa products.
I just received a Prusa i3 MK3 used. Not sure how heavily used it is but it was given to me for free so that's not a bad deal, for now...
I say for now because the previous owner didn't give me any manuals, power cord, or any insight on any quirks or characteristics I should be aware of with this unit. It was basically a "here you go, don't bother me about it..." type of deal so I'm basically own my own at the moment.
I was able to power it up and check the firmware which is 3.10.1-4697.
I watched a YouTube vid on initial setup and calibrating by Josef Prusa. As I was following the vid and the guide on the unit LCD I discovered that part of the unit was broken and jerry-rigged at the top right Z axis bracket. The bracket was broken and the smooth rod and the Z axis threaded rod were held in place with a zip tie that prevented the Z axis calibration from completing correctly. The Z bar (or whatever it's called) would meet the zip tie and stop and the calibration would fail.
I went online to purchase the part necessary for repair. One question I have regarding the purchase of parts is does anyone know if there is a cheaper method of shipping to the U.S.? I'm assuming the official parts are coming from over seas. Is there a U.S. distributor or source? Shipping can get expensive if I have to order parts as I come across them broken or worn.
Second question I have is since I received this as is, what should I be looking for to make sure everything is working correctly or at least any thing major that I should be aware of.
I'm hoping to not have to buy so many parts that I just end up building a brand new unit or I have to buy parts so often that it was shipping that breaks my bank... If I could be aware of what to look for then I can place an big order of what I need all at once if possible.
Any help and guidance would be appreciated... I'm anxious and excited to get this up and running and start on some projects...
Thans in advance...
RE: Hardware to Inspect i3 MK3
I believe Printed Solid is a US Source for Prusa Parts.
there are E3D re sellers in many locations for extruder parts.
the Prusa Knowledgebase is a valuable resource for printer manuals and information
https://help.prusa3d.com/article/printer-handbooks_125045
Prusa slicer info is useful https://help.prusa3d.com/category/prusaslicer_204
In Prusa slicer, look for an orange triangle with an exclamation mark (Pling) ! in the right hand window of Prusa slicer... that indicated there are errors in the STL. If you are using windows, there is a windows tool, to help repair STL's...
Prusa slicer has three modes. Simple, Advanced, Expert there are lots of options... don't go mad, you can over use the features... and cause yourself a whole pile of pain...
there are many online repositories. where you can obtain ready made STL's... remember there is no guarantee they will work...
Yeggi, seems to look at several resources https://www.yeggi.com/
good luck
Joan
I try to make safe suggestions,You should understand the context and ensure you are happy that they are safe before attempting to apply my suggestions, what you do, is YOUR responsibility.Location Halifax UK
RE: Hardware to Inspect i3 MK3
Hello everyone,
I'm new to 3d printing and Prusa products.
I just received a Prusa i3 MK3 used. Not sure how heavily used it is but it was given to me for free so that's not a bad deal, for now...
I say for now because the previous owner didn't give me any manuals, power cord, or any insight on any quirks or characteristics I should be aware of with this unit. It was basically a "here you go, don't bother me about it..." type of deal so I'm basically own my own at the moment.
I was able to power it up and check the firmware which is 3.10.1-4697.
I watched a YouTube vid on initial setup and calibrating by Josef Prusa. As I was following the vid and the guide on the unit LCD I discovered that part of the unit was broken and jerry-rigged at the top right Z axis bracket. The bracket was broken and the smooth rod and the Z axis threaded rod were held in place with a zip tie that prevented the Z axis calibration from completing correctly. The Z bar (or whatever it's called) would meet the zip tie and stop and the calibration would fail.
I went online to purchase the part necessary for repair. One question I have regarding the purchase of parts is does anyone know if there is a cheaper method of shipping to the U.S.? I'm assuming the official parts are coming from over seas. Is there a U.S. distributor or source? Shipping can get expensive if I have to order parts as I come across them broken or worn.
Second question I have is since I received this as is, what should I be looking for to make sure everything is working correctly or at least any thing major that I should be aware of.
I'm hoping to not have to buy so many parts that I just end up building a brand new unit or I have to buy parts so often that it was shipping that breaks my bank... If I could be aware of what to look for then I can place an big order of what I need all at once if possible.
Any help and guidance would be appreciated... I'm anxious and excited to get this up and running and start on some projects...
Thans in advance...
Can you take a picture of the printer and we can tell you if we can see anything thats worn. As for the printed part check print solid like joan said or a local makerspace
Please help me out by downloading a model it's free and easy but really helps me out https://www.printables.com/@Hello_474427/models
RE:
It sounds like one of the printed parts is broken. If you know anyone local to you who prints, you may be able to get them to print a new part for you out of PETG. Prusa doesn't charge much for replacement printed parts, but you are correct in that shipping from Europe is not ideal for the low cost parts.
One thing you should be aware of, is a lot of the "Prusa" printers out there are not genuine Prusa manufacture. Because of the nature of the open source hardware, there are many clones, some of which even have the Prusa branding visible because they just print the Prusa parts with no change. Most of these clones use components that are of lower quality (hot ends, heated beds, electronics etc) than those supplied by Prusa. That's not to say that the clone printers can't work fine, but it's a good idea to figure out exactly what you have before you put a lot of time and money into it. One thing to look for is the Prusa serial number sticker that should be on a genuine machine.
https://help.prusa3d.com/article/original-prusa-serial-number_134171
RE: Hardware to Inspect i3 MK3
Hello everyone,
I'm new to 3d printing and Prusa products.
I just received a Prusa i3 MK3 used. Not sure how heavily used it is but it was given to me for free so that's not a bad deal, for now...
Thans in advance...
Find spare parts for the Prusa MK3 in America here:
RE: Hardware to Inspect i3 MK3
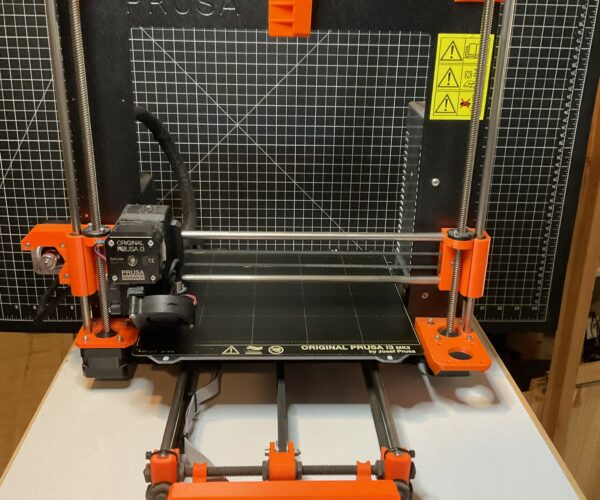
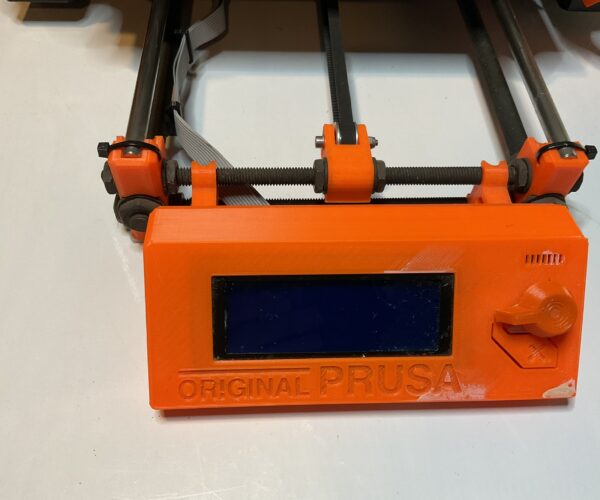
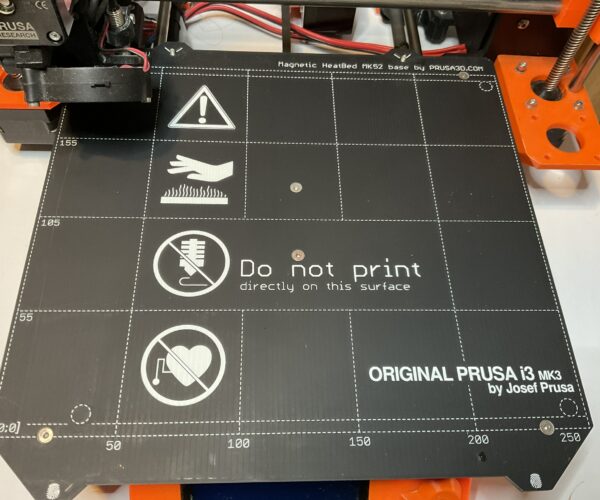
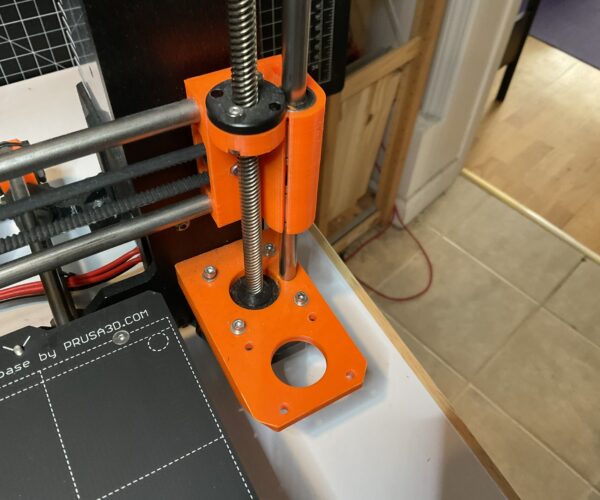
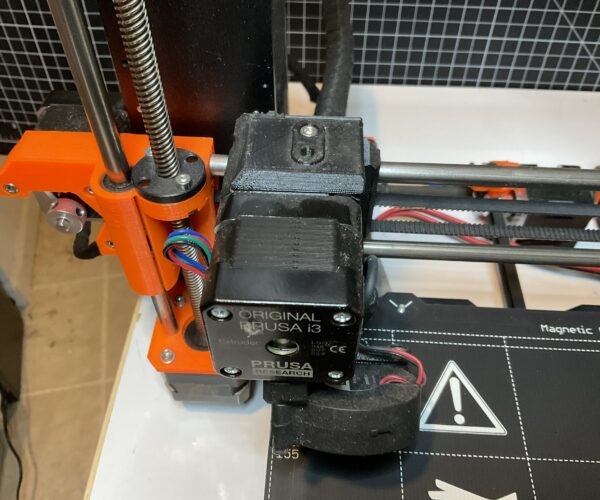
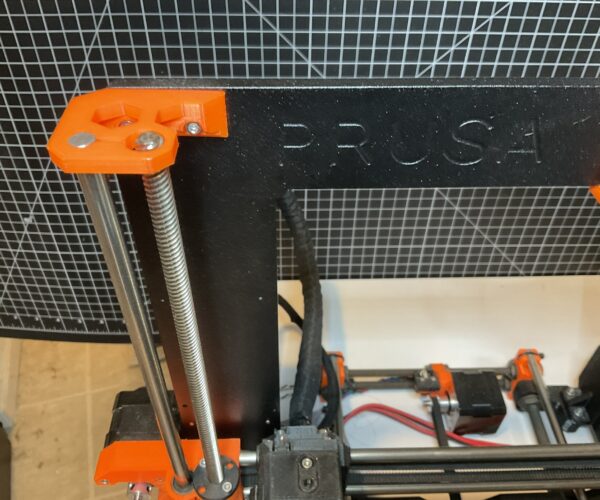
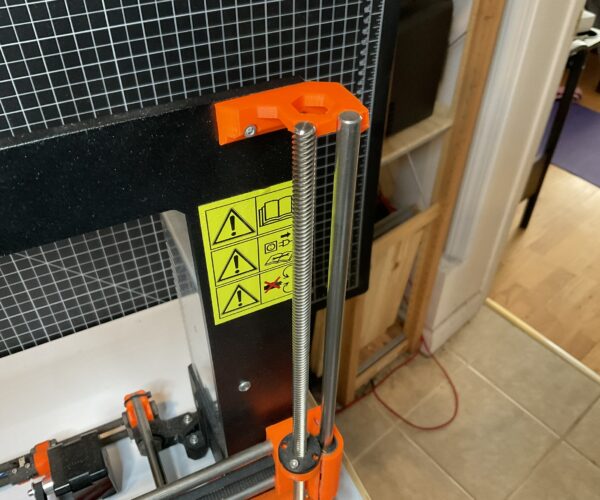
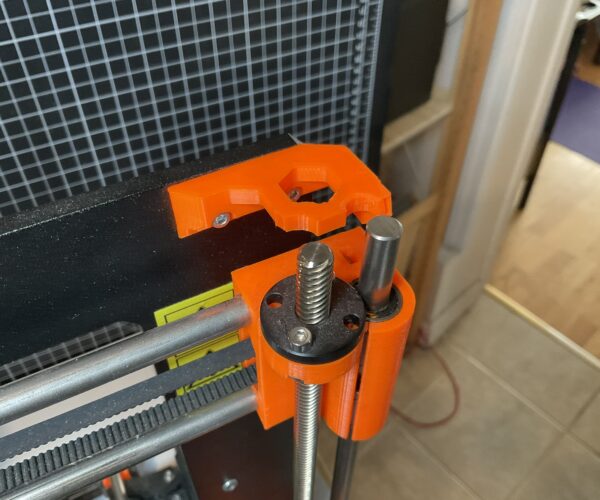
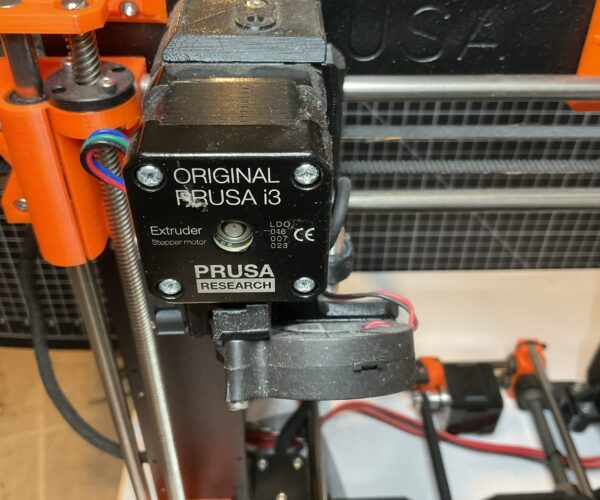
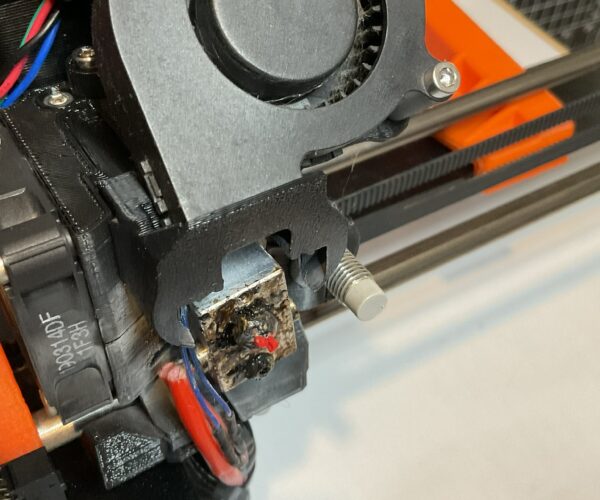
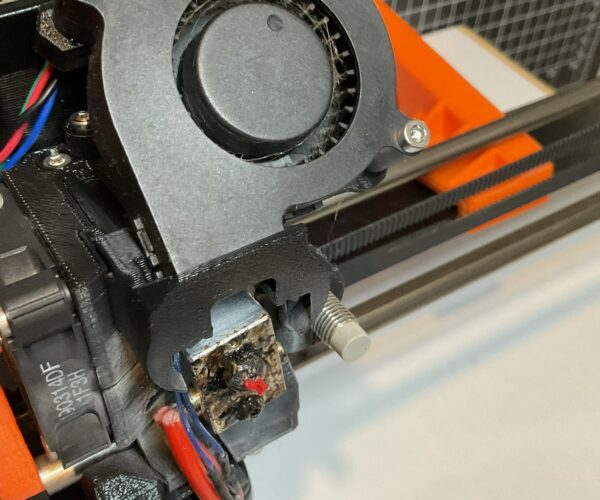
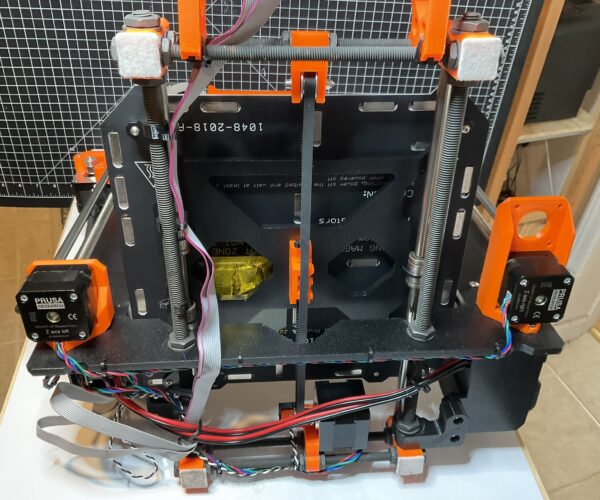
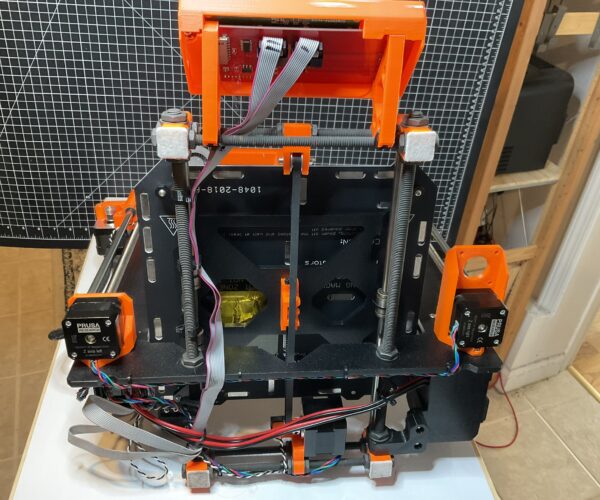
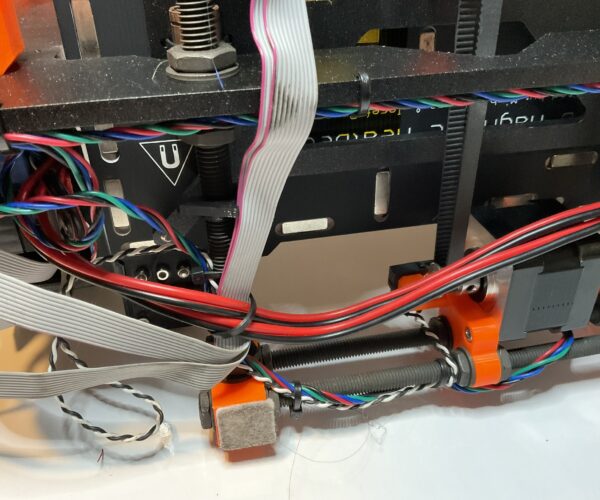
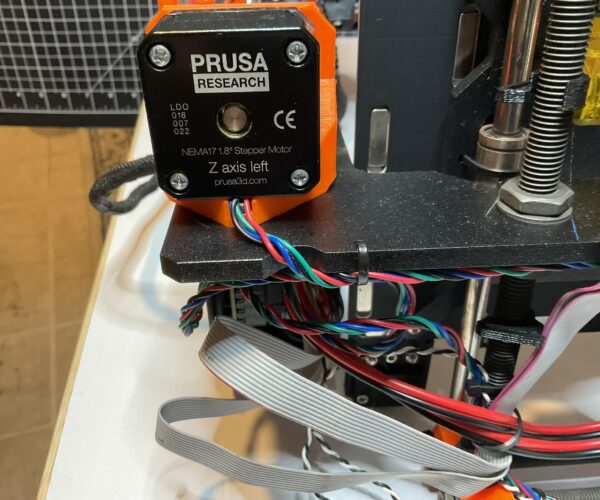
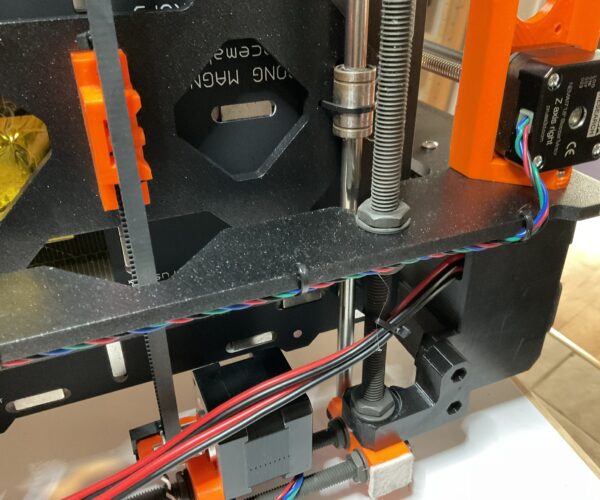
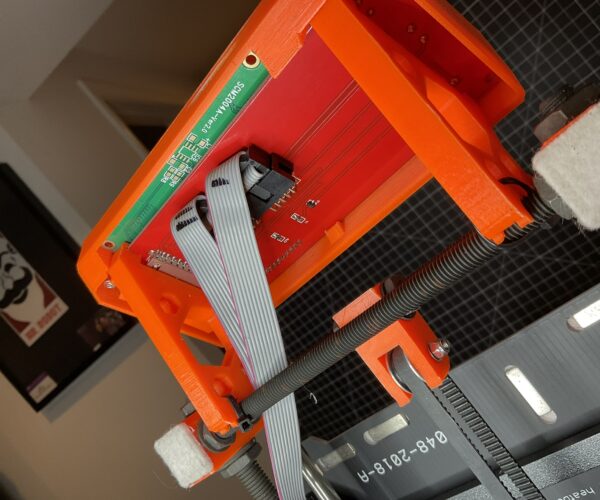
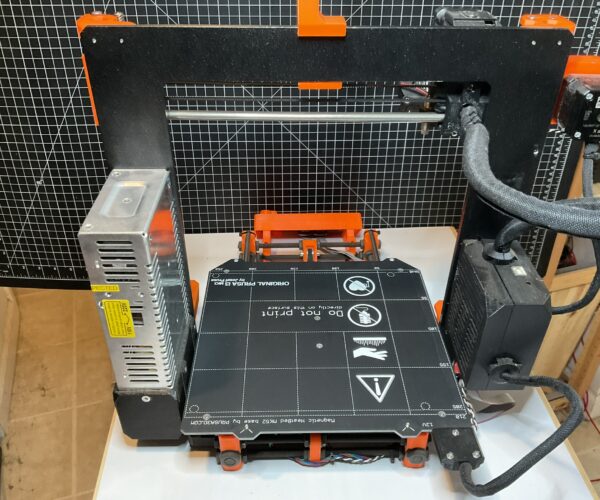
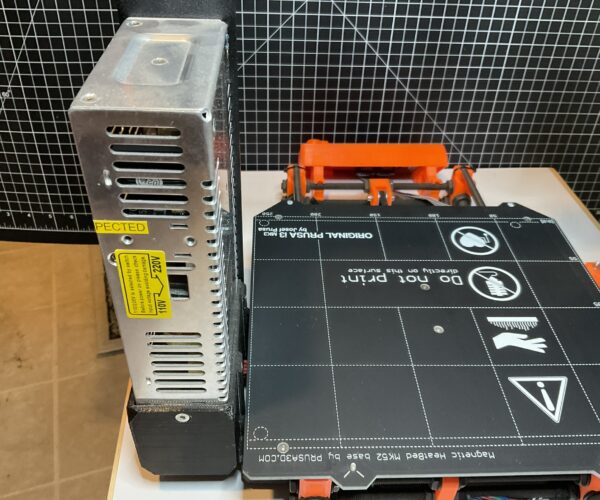
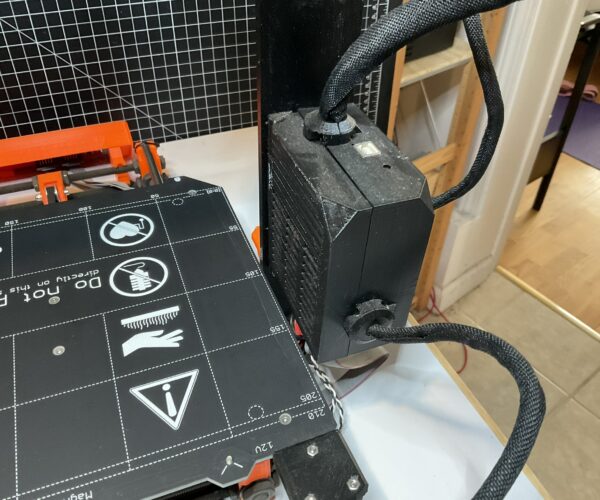
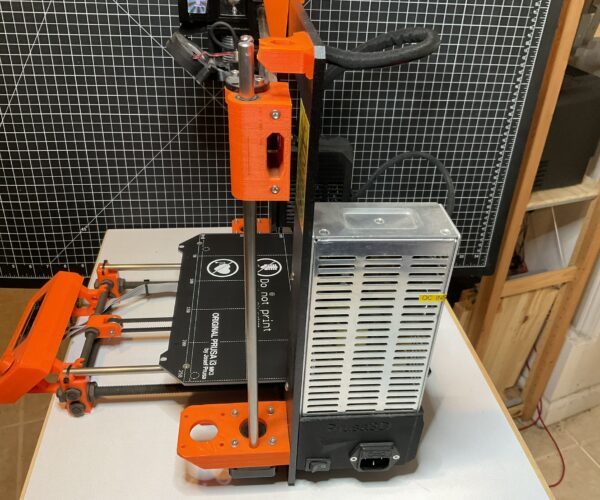
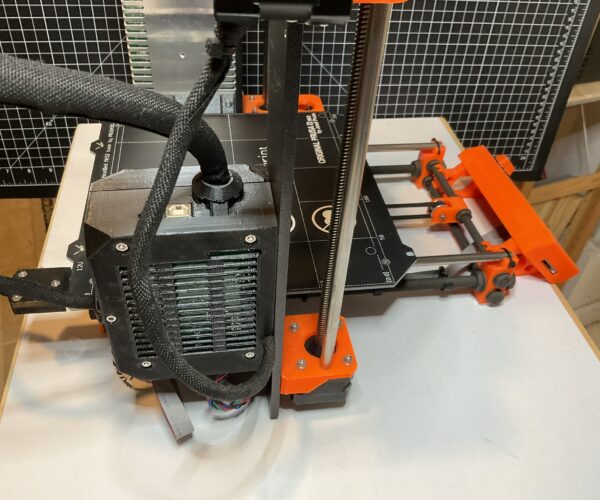
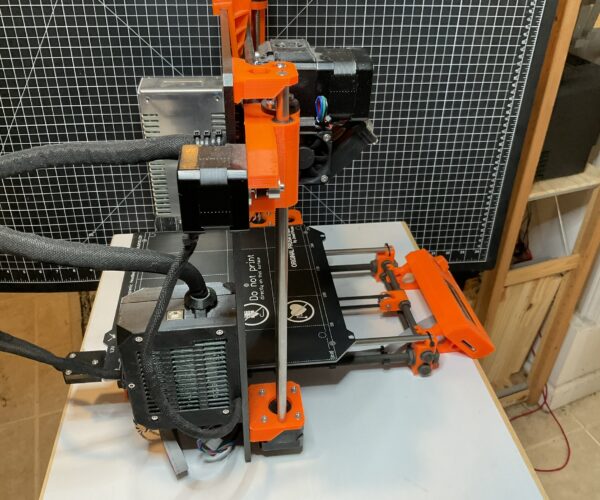
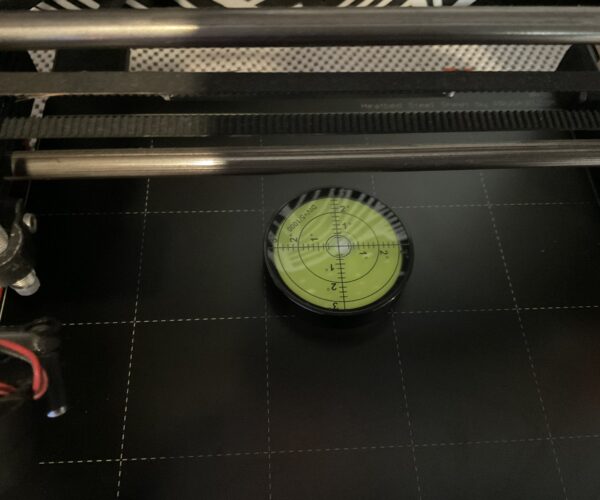
Hello, I hope this collection of pics are OK to post.
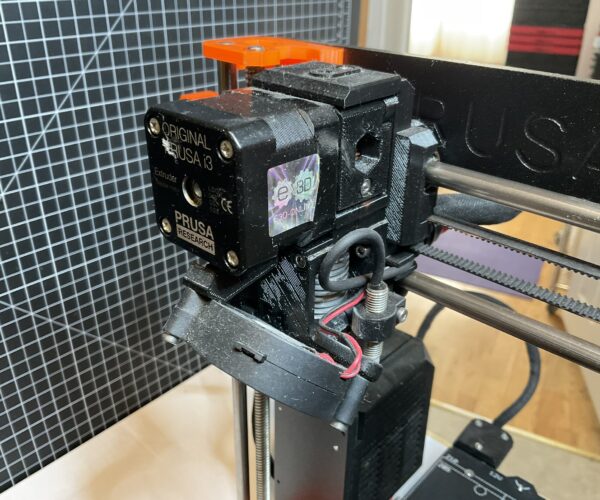
I have a slight vision disability so looking at some of these is interesting for me to see what looks worn. It looks like I'll need a new extruder or hot point (whatever it's called... I'm learning) unless I learn how to clean that part.
When I look at the upper right Z axis bracket it feels like there is some tension when the Z axis is as far up as it can go, which is probably why that bracket broke. I can't tell why or what is causing the tension. I hope the new part that should be arriving soon will keep it in place without any problem.
If you spot anything else that I should pay attention to please let me know. I'd appreciate it.
RE: Hardware to Inspect i3 MK3
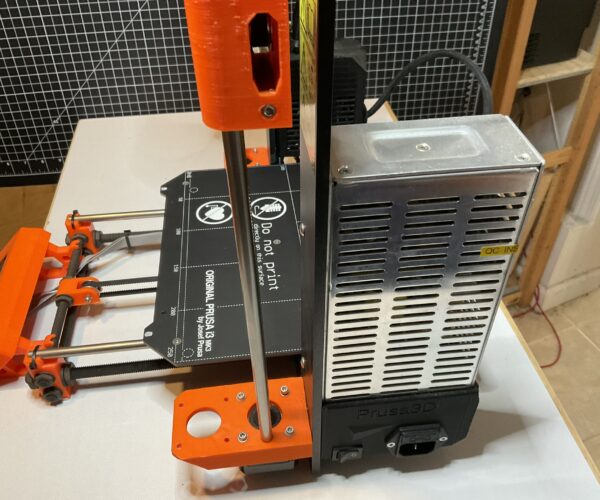
I'm a little bummed that I don't see a sticker with a serial number or any information that might prove it's a legitimate Prusa printer. I did visit one of the links regarding the serial number/sticker and there was some information that SN information might be found hard coded onto the system board and that I could email Prusa for information and steps to find the SN on the system board. I may have to do that.
Looking at the printer more closely while taking pics it has Prusa all over this thing. If it's a knockoff there was a lot of effort put into it. I'm holding hope that it's not a knock off though and I hoping when I get the needed parts to restore it that it works.
One thing you should be aware of, is a lot of the "Prusa" printers out there are not genuine Prusa manufacture. Because of the nature of the open source hardware, there are many clones, some of which even have the Prusa branding visible because they just print the Prusa parts with no change. Most of these clones use components that are of lower quality (hot ends, heated beds, electronics etc) than those supplied by Prusa. That's not to say that the clone printers can't work fine, but it's a good idea to figure out exactly what you have before you put a lot of time and money into it. One thing to look for is the Prusa serial number sticker that should be on a genuine machine.
https://help.prusa3d.com/article/original-prusa-serial-number_134171
RE: Hardware to Inspect i3 MK3
On the first attempt of the calibration wizard it spun up the fans and the front/extruder fan is a little noisy to me so I may need to replace it.
RE: Hardware to Inspect i3 MK3
try taking the fan off, peeling the label on the back, just over half off, to expose the bearing hole, then putting one drop of light oil in the hole
Clean off any spillage and replace the label and then replace the fan.
With luck your printer will be quiet enough to use while you await the arrival of your new fan
Joan
I try to make safe suggestions,You should understand the context and ensure you are happy that they are safe before attempting to apply my suggestions, what you do, is YOUR responsibility.Location Halifax UK
RE: Hardware to Inspect i3 MK3
The serial number sticker is usually a silver sticker on the rear of the frame, above the power supply
you don't appear to have one
I try to make safe suggestions,You should understand the context and ensure you are happy that they are safe before attempting to apply my suggestions, what you do, is YOUR responsibility.Location Halifax UK
RE: Hardware to Inspect i3 MK3
this appears to be a Prusa Mk2.5 S
this is A Mk2 frame with 12 volt magnetic heatbed and Mk3 style extruder (I have one of these )
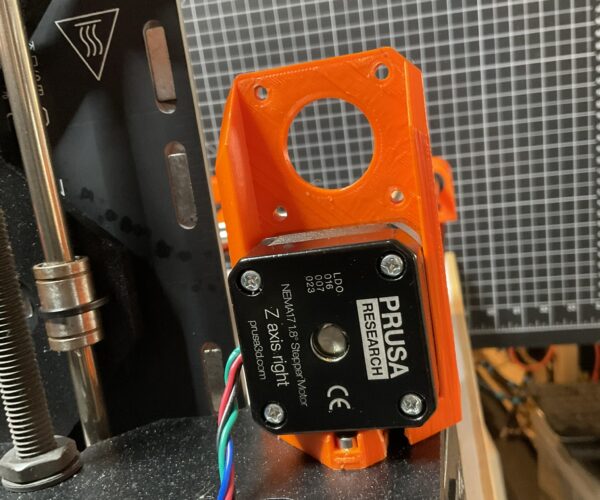
The lower right Z motor bracket is non standard, and the upper right Z bracket looks broken
if the tension in the Right Z assembly is front to back, replacing the Z Motor bracket with a standard one may help
If the tension is side to side, Slackening off the Black 'POM NUTS' (Lead screw nuts) on the Z Motor shafts, may allow them to re position in the orange X axis end pieces and resolve the tension (Slacken both sides and move the X axis assembly up and down the Z axis to try and re seat the parts.
the Y Platform is held in place with cable ties (this was done on the Mk2 printer, as standard) Later models used U Bolts or metal clamps
My cable ties are still working.
Do you have a removable build plate to go on the heatbed?
regards Joan
I try to make safe suggestions,You should understand the context and ensure you are happy that they are safe before attempting to apply my suggestions, what you do, is YOUR responsibility.Location Halifax UK
RE: Hardware to Inspect i3 MK3
So I make sure I know what model the is is for when I research needed parts and instructions on how to use it this IS a MK2.5S?
The heat bed is marked as a MK3.
If the lower right Z bracket is not standard or correct then it's most likely the reason the upper right Z bracket is broken and creating tension on the smooth and threaded rods. As the Z axis arm moves up both rods start to lean forward and a little to the right. When I try to manually hold the rods in place where they should be in what's left of the upper bracket there is tension but not a lot or enough that it seems like anything else might break or be breaking (no crackling/creaking noises).
I'll research the correct part for the lower Z bracket.
I do have a removable build plate. I believe it's an older one that's smooth or not power coated/textured. It too is labeled as a MK3 part.
If this is a MK2.5(S) is there anything I can or should do as far as maintenance and maybe upgraded it to has high a model possible?
When I look at the pic of the hot end or nozel it looks pretty worn or in bad shape. What should I be looking for in regards to that part or area? If I can clean it up to at least perform a test that would be nice. If I can't clean it up I'd eventually like to replace it, but I'm trying to gather as much info and listing of necessary parts to make one big order to cut down on multiple shipping charges.
Thanks so much for your help, I appreciate it.
this appears to be a Prusa Mk2.5 S
this is A Mk2 frame with 12 volt magnetic heatbed and Mk3 style extruder (I have one of these )
The lower right Z motor bracket is non standard, and the upper right Z bracket looks broken
if the tension in the Right Z assembly is front to back, replacing the Z Motor bracket with a standard one may help
If the tension is side to side, Slackening off the Black 'POM NUTS' (Lead screw nuts) on the Z Motor shafts, may allow them to re position in the orange X axis end pieces and resolve the tension (Slacken both sides and move the X axis assembly up and down the Z axis to try and re seat the parts.the Y Platform is held in place with cable ties (this was done on the Mk2 printer, as standard) Later models used U Bolts or metal clamps
My cable ties are still working.
Do you have a removable build plate to go on the heatbed?
regards Joan
RE:
Good morning Alan,
Have you considered reaching out to Prusa owners in your area.
Or perhaps seeking a local maker space or Hacker space
Perhaps even a local library with a 3D Printer?
the spare parts that you need are not big parts and someone local may be prepared to print them for you.
I Live in the UK, so I am probably a bit far away
the Z axis part files that you need, are available at the URL Below
https://www.printables.com/model/88231-i3-mk2s-printable-parts/files
these are basic Prusa Mk2S files
Z axis parts (Z axis top and bottom brackets in a zip file)
If you need any Prusa Mk2.5S files they are available at the URL Below
https://www.printables.com/model/88638-i3-mk2s-to-mk25s-upgrade-printable-parts
The frame on your printer is a Mk2 frame with Threaded rods for the lower frame, 
the Mk3 Frame, has Aluminium extrusions for the lower extensions, which is different to your printer
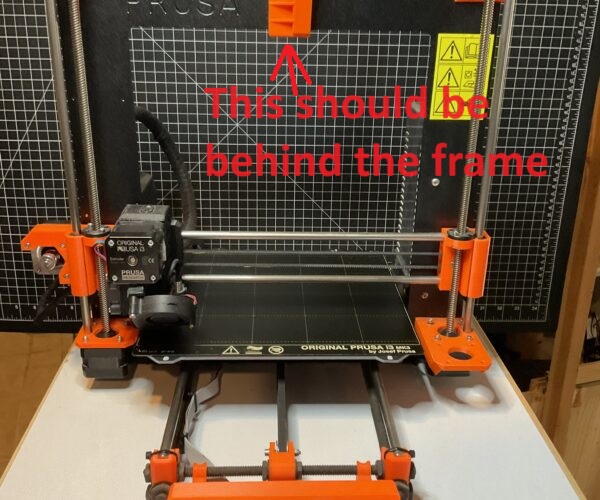
Your printer has the Mk3 style filament roll holder, however it is installed Back to front,
The filament roll should be supported behind the main frame, not in front of it.
Where the filament holder is attached on your printer, it will prevent the extruder working at the top of ‘Z’ axis travel.
Your heatbed does say Mk3 in the front right corner BUT in the rear left corner it also says ‘12v’ (for a 12 volt printer)(ignore the arrows this image was cropped from the assembly manual)
The Mk3 printer is a ‘24Volt’ printer the heatbed that you have is intended for the Mk2.5 upgrade (12 volt printers), similarly the build plate will show mk3 because that is what it was originally designed for, and Prusa saw no advantage in creating a mk2.5 variation for what would be physically an identical item (A Mk4 build plate would work perfectly fine on the Mk2.5 printer heat bed)
Your nozzle is a little contaminated with old filament, but I have seen much worse.
I would simply heat the nozzle to say 250C and wipe the waste off with a cloth, being careful not to burn your fingers.
Beware! Some folk recommend using a brass brush, to clean the heater block, there is a very real risk of damaging the heater and thermistor wires and causing a catastrophic short circuit that will damage your mini Rambo printer controller!
your heat block seems a little turned out of line but that’s not a big issue.
You say your nozzle may be worn…
It’s difficult to comment with the red filament in the way
Please be aware that there are LOTS of different nozzle types available on the internet.. the ones for the Prusa mk2.5 like yours are ‘E3D V6 Nozzles’ the design of the nozzle is very important, ‘Mk8 Nozzles’ are very common, but they are NOT suitable for a Prusa printer like yours Inside the heat block, the nozzle and the heat break, MUST be in intimate contact, in order to prevent filament leaks...
the length of the screw thread on the ‘V6’ nozzle is critical.
I Hope I haven’t caused overload.
Best wishes with your printer
regards Joan
I try to make safe suggestions,You should understand the context and ensure you are happy that they are safe before attempting to apply my suggestions, what you do, is YOUR responsibility.Location Halifax UK
RE: Hardware to Inspect i3 MK3
Thank you so much for your help!!! You have not created an overload for me yet. This is very much helpful!!!
I will research make/3dprinter groups in my area. I live in San Francisco, CA. This is a big enough place that I'm sure there is someone around that can help... but I will probably also post here.
I will need to check for mk2.5s resources to make sure I'm specific to the model priter I have.
Thanks so much again!!! I really appreciate it!
RE:
The printer in my workshop is almost the same (MK2.5S). As Joan described very well! it is a MK2 upgraded with other stuff over time.
After buying mine I had to find my way, thinkering about why things do (and sometime do NOT) work. Learned a lot.
A couple of things I had to do with my printer (Could be issues on your machine too):
- Calibration did not work on the Z-axis. Over time (because of a couple of upgrades) the firmware "thinks" my machine is higher then it is. So when going down on the Z-calibration it wants to go about 5 mm more, then possible. I found this workaround:
- Heat the nozzle up: take it off; adjust the pinda about 4 mm higher (only for calibration); then calibrate. Because of the higher pinda and the nozzle not in the way, it will calibrate
- When done adjust pinda back (DO NOT FORGET THIS) and heat up again to put nozzle on.
- Set pinda on exact height (nozzle on paper on bed; pinda on creditcard on paper; the creditcard is about 1mm giving it enough space).
- The PFTE tube in the extruder was damaged (the filament clotted inside the tube) and I had to disassemble the extruder. New PFTE tube installed (I bought one, but guess by now I would cut one myself). Was not expensive
- Clean rods and a bit of oil to bring the noise down
- A silicone sock around the heaterblock to avoid temperature errors. This because the 12Volt power can be to less to get it heated up well.
- Adjusting tension on the belts. With a Music tuner (on your phone) this is easily done. If in doubt a bit to high is better then too low.
- First layer adjustment. took me a lot of time, best done with a larger rectangle stl. so you see what is happening. Most time was needed to understand what happened, if too low or too high.
3 months later (now) it is running smoothly. With PAL, PETG
PS: An enclosure to keep temp around 25 degrees will also help, because of the lower power of the 12 Volt system
Enjoy
We will do what we have always done. We will find hope in the impossible.
RE: Hardware to Inspect i3 MK3
I was able to rever the installation of the filament spool arm after reading the post about it being backwards. After I corrected the install I checked the Z axis arm by slowly turning the threaded rods so it moves upwards and it made it to the top without the tension on the upper right Z axis bracket. I'm not sure if this is good enough for a calibration now but I'll try to at least figure out what else could be wrong and needs attention. If this unit works at a minimum level I'll try to print the parts I need.
RE: Hardware to Inspect i3 MK3
@eef thanks for the info. As soon as I can get this to work I'll review your info and see if anything applies to my situation. I appreciate it! Can you recall what version firmware you were using? I was able to power mine up and check the firmware which is 3.10.1-4697.
Another question for everyone, what filament are the original Prusa parts printed with? Just a quick glance it looks like it's PETG. I've downloaded the file that @joantabb has linked me to. I have a cousin that lives a bit away from me but is willing to get the parts I need printed and bring them. I just need to order the correct filament and have them shipped to him.
RE:
@eef thanks for the info. As soon as I can get this to work I'll review your info and see if anything applies to my situation. I appreciate it! Can you recall what version firmware you were using? I was able to power mine up and check the firmware which is 3.10.1-4697.
I installed the latest version. If calibration (Z) does not work, look at workaround above.
Another question for everyone, what filament are the original Prusa parts printed with? Just a quick glance it looks like it's PETG. I've downloaded the file that @joantabb has linked me to. I have a cousin that lives a bit away from me but is willing to get the parts I need printed and bring them. I just need to order the correct filament and have them shipped to him.
Any good quality PETG will do. I started with prusament but use now different brands.
PS: As a start it is very hard to print PETG better start with PLA first. You could print the pieces you need with PLA. There is no special heat on those spots so should work alright. As soon you have the printer running and you learned how to print PETG, you reprint them yourself.
We will do what we have always done. We will find hope in the impossible.
RE: Hardware to Inspect i3 MK3
If this unit works at a minimum level I'll try to print the parts I need.
I looked at the pictures you have sent. And as far I can see, the printer should (mechanicly) work.
The filament holder is not needed (I do not use one, because my printer is in an enclosure, so any simple solution to hold your filament should work.
The not original part at the right side is no issue. Probably has been used for mounting a camera? Will not be a problem when printing.
The broken part (right side on top of Z-axis). There is hardly tension on that part.
My advice: During calibration, hold the axis with a tie-rip (like it was before)
Durig Z calibration cut it off, hold it with your hand. (this is only needed at the start of the process)
As soon the calibration is running, quickly mount a second tie-rip and you will be good.
As soon the calibration is done, do some tests with first layer etcetera untill you are able to print the part what is broken in PLA (see my other post).
We will do what we have always done. We will find hope in the impossible.
RE: Hardware to Inspect i3 MK3
PS: As a start it is very hard to print PETG better start with PLA first. You could print the pieces you need with PLA. There is no special heat on those spots so should work alright. As soon you have the printer running and you learned how to print PETG, you reprint them yourself.
Good to know, the guy I received the printer from provided 2 spools of PLA, 1 white and 1 green.
I took a chance on trying a calibration now that I moved the spool arm into the correct orientation and it all seems to be working. Just need to read the manual to make sure I do the calibration correctly... I just did the steps before reading it all over. I let the Wizard take control and followed the directions on the screen. Nothing caught the paper, and it printed the zig zag pattern but I left the Z axis/bed adjustment at 0.0. I will need to read the manual to make sure I have that part of the calibration done correctly before I do any real prints.
