Problems with PETG printing, failed print
Dear Prusa Forum,
I'm a complete noob in 3D-Printing, just received my first printer (Mini) last week.
Since the machine was working great out of the box with Prusament PLA I changed the spool to a Prusament PETG and started a print (this file) with the standard PETG MINI settings in Prusa Slicer.
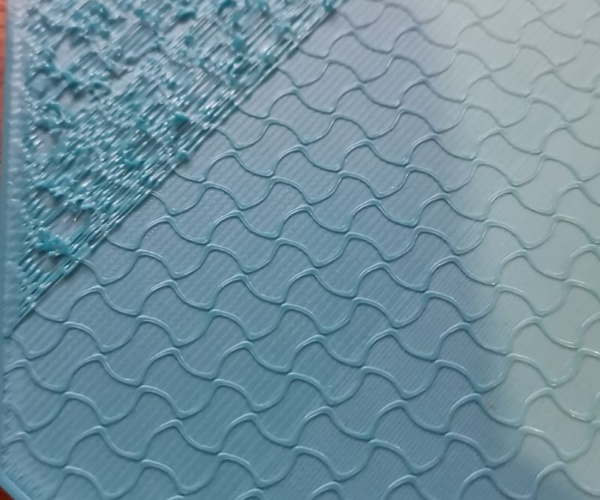
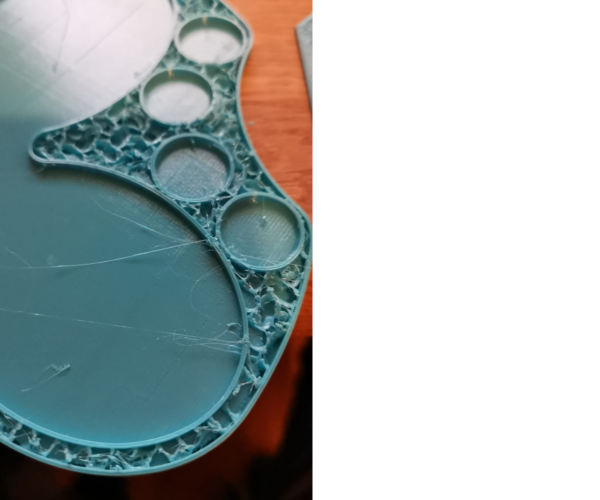
After seeing the first layers being printed okay I checked back ca. 40 minutes later to this:

and canceled the print.
After cleaning the nozzle I switched back to PLA, put the file in Prusa Slicer again with PLA settings and it printed the part without any problem.
Oh, and I really need to learn some 3D printing lingo, let's see if I tried googling the right things:
Stringing seems to happen between the printed parts and there appears to be blobs everywhere.
For the stringing part most tips would be to change speed settings, but since I bought Prusament I think this should not be the main problem, because of settings in Slicer made by pros.
And since the printer works very well with PLA I did not dare to remove any parts of the printer without reason right now.
Some hints to what went wrong and how to make it better in the future would be greatly appreciated, thanks a lot in advance,
Karl
RE: Problems with PETG printing, failed print
If it is stringing and blobbing mess, dry the filament. I had the same problem during weekend, drying helped immensely.
RE: Problems with PETG printing, failed print
If it is stringing and blobbing mess, dry the filament. I had the same problem during weekend, drying helped immensely.
That would be a great solution for the problem, I will put the filament in a plastic container with the color changing silica pearls and report back after the next print!
But how long can I leave a roll outside without worrying? I opened the new, sealed roll on Saturday morning and printed on Saturday night, I didn't know the filament is that sensitive 😧
RE: Problems with PETG printing, failed print
PETG and PLA quite often need a slightly different live Z value. Basically run live z for a 75mm square and note down the live z value. Then re-slice the 75mm square for petg and adjust live z to get the same squished but not too squished lines. Usually the nozzle needs to be a bit further away from the bed for petg. Once you know your offset for petg you can just adjust the live z before printing in petg.
RE: Problems with PETG printing, failed print
PETG is not as sensitive as nylon for example, it can stay dry for weeks, depending on how humid air is. I opened pack of Prusament I bought ~4 months ago and it was no good.
Dessicant will help keep filament dry, but it will not suck water out of it. You can't dry with desdicant only in reasonable amount of time, if at all. You need heat.
You can use electric oven, many people use food dehydrators, expensive filament driers are available too. Now as for time and temperature... that's a topic on its own. You will find many recommendations... 70 degrees Celsius for 6 hours, 65 for 2 hours, 55 overnight. This is big discussion thread as an example https://forum.prusa3d.com/forum/original-prusa-i3-mk3s-mk3-general-discussion-announcements-and-releases/drying-times-and-temps-in-dehydrator/ there are videos from known youtubers and howto articles to get the basics. I shot from the hip, tossed it into cheap dehydrator with temperature knob and cut out grates for 4 hours at around 65 degrees (though I think my unit underperforms and it'smore like 55) and it was waaaaay better than initially. Much less stringing and barely any blobs.
RE: Problems with PETG printing, failed print
One observation. This won't fix your problem but will prevent another. It appears you are printing PETG directly on a smooth plate. You will ruin your plate this way (PETG sticks too well and will rip the surface off when you try to remove the part). Use either a textured (powder coated) plate or apply gluestick to the smooth plate.
RE: Problems with PETG printing, failed print
@ticktock
Thank you for the tip, I learnt it the hard way with this print 😖 😖
But thankfully I could remove it almost without scratching the plate.
RE: Problems with PETG printing, failed print
Yeah. so did I. Any progress? PETG is actually my favorite/go-to material now. Prusament PETG works very well for me. I also like Matterhacker PRO PETG.
If drying the filament doesn't work, I would check the extruder tension.
RE: Problems with PETG printing, failed print
Hi,
I am also having problem printing PETG with the mini.
I think I have manage to get a good first layer most of the time. Even it is did not second and third layer is normaly good but after a while the problem starts. See picutres below.
Anyone that know what can be wrong and how I can fix it?
RE: Problems with PETG printing, failed print
Do you have the filament sensor and if so does the filament move smoothly through it? It looks like inconsistent extrusion and I would check the tension on the extruder gear as well as make sure the spool and filament sensor are not creating too much friction upstream of it. Do you hear any clicking sounds during the print while it is misbehaving?
RE: Problems with PETG printing, failed print
@ticktock
Yeah I have the filament sensor. I do think it is some friction. I will check the if there is any clicking.
Also the filament was stuck when I went to change back to PLA.
I will try to remove the filament sensor and see if that helps and make sure my spool is turning without a problem
RE: Problems with PETG printing, failed print
I also had problems removing the PETG filament from the printer.
I took the advice from earlier and put my rolls in a storage container with silica gel pearls and will report back on the weekend if the filament was too humid.
I will also try to remove the filament sensor for the next prints
RE: Problems with PETG printing, failed print
@tokyo2ooo
You can try, but I am not sure dessicant in and of itself will be able to suck up water from filament. Baking filament for few hours at 55-65 degrees looks to be most efficient way, even better than vacuum drying.
RE: Problems with PETG printing, failed print
Follow up on my own printing.
Baking it for 5+ hours and making the filament move easier did not really help. (it was new since before so I did not think that was the issue)
Same problem as earlier. First layers looks really nice and then 2 or 3 layer of the infill get messed up. Trying another type of infill patter now and lower the speed from 100 to 95. Hoping for the best.
RE: Problems with PETG printing, failed print
Updating my progress.
Got my first successful print with PETG. End result really nice. Changes in the setting for me was needed to go down in speed to 95 then 93 and increase infill from 15% to 20% and change infill pattern from gyroid to 3D Honeycomb.
But it is not 100% yet there where 2 times that I could see issues.
- First or second solid infill layer became uneven after an it printed on top of a internal layer infill. I reduce the speed then from 95 to 93. No similar issue again. Also this issue was covered with more layers so did not show in end result.
- First layer of briding did not look that good a bit stringy. The rest of the layers covered it up, so end result good
PLA still produce better result but if I can get these result on longer prints on regularly basis all the time I would be happy for now.
RE: Problems with PETG printing, failed print
If you post your gcode, I would be willing to try it on my MINI.
RE: Problems with PETG printing, failed print
@ticktock
I sadly not home. But I can post it tomorrow, would be really intresting to see your result.
RE: Problems with PETG printing, failed print
@tischan
PETG does not like bridging very much. Turn on bridging detection for gaps in Print settings, and use denser infill, 20% and more. Also, first layer after infill is somewhat sacrificial, it is not uncommon for it to look bad, then it gets covered by solid infill. Don't worry about it very much as long as upper layers look better. One of the reasons you have 5 top layers by default.


